Docs/Sending messages/Send SMS/WhatsApp from Salesforce Reports

Send SMS/WhatsApp from Salesforce Reports

Texting from Reports lets you select a Salesforce report and send a message to every contact it returns. For example, if you run a report on newly created leads every day or every week, you can message every lead in that report without building a separate list.

Last updated 28 Nov 2025

Open Texting from Reports

  1. Go to the Texting From Reports tab. Search for Texting From Reports in your Salesforce org.
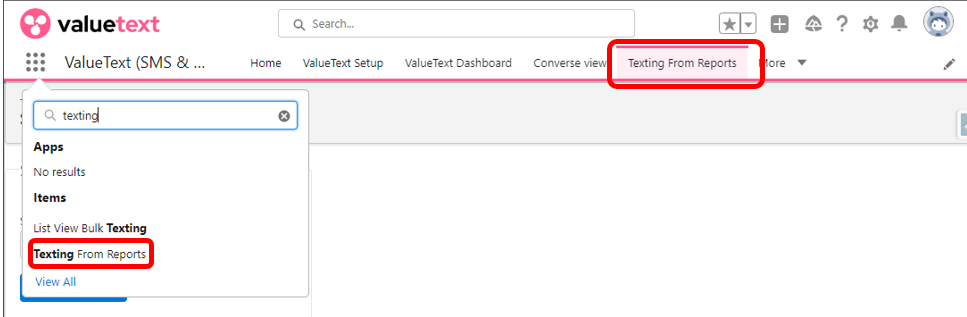
    ValueText app launcher search box with
    Fig 01
  2. Select the report. Search for and select the report you want to message.
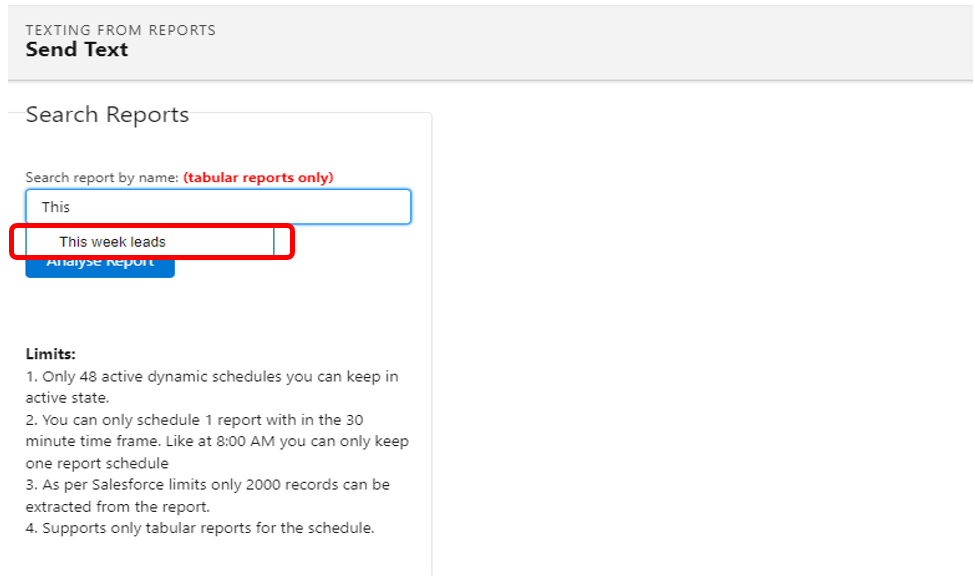
    Texting From Reports Send Text screen with the Search Reports panel, showing a report search box with
    Fig 02
  3. Select the object. Choose the object your report is built on.
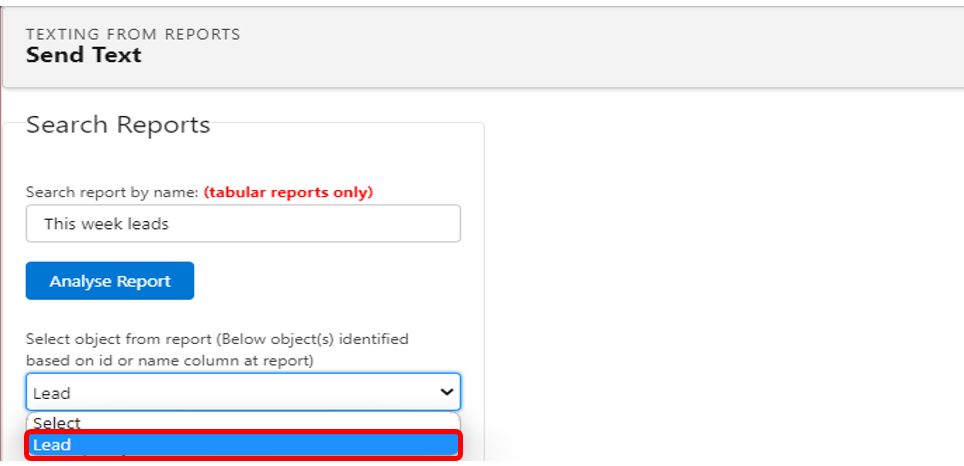
    Texting From Reports Send Text screen with the Select object from report dropdown open, showing Lead selected below the Analyse Report button.
    Fig 03
  4. Open Dynamic Scheduling. This opens the panel where you configure the message.
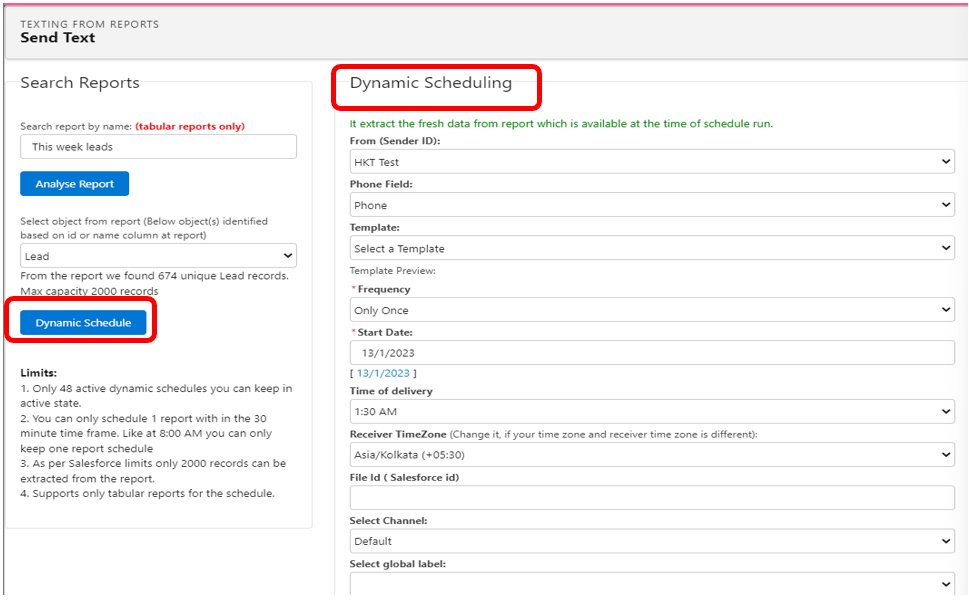
    Texting From Reports Send Text screen with the Dynamic Schedule button highlighted on the Search Reports panel, and the resulting Dynamic Scheduling panel open on the right, showing the From (Sender ID), Phone Field, Template, Frequency, Start Date, Time of delivery, Receiver TimeZone, and File Id fields.
    Fig 04

Configure the scheduling fields

Edit the fields described below.
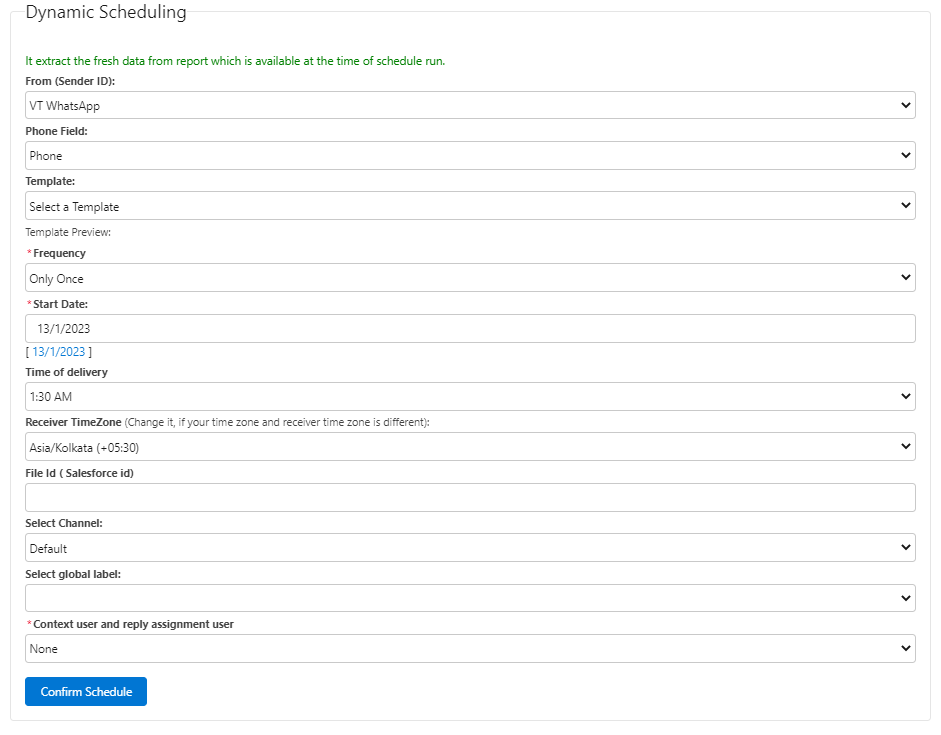
Dynamic Scheduling panel showing all fields end to end: From (Sender ID) set to VT WhatsApp, Phone Field, Template, Frequency set to Only Once, Start Date, Time of delivery, Receiver TimeZone, File Id, Select Channel, Select global label, Context user and reply assignment user, and the Confirm Schedule button.
Fig 05
  1. From (Sender ID): select your Sender ID. The Sender ID represents a phone number.
  2. Phone Field: the phone fields available on the Lead object.

    Phone Field dropdown open showing three phone field options: Phone, Mobile Phone, and Fax.
    Fig 06
  3. Template: select the template or message you want to send.

    ![Template field set to "Template : leadfirst" with a Template Preview below it showing the message text "Hi [name], thank you."](/docs-img/texting-reports-template-field.png)

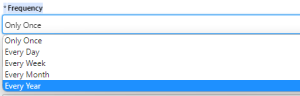
  4. Frequency:
    Frequency dropdown open showing Only Once, Every Day, Every Week, Every Month, and Every Year, with Every Year highlighted.
    Fig 07
    • Only once: sends the message a single time.
    • Every Day: adds an End Date field, the date after which the schedule stops.
    • Every Week: displays a row of weekday checkboxes to choose from (Monday-Sunday).

    Frequency field set to Every Week with a row of weekday checkboxes below it, Monday checked.
    Fig 08
    • Every Month: displays a date option (1st-31st).
    • Every Year: sends the message on January 1st every year.
  5. Start Date: the date the messages start.

    Start Date field set to 13/1/2023, with a date-picker link shown below it.
    Fig 09
  6. Time of delivery: select the time you want the customer to receive the message.
  7. Receiver Time Zone: select a specific region's time zone if it's different from yours.
  8. End Date: select when you want the dynamic scheduling to end.
  9. File Id (Salesforce ID): with Dynamic Scheduling you can also send files. Search for the file's ID in this field to attach it to the message.

Find your file ID

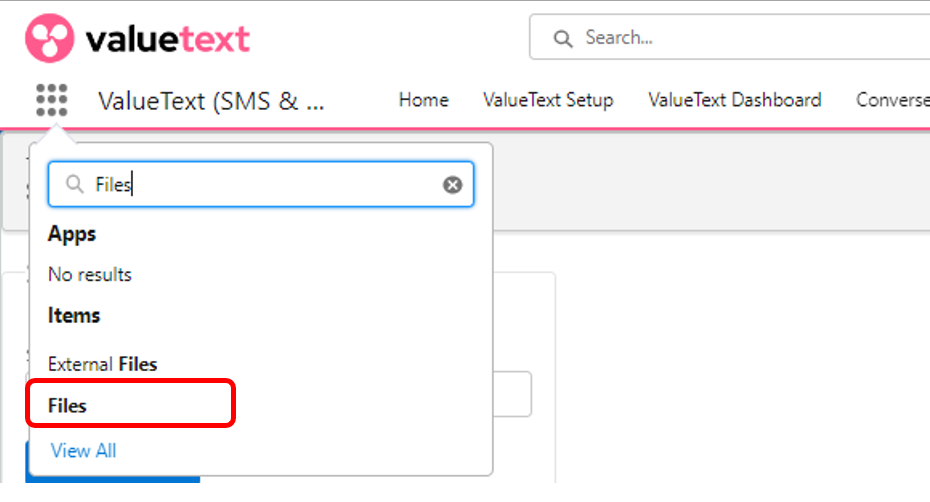
  1. Search for "Files".
    ValueText app launcher search box with
    Fig 10
  2. Upload or select an existing file. Click Upload Files to upload a new file.
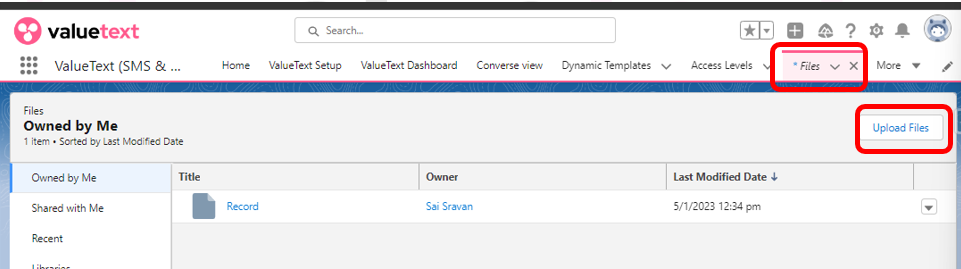
    Files list view
    Fig 11

    For an existing file, open its row-level dropdown menu and click View File Details.
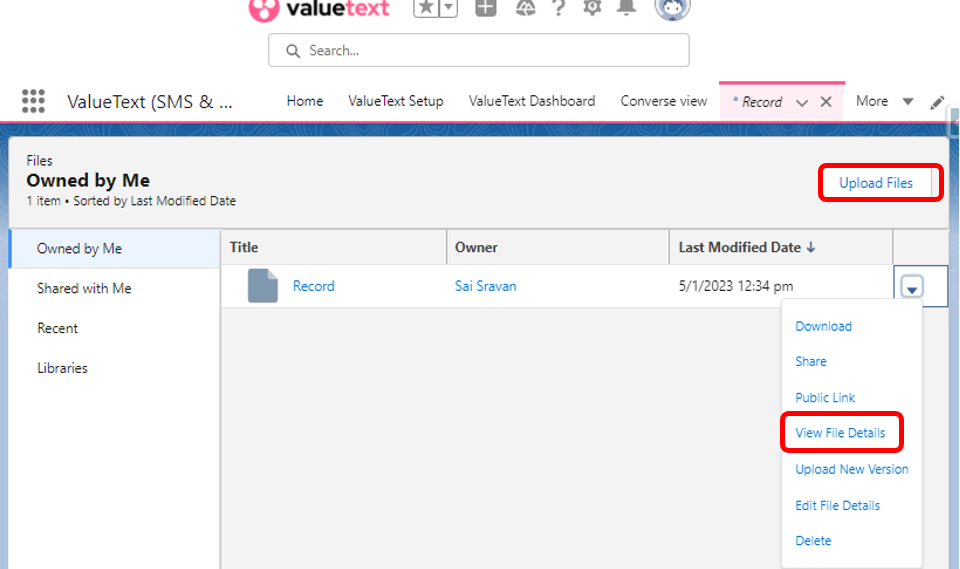
    Files list view with the row-level dropdown open on the Record file, showing Download, Share, Public Link, View File Details, Upload New Version, Edit File Details, and Delete, with View File Details highlighted.
    Fig 12
  3. Copy the file ID. In the URL section, copy the file's ID and paste it into the File Id field of Dynamic Scheduling.
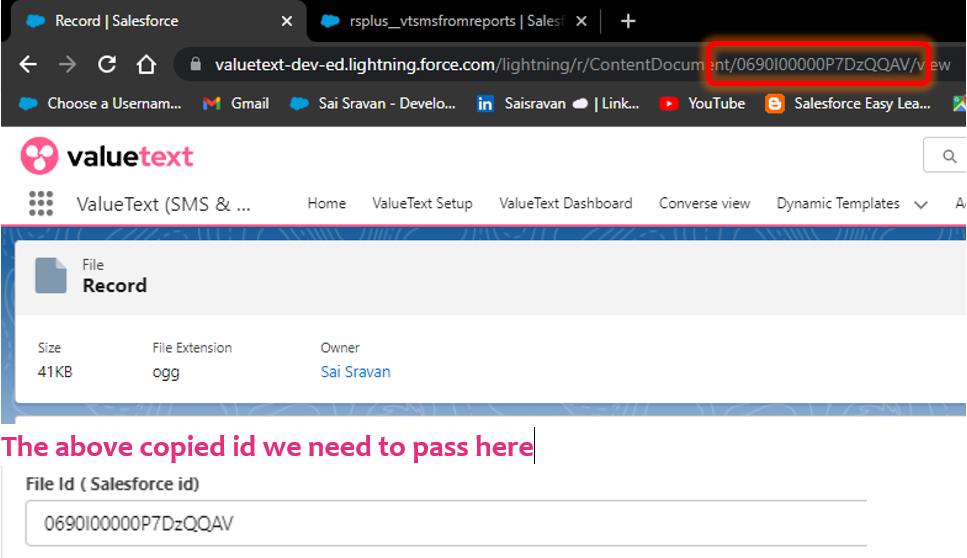
    Salesforce file detail page with the ContentDocument ID highlighted in the browser's address bar, and the same ID pasted into the File Id (Salesforce id) field below.
    Fig 13

Select the channel and context user

  1. Select Channel: choose Default, WhatsApp or SMS.
  2. Context user and reply assignment user: choose one of three options.
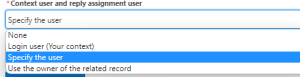
    Context user and reply assignment user dropdown open, showing None, Login user (Your context), Specify the user, and Use the owner of the related record.
    Fig 14
    • Login user: the records available in your org.
    • Specify the User: select a user, then select a user related to the Message Bucket object.

    Related User For Message Bucket field with a partial name typed in and
    Fig 15
    • Use the owner of the related record: the owner of the Lead object records.

Once you've completed all the steps above, click Confirm Scheduling.

Was this helpful?
← PreviousBulk message job reporting Next →Send Messages from a Related List
Docs/Sending messages/Send SMS/WhatsApp from Salesforce Reports

Send SMS/WhatsApp from Salesforce Reports

Texting from Reports lets you select a Salesforce report and send a message to every contact it returns. For example, if you run a report on newly created leads every day or every week, you can message every lead in that report without building a separate list.

Last updated 28 Nov 2025

Open Texting from Reports

  1. Go to the Texting From Reports tab. Search for Texting From Reports in your Salesforce org.
    ValueText app launcher search box with
    Fig 01
  2. Select the report. Search for and select the report you want to message.
    Texting From Reports Send Text screen with the Search Reports panel, showing a report search box with
    Fig 02
  3. Select the object. Choose the object your report is built on.
    Texting From Reports Send Text screen with the Select object from report dropdown open, showing Lead selected below the Analyse Report button.
    Fig 03
  4. Open Dynamic Scheduling. This opens the panel where you configure the message.
    Texting From Reports Send Text screen with the Dynamic Schedule button highlighted on the Search Reports panel, and the resulting Dynamic Scheduling panel open on the right, showing the From (Sender ID), Phone Field, Template, Frequency, Start Date, Time of delivery, Receiver TimeZone, and File Id fields.
    Fig 04

Configure the scheduling fields

Edit the fields described below.

Dynamic Scheduling panel showing all fields end to end: From (Sender ID) set to VT WhatsApp, Phone Field, Template, Frequency set to Only Once, Start Date, Time of delivery, Receiver TimeZone, File Id, Select Channel, Select global label, Context user and reply assignment user, and the Confirm Schedule button.
Fig 05
  1. From (Sender ID): select your Sender ID. The Sender ID represents a phone number.
  2. Phone Field: the phone fields available on the Lead object.
    Phone Field dropdown open showing three phone field options: Phone, Mobile Phone, and Fax.
    Fig 06
  3. Template: select the template or message you want to send.

    ![Template field set to "Template : leadfirst" with a Template Preview below it showing the message text "Hi [name], thank you."](/docs-img/texting-reports-template-field.png)

  4. Frequency:
    Frequency dropdown open showing Only Once, Every Day, Every Week, Every Month, and Every Year, with Every Year highlighted.
    Fig 07
    • Only once: sends the message a single time.
    • Every Day: adds an End Date field, the date after which the schedule stops.
    • Every Week: displays a row of weekday checkboxes to choose from (Monday-Sunday).
    Frequency field set to Every Week with a row of weekday checkboxes below it, Monday checked.
    Fig 08
    • Every Month: displays a date option (1st-31st).
    • Every Year: sends the message on January 1st every year.
  5. Start Date: the date the messages start.
    Start Date field set to 13/1/2023, with a date-picker link shown below it.
    Fig 09
  6. Time of delivery: select the time you want the customer to receive the message.
  7. Receiver Time Zone: select a specific region's time zone if it's different from yours.
  8. End Date: select when you want the dynamic scheduling to end.
  9. File Id (Salesforce ID): with Dynamic Scheduling you can also send files. Search for the file's ID in this field to attach it to the message.

Find your file ID

  1. Search for "Files".
    ValueText app launcher search box with
    Fig 10
  2. Upload or select an existing file. Click Upload Files to upload a new file.
    Files list view
    Fig 11

    For an existing file, open its row-level dropdown menu and click View File Details.

    Files list view with the row-level dropdown open on the Record file, showing Download, Share, Public Link, View File Details, Upload New Version, Edit File Details, and Delete, with View File Details highlighted.
    Fig 12
  3. Copy the file ID. In the URL section, copy the file's ID and paste it into the File Id field of Dynamic Scheduling.
    Salesforce file detail page with the ContentDocument ID highlighted in the browser's address bar, and the same ID pasted into the File Id (Salesforce id) field below.
    Fig 13

Select the channel and context user

  1. Select Channel: choose Default, WhatsApp or SMS.
  2. Context user and reply assignment user: choose one of three options.
    Context user and reply assignment user dropdown open, showing None, Login user (Your context), Specify the user, and Use the owner of the related record.
    Fig 14
    • Login user: the records available in your org.
    • Specify the User: select a user, then select a user related to the Message Bucket object.
    Related User For Message Bucket field with a partial name typed in and
    Fig 15
    • Use the owner of the related record: the owner of the Lead object records.

Once you've completed all the steps above, click Confirm Scheduling.

Was this helpful?
← PreviousBulk message job reporting Next →Send Messages from a Related List
Docs/Sending messages/Send SMS/WhatsApp from Salesforce Reports

Send SMS/WhatsApp from Salesforce Reports

Texting from Reports lets you select a Salesforce report and send a message to every contact it returns. For example, if you run a report on newly created leads every day or every week, you can message every lead in that report without building a separate list.

Last updated 28 Nov 2025

Open Texting from Reports

  1. Go to the Texting From Reports tab. Search for Texting From Reports in your Salesforce org.
    ValueText app launcher search box with
    Fig 01
  2. Select the report. Search for and select the report you want to message.
    Texting From Reports Send Text screen with the Search Reports panel, showing a report search box with
    Fig 02
  3. Select the object. Choose the object your report is built on.
    Texting From Reports Send Text screen with the Select object from report dropdown open, showing Lead selected below the Analyse Report button.
    Fig 03
  4. Open Dynamic Scheduling. This opens the panel where you configure the message.
    Texting From Reports Send Text screen with the Dynamic Schedule button highlighted on the Search Reports panel, and the resulting Dynamic Scheduling panel open on the right, showing the From (Sender ID), Phone Field, Template, Frequency, Start Date, Time of delivery, Receiver TimeZone, and File Id fields.
    Fig 04

Configure the scheduling fields

Edit the fields described below.

Dynamic Scheduling panel showing all fields end to end: From (Sender ID) set to VT WhatsApp, Phone Field, Template, Frequency set to Only Once, Start Date, Time of delivery, Receiver TimeZone, File Id, Select Channel, Select global label, Context user and reply assignment user, and the Confirm Schedule button.
Fig 05
  1. From (Sender ID): select your Sender ID. The Sender ID represents a phone number.
  2. Phone Field: the phone fields available on the Lead object.
    Phone Field dropdown open showing three phone field options: Phone, Mobile Phone, and Fax.
    Fig 06
  3. Template: select the template or message you want to send.

    ![Template field set to "Template : leadfirst" with a Template Preview below it showing the message text "Hi [name], thank you."](/docs-img/texting-reports-template-field.png)

  4. Frequency:
    Frequency dropdown open showing Only Once, Every Day, Every Week, Every Month, and Every Year, with Every Year highlighted.
    Fig 07
    • Only once: sends the message a single time.
    • Every Day: adds an End Date field, the date after which the schedule stops.
    • Every Week: displays a row of weekday checkboxes to choose from (Monday-Sunday).
    Frequency field set to Every Week with a row of weekday checkboxes below it, Monday checked.
    Fig 08
    • Every Month: displays a date option (1st-31st).
    • Every Year: sends the message on January 1st every year.
  5. Start Date: the date the messages start.
    Start Date field set to 13/1/2023, with a date-picker link shown below it.
    Fig 09
  6. Time of delivery: select the time you want the customer to receive the message.
  7. Receiver Time Zone: select a specific region's time zone if it's different from yours.
  8. End Date: select when you want the dynamic scheduling to end.
  9. File Id (Salesforce ID): with Dynamic Scheduling you can also send files. Search for the file's ID in this field to attach it to the message.

Find your file ID

  1. Search for "Files".
    ValueText app launcher search box with
    Fig 10
  2. Upload or select an existing file. Click Upload Files to upload a new file.
    Files list view
    Fig 11

    For an existing file, open its row-level dropdown menu and click View File Details.

    Files list view with the row-level dropdown open on the Record file, showing Download, Share, Public Link, View File Details, Upload New Version, Edit File Details, and Delete, with View File Details highlighted.
    Fig 12
  3. Copy the file ID. In the URL section, copy the file's ID and paste it into the File Id field of Dynamic Scheduling.
    Salesforce file detail page with the ContentDocument ID highlighted in the browser's address bar, and the same ID pasted into the File Id (Salesforce id) field below.
    Fig 13

Select the channel and context user

  1. Select Channel: choose Default, WhatsApp or SMS.
  2. Context user and reply assignment user: choose one of three options.
    Context user and reply assignment user dropdown open, showing None, Login user (Your context), Specify the user, and Use the owner of the related record.
    Fig 14
    • Login user: the records available in your org.
    • Specify the User: select a user, then select a user related to the Message Bucket object.
    Related User For Message Bucket field with a partial name typed in and
    Fig 15
    • Use the owner of the related record: the owner of the Lead object records.

Once you've completed all the steps above, click Confirm Scheduling.

Was this helpful?
← PreviousBulk message job reporting Next →Send Messages from a Related List
Docs/Sending messages/Send SMS/WhatsApp from Salesforce Reports

Send SMS/WhatsApp from Salesforce Reports

Texting from Reports lets you select a Salesforce report and send a message to every contact it returns. For example, if you run a report on newly created leads every day or every week, you can message every lead in that report without building a separate list.

Last updated 28 Nov 2025

Open Texting from Reports

  1. Go to the Texting From Reports tab. Search for Texting From Reports in your Salesforce org.
    ValueText app launcher search box with
    Fig 01
  2. Select the report. Search for and select the report you want to message.
    Texting From Reports Send Text screen with the Search Reports panel, showing a report search box with
    Fig 02
  3. Select the object. Choose the object your report is built on.
    Texting From Reports Send Text screen with the Select object from report dropdown open, showing Lead selected below the Analyse Report button.
    Fig 03
  4. Open Dynamic Scheduling. This opens the panel where you configure the message.
    Texting From Reports Send Text screen with the Dynamic Schedule button highlighted on the Search Reports panel, and the resulting Dynamic Scheduling panel open on the right, showing the From (Sender ID), Phone Field, Template, Frequency, Start Date, Time of delivery, Receiver TimeZone, and File Id fields.
    Fig 04

Configure the scheduling fields

Edit the fields described below.

Dynamic Scheduling panel showing all fields end to end: From (Sender ID) set to VT WhatsApp, Phone Field, Template, Frequency set to Only Once, Start Date, Time of delivery, Receiver TimeZone, File Id, Select Channel, Select global label, Context user and reply assignment user, and the Confirm Schedule button.
Fig 05
  1. From (Sender ID): select your Sender ID. The Sender ID represents a phone number.
  2. Phone Field: the phone fields available on the Lead object.
    Phone Field dropdown open showing three phone field options: Phone, Mobile Phone, and Fax.
    Fig 06
  3. Template: select the template or message you want to send.

    ![Template field set to "Template : leadfirst" with a Template Preview below it showing the message text "Hi [name], thank you."](/docs-img/texting-reports-template-field.png)

  4. Frequency:
    Frequency dropdown open showing Only Once, Every Day, Every Week, Every Month, and Every Year, with Every Year highlighted.
    Fig 07
    • Only once: sends the message a single time.
    • Every Day: adds an End Date field, the date after which the schedule stops.
    • Every Week: displays a row of weekday checkboxes to choose from (Monday-Sunday).
    Frequency field set to Every Week with a row of weekday checkboxes below it, Monday checked.
    Fig 08
    • Every Month: displays a date option (1st-31st).
    • Every Year: sends the message on January 1st every year.
  5. Start Date: the date the messages start.
    Start Date field set to 13/1/2023, with a date-picker link shown below it.
    Fig 09
  6. Time of delivery: select the time you want the customer to receive the message.
  7. Receiver Time Zone: select a specific region's time zone if it's different from yours.
  8. End Date: select when you want the dynamic scheduling to end.
  9. File Id (Salesforce ID): with Dynamic Scheduling you can also send files. Search for the file's ID in this field to attach it to the message.

Find your file ID

  1. Search for "Files".
    ValueText app launcher search box with
    Fig 10
  2. Upload or select an existing file. Click Upload Files to upload a new file.
    Files list view
    Fig 11

    For an existing file, open its row-level dropdown menu and click View File Details.

    Files list view with the row-level dropdown open on the Record file, showing Download, Share, Public Link, View File Details, Upload New Version, Edit File Details, and Delete, with View File Details highlighted.
    Fig 12
  3. Copy the file ID. In the URL section, copy the file's ID and paste it into the File Id field of Dynamic Scheduling.
    Salesforce file detail page with the ContentDocument ID highlighted in the browser's address bar, and the same ID pasted into the File Id (Salesforce id) field below.
    Fig 13

Select the channel and context user

  1. Select Channel: choose Default, WhatsApp or SMS.
  2. Context user and reply assignment user: choose one of three options.
    Context user and reply assignment user dropdown open, showing None, Login user (Your context), Specify the user, and Use the owner of the related record.
    Fig 14
    • Login user: the records available in your org.
    • Specify the User: select a user, then select a user related to the Message Bucket object.
    Related User For Message Bucket field with a partial name typed in and
    Fig 15
    • Use the owner of the related record: the owner of the Lead object records.

Once you've completed all the steps above, click Confirm Scheduling.

Was this helpful?
← PreviousBulk message job reporting Next →Send Messages from a Related List