
Docs/Developers & integrations/Create Message Bucket Records in Salesforce from SFMC

Create Message Bucket Records in Salesforce from SFMC

You can create a Message Bucket record in Salesforce Marketing Cloud using any of the four options below.

Last updated 26 Jun 2026

Option 1: Journey Builder object activity

  1. Create the journey. Build a simple journey with one activity: drag the Object Activity from the activity list onto the canvas.
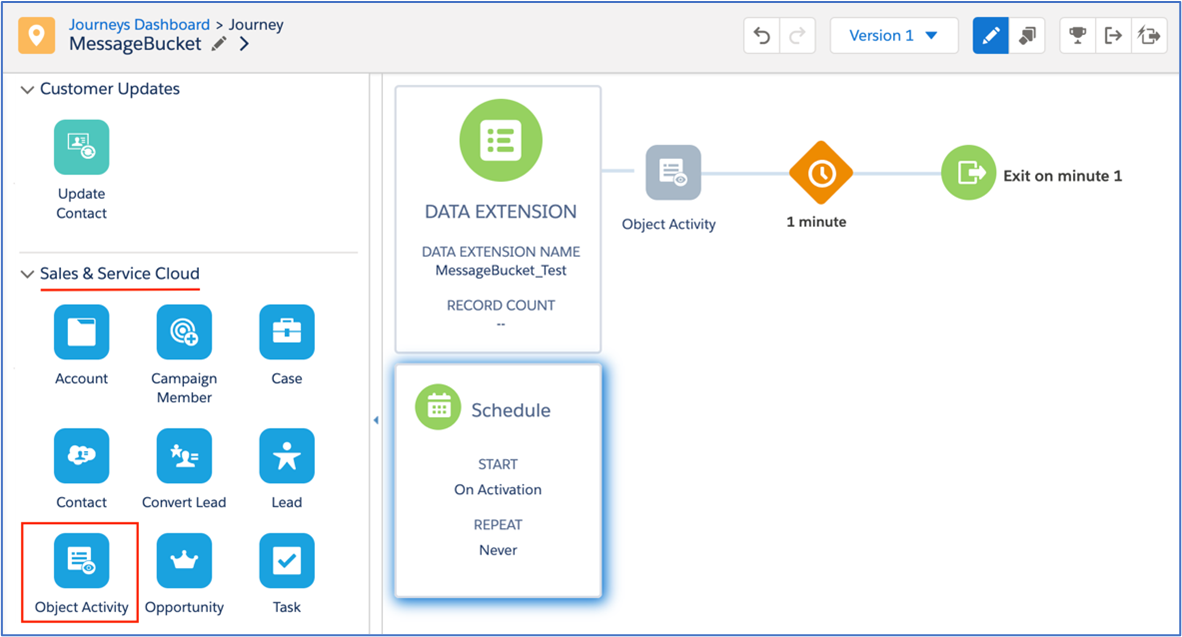
    Salesforce Marketing Cloud Journey Builder canvas for the MessageBucket journey, with Object Activity highlighted in the Sales & Service Cloud activity list on the left and already placed on the canvas next to a Schedule panel showing Start: On Activation and Repeat: Never.
    Fig 01
  2. Select the object. Click the Object Activity to start configuring it. On the Select Object step, search for the "Message Bucket" object and select it.
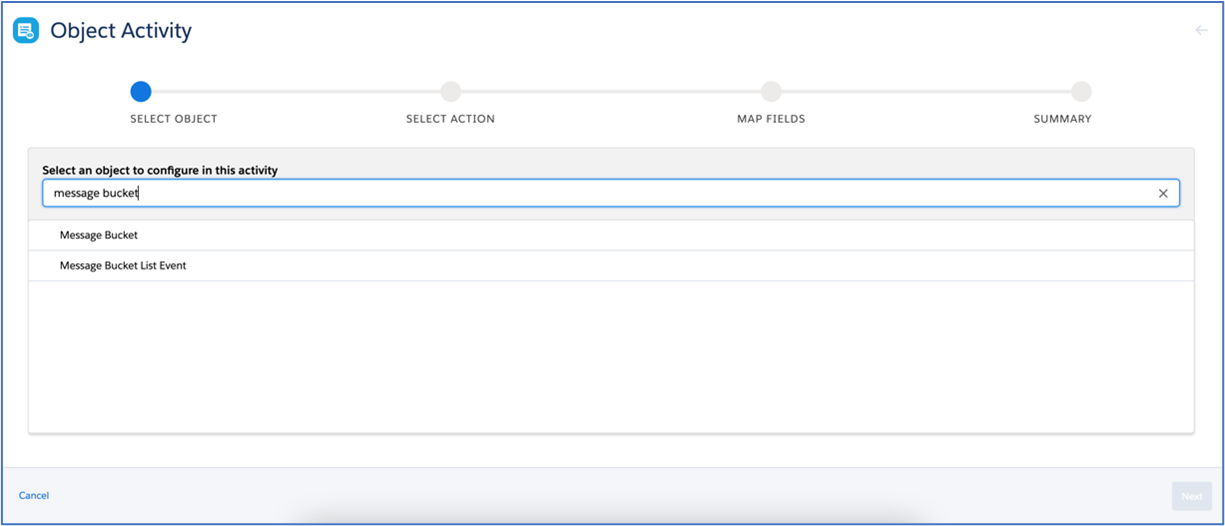
    Salesforce Marketing Cloud Object Activity wizard on the Select Object step, with
    Fig 02
  3. Choose the action. This activity only creates a Message Bucket record in Sales Cloud, so choose Create New as the action.
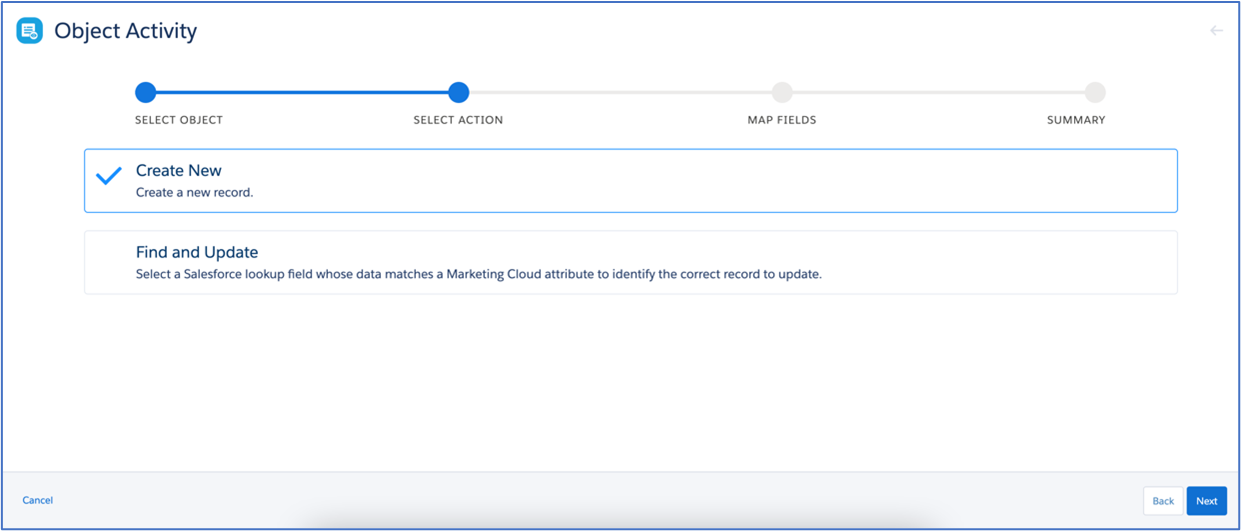
    Salesforce Marketing Cloud Object Activity wizard on the Select Action step, with Create New checked over the Find and Update option.
    Fig 03
  4. Open the field mapping. On the Map Fields step, select the fields to map for the new Message Bucket record. This step lists every available field on the Message Bucket object.
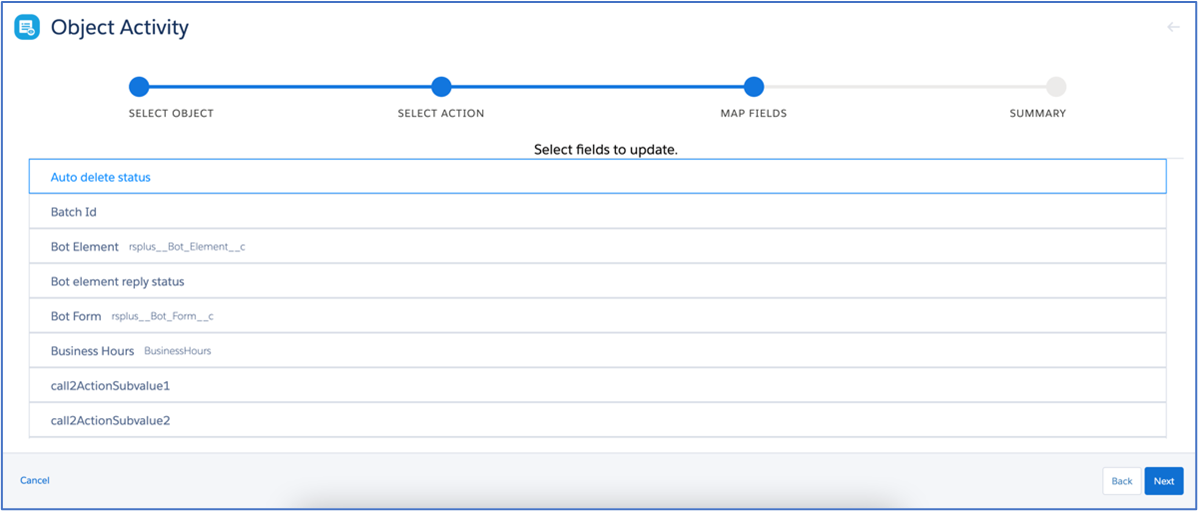
    Salesforce Marketing Cloud Object Activity wizard on the Map Fields step, listing available Message Bucket fields to select, including Bot Element (rsplus__Bot_Element__c) and Bot Form (rsplus__Bot_Form__c).
    Fig 04
  5. Map the phone number. Select the Number (To Phone) field: this is the message recipient's phone number. From the panel on the right, choose the phone number field from the journey's data extension (in this example, that field is Mobile_Phone__c).
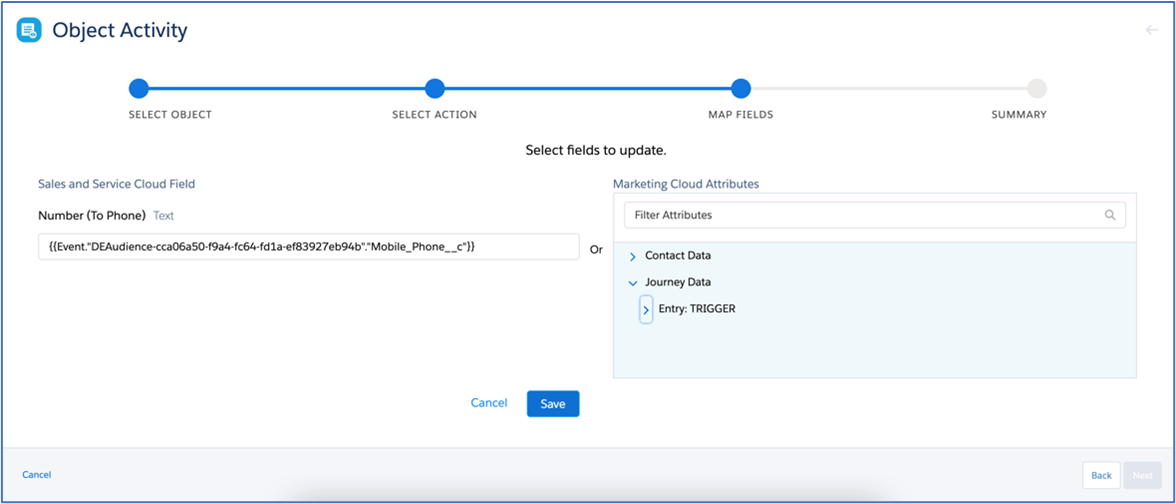
    Salesforce Marketing Cloud Object Activity Map Fields step, with the Number (To Phone) field set to a merge field pulling Mobile_Phone__c from the Journey Data entry trigger.
    Fig 05
  6. Map the account. Map the Account field the same way, linking it to the corresponding field in the data extension.
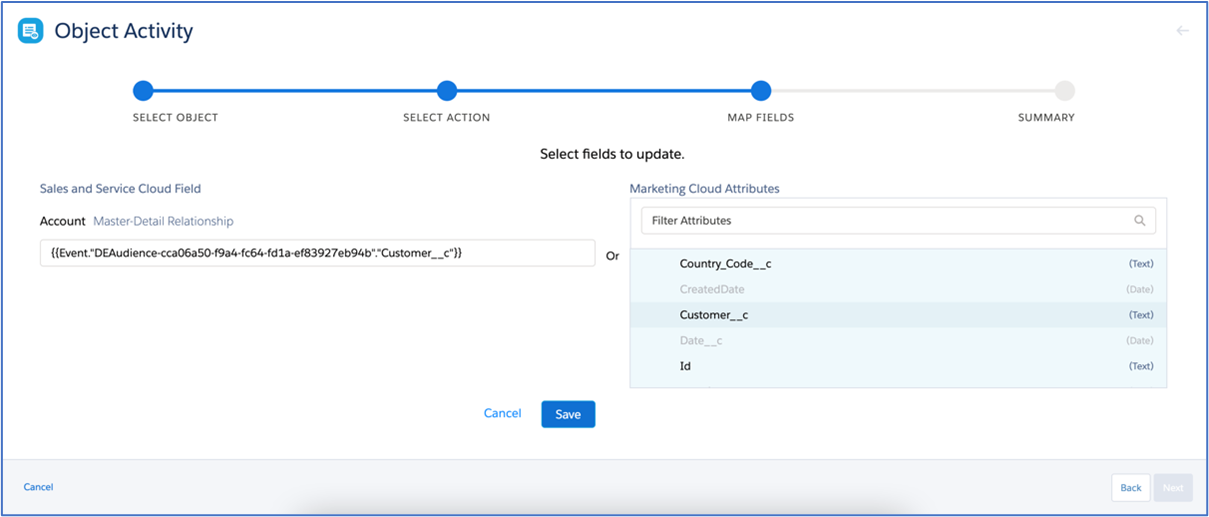
    Salesforce Marketing Cloud Object Activity Map Fields step, with the Account field set to a merge field mapped to the Customer__c attribute from the data extension.
    Fig 06
  7. Map the remaining fields. Repeat the mapping until all six fields are set:
    • Sender ID (From): the sending mobile number. You can also type this value in manually instead of mapping it to a data extension field.
    • Template ID: enter the WhatsApp template ID manually.
    • Related To: the ID of the related object record.
    • Requested Channel: enter this manually as "WhatsApp".
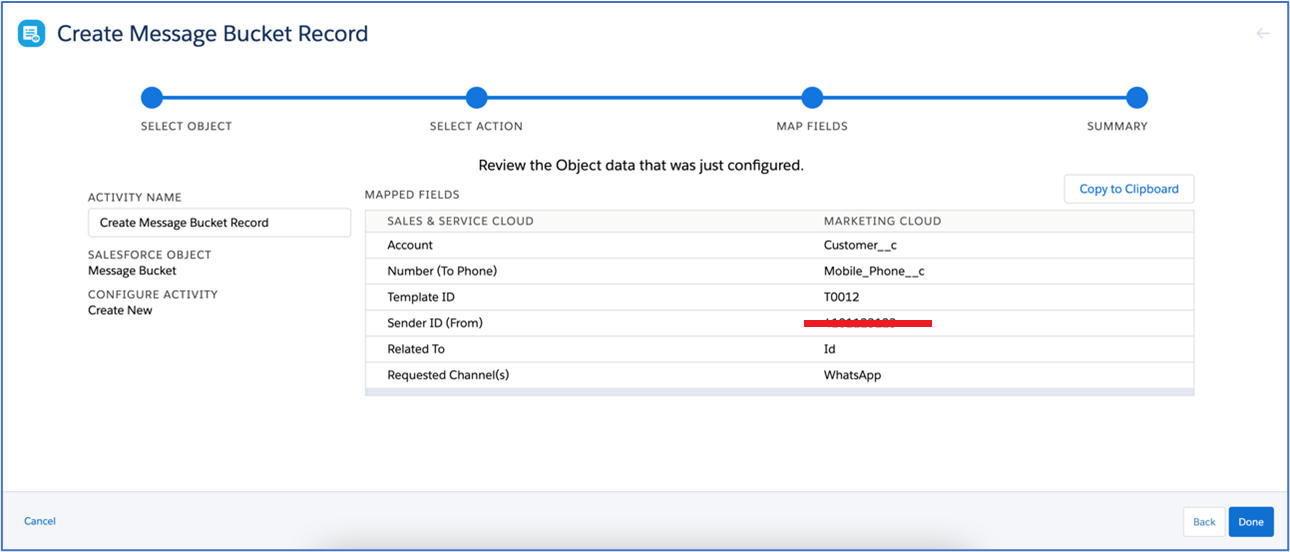
    Salesforce Marketing Cloud Create Message Bucket Record summary screen, listing all six mapped fields: Account, Number (To Phone), Template ID, Sender ID (From), Related To, and Requested Channel(s).
    Fig 07
  8. Confirm the journey. The result is a single-step journey. The data extension needs to contain the target customer records with every field the mapping requires.
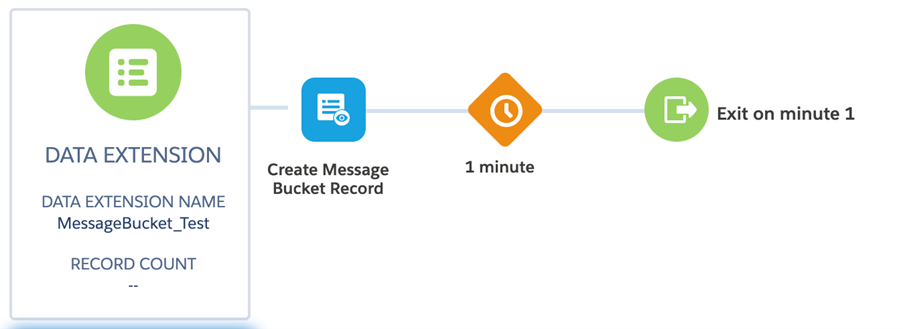
    Salesforce Marketing Cloud journey canvas showing a single-step journey: the MessageBucket_Test data extension feeding a Create Message Bucket Record activity, followed by a 1 minute wait and Exit on minute 1.
    Fig 08

Notes:

  • Journey Builder's object activity does not use the Bulk API.
  • It processes records slowly, in cycles of about a few hundred records per minute.
  • It's easy to configure and works well for low volumes of Message Bucket creation.
  • The object activity uses Marketing Cloud Connect to update Salesforce, so it does not consume Salesforce API limits.

Option 2: SFMC scripts with Bulk API 2.0

Using Salesforce Bulk API 2.0 with custom SSJS scripts in Automation Studio, you call Salesforce directly to insert Message Bucket records.

Notes:

  • A Bulk API 2.0 request can send up to 150,000,000 records (150 million) in a 24 hour period, with a maximum data size of 150MB per request.
  • Each batch processes up to 10,000 records. That counts as one API call.
  • This does consume API calls outside of the connector's Connected App authentication.
  • For one million updates, that's roughly 100 calls (plus a couple more for authentication and opening or closing the batch job).

Bulk API flow:

  1. Create the job. Define a job for the creation of records.
  2. Push the batches. Send data into the job in batches for Salesforce to process.
  3. Repeat as needed. Continue in batches of up to 10,000 records.
  4. Close the job. Close the job once every batch has been processed.

Option 3: Journey Builder custom activity (Salesforce Bulk/REST API)

The custom activity currently calls the external WhatsApp vendor API. It can be updated to call the Salesforce endpoint instead.

Using the Salesforce REST API, you can create a Message Bucket record in Salesforce by calling the Salesforce endpoint directly.

Salesforce REST endpoint URL
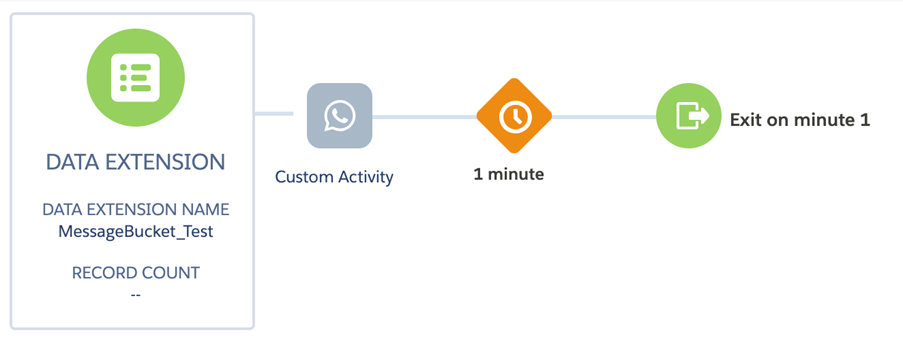
Salesforce Marketing Cloud journey canvas showing the MessageBucket_Test data extension feeding a WhatsApp Custom Activity, followed by a 1 minute wait and Exit on minute 1, with no Salesforce object activity yet in the flow.
Fig 09

Request to create a Message Bucket record in Salesforce

json
{
  "Sender_ID__c": "XXXXX",
  "Number (To Phone)": "XXXXX",
  "Related_To__c": "002XXXXXXX",
  "Requested_Channel__c": "WhatsApp",
  "Account": "002XXXXXXX",
  "Template_ID__c": "T0012"
}

Response

json
{
  "id": "001D000000IqhXXXXX",
  "errors": [],
  "success": true
}

Option 4: After the custom activity (Salesforce Bulk/REST API)

Amend the current custom activity to fetch the Template ID and store it in a data extension. This is slightly more complex to set up. Then use the Object Activity to create the Message Bucket record, the same as in Option 1.
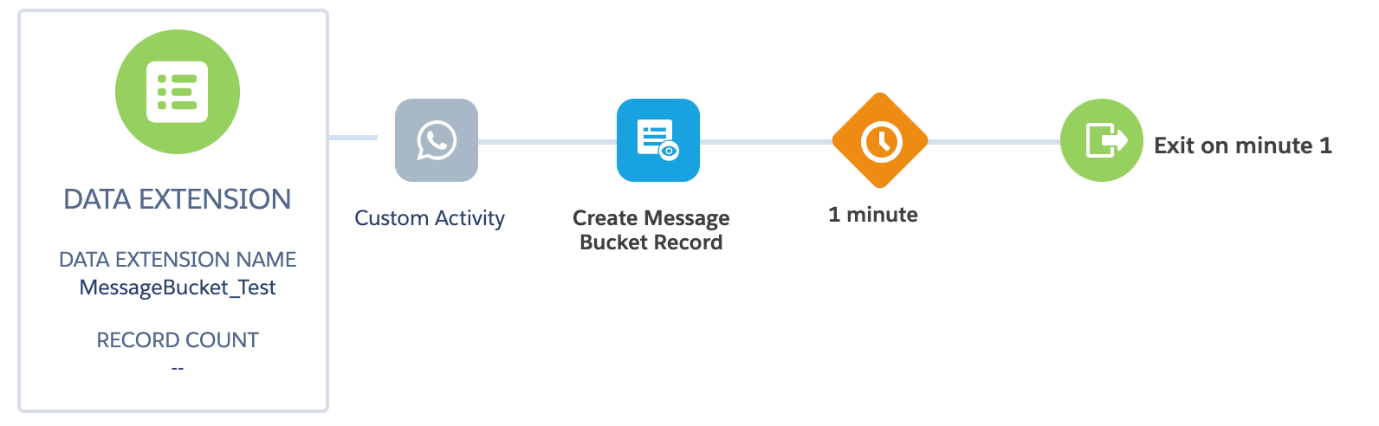
Salesforce Marketing Cloud journey canvas showing the MessageBucket_Test data extension feeding a WhatsApp Custom Activity followed by a Create Message Bucket Record object activity, then a 1 minute wait and Exit on minute 1.
Fig 10
Was this helpful?
← PreviousChatGPT Integration with Salesforce Next →Short Link Integration with ValueText
Docs/Developers & integrations/Create Message Bucket Records in Salesforce from SFMC

Create Message Bucket Records in Salesforce from SFMC

You can create a Message Bucket record in Salesforce Marketing Cloud using any of the four options below.

Last updated 26 Jun 2026

Option 1: Journey Builder object activity

  1. Create the journey. Build a simple journey with one activity: drag the Object Activity from the activity list onto the canvas.
    Salesforce Marketing Cloud Journey Builder canvas for the MessageBucket journey, with Object Activity highlighted in the Sales & Service Cloud activity list on the left and already placed on the canvas next to a Schedule panel showing Start: On Activation and Repeat: Never.
    Fig 01
  2. Select the object. Click the Object Activity to start configuring it. On the Select Object step, search for the "Message Bucket" object and select it.
    Salesforce Marketing Cloud Object Activity wizard on the Select Object step, with
    Fig 02
  3. Choose the action. This activity only creates a Message Bucket record in Sales Cloud, so choose Create New as the action.
    Salesforce Marketing Cloud Object Activity wizard on the Select Action step, with Create New checked over the Find and Update option.
    Fig 03
  4. Open the field mapping. On the Map Fields step, select the fields to map for the new Message Bucket record. This step lists every available field on the Message Bucket object.
    Salesforce Marketing Cloud Object Activity wizard on the Map Fields step, listing available Message Bucket fields to select, including Bot Element (rsplus__Bot_Element__c) and Bot Form (rsplus__Bot_Form__c).
    Fig 04
  5. Map the phone number. Select the Number (To Phone) field: this is the message recipient's phone number. From the panel on the right, choose the phone number field from the journey's data extension (in this example, that field is Mobile_Phone__c).
    Salesforce Marketing Cloud Object Activity Map Fields step, with the Number (To Phone) field set to a merge field pulling Mobile_Phone__c from the Journey Data entry trigger.
    Fig 05
  6. Map the account. Map the Account field the same way, linking it to the corresponding field in the data extension.
    Salesforce Marketing Cloud Object Activity Map Fields step, with the Account field set to a merge field mapped to the Customer__c attribute from the data extension.
    Fig 06
  7. Map the remaining fields. Repeat the mapping until all six fields are set:
    • Sender ID (From): the sending mobile number. You can also type this value in manually instead of mapping it to a data extension field.
    • Template ID: enter the WhatsApp template ID manually.
    • Related To: the ID of the related object record.
    • Requested Channel: enter this manually as "WhatsApp".
    Salesforce Marketing Cloud Create Message Bucket Record summary screen, listing all six mapped fields: Account, Number (To Phone), Template ID, Sender ID (From), Related To, and Requested Channel(s).
    Fig 07
  8. Confirm the journey. The result is a single-step journey. The data extension needs to contain the target customer records with every field the mapping requires.
    Salesforce Marketing Cloud journey canvas showing a single-step journey: the MessageBucket_Test data extension feeding a Create Message Bucket Record activity, followed by a 1 minute wait and Exit on minute 1.
    Fig 08

Notes:

  • Journey Builder's object activity does not use the Bulk API.
  • It processes records slowly, in cycles of about a few hundred records per minute.
  • It's easy to configure and works well for low volumes of Message Bucket creation.
  • The object activity uses Marketing Cloud Connect to update Salesforce, so it does not consume Salesforce API limits.

Option 2: SFMC scripts with Bulk API 2.0

Using Salesforce Bulk API 2.0 with custom SSJS scripts in Automation Studio, you call Salesforce directly to insert Message Bucket records.

Notes:

  • A Bulk API 2.0 request can send up to 150,000,000 records (150 million) in a 24 hour period, with a maximum data size of 150MB per request.
  • Each batch processes up to 10,000 records. That counts as one API call.
  • This does consume API calls outside of the connector's Connected App authentication.
  • For one million updates, that's roughly 100 calls (plus a couple more for authentication and opening or closing the batch job).

Bulk API flow:

  1. Create the job. Define a job for the creation of records.
  2. Push the batches. Send data into the job in batches for Salesforce to process.
  3. Repeat as needed. Continue in batches of up to 10,000 records.
  4. Close the job. Close the job once every batch has been processed.

Option 3: Journey Builder custom activity (Salesforce Bulk/REST API)

The custom activity currently calls the external WhatsApp vendor API. It can be updated to call the Salesforce endpoint instead.

Using the Salesforce REST API, you can create a Message Bucket record in Salesforce by calling the Salesforce endpoint directly.

Salesforce REST endpoint URL

Salesforce Marketing Cloud journey canvas showing the MessageBucket_Test data extension feeding a WhatsApp Custom Activity, followed by a 1 minute wait and Exit on minute 1, with no Salesforce object activity yet in the flow.
Fig 09

Request to create a Message Bucket record in Salesforce

json
{
  "Sender_ID__c": "XXXXX",
  "Number (To Phone)": "XXXXX",
  "Related_To__c": "002XXXXXXX",
  "Requested_Channel__c": "WhatsApp",
  "Account": "002XXXXXXX",
  "Template_ID__c": "T0012"
}

Response

json
{
  "id": "001D000000IqhXXXXX",
  "errors": [],
  "success": true
}

Option 4: After the custom activity (Salesforce Bulk/REST API)

Amend the current custom activity to fetch the Template ID and store it in a data extension. This is slightly more complex to set up. Then use the Object Activity to create the Message Bucket record, the same as in Option 1.

Salesforce Marketing Cloud journey canvas showing the MessageBucket_Test data extension feeding a WhatsApp Custom Activity followed by a Create Message Bucket Record object activity, then a 1 minute wait and Exit on minute 1.
Fig 10
Was this helpful?
← PreviousChatGPT Integration with Salesforce Next →Short Link Integration with ValueText
Docs/Developers & integrations/Create Message Bucket Records in Salesforce from SFMC

Create Message Bucket Records in Salesforce from SFMC

You can create a Message Bucket record in Salesforce Marketing Cloud using any of the four options below.

Last updated 26 Jun 2026

Option 1: Journey Builder object activity

  1. Create the journey. Build a simple journey with one activity: drag the Object Activity from the activity list onto the canvas.
    Salesforce Marketing Cloud Journey Builder canvas for the MessageBucket journey, with Object Activity highlighted in the Sales & Service Cloud activity list on the left and already placed on the canvas next to a Schedule panel showing Start: On Activation and Repeat: Never.
    Fig 01
  2. Select the object. Click the Object Activity to start configuring it. On the Select Object step, search for the "Message Bucket" object and select it.
    Salesforce Marketing Cloud Object Activity wizard on the Select Object step, with
    Fig 02
  3. Choose the action. This activity only creates a Message Bucket record in Sales Cloud, so choose Create New as the action.
    Salesforce Marketing Cloud Object Activity wizard on the Select Action step, with Create New checked over the Find and Update option.
    Fig 03
  4. Open the field mapping. On the Map Fields step, select the fields to map for the new Message Bucket record. This step lists every available field on the Message Bucket object.
    Salesforce Marketing Cloud Object Activity wizard on the Map Fields step, listing available Message Bucket fields to select, including Bot Element (rsplus__Bot_Element__c) and Bot Form (rsplus__Bot_Form__c).
    Fig 04
  5. Map the phone number. Select the Number (To Phone) field: this is the message recipient's phone number. From the panel on the right, choose the phone number field from the journey's data extension (in this example, that field is Mobile_Phone__c).
    Salesforce Marketing Cloud Object Activity Map Fields step, with the Number (To Phone) field set to a merge field pulling Mobile_Phone__c from the Journey Data entry trigger.
    Fig 05
  6. Map the account. Map the Account field the same way, linking it to the corresponding field in the data extension.
    Salesforce Marketing Cloud Object Activity Map Fields step, with the Account field set to a merge field mapped to the Customer__c attribute from the data extension.
    Fig 06
  7. Map the remaining fields. Repeat the mapping until all six fields are set:
    • Sender ID (From): the sending mobile number. You can also type this value in manually instead of mapping it to a data extension field.
    • Template ID: enter the WhatsApp template ID manually.
    • Related To: the ID of the related object record.
    • Requested Channel: enter this manually as "WhatsApp".
    Salesforce Marketing Cloud Create Message Bucket Record summary screen, listing all six mapped fields: Account, Number (To Phone), Template ID, Sender ID (From), Related To, and Requested Channel(s).
    Fig 07
  8. Confirm the journey. The result is a single-step journey. The data extension needs to contain the target customer records with every field the mapping requires.
    Salesforce Marketing Cloud journey canvas showing a single-step journey: the MessageBucket_Test data extension feeding a Create Message Bucket Record activity, followed by a 1 minute wait and Exit on minute 1.
    Fig 08

Notes:

  • Journey Builder's object activity does not use the Bulk API.
  • It processes records slowly, in cycles of about a few hundred records per minute.
  • It's easy to configure and works well for low volumes of Message Bucket creation.
  • The object activity uses Marketing Cloud Connect to update Salesforce, so it does not consume Salesforce API limits.

Option 2: SFMC scripts with Bulk API 2.0

Using Salesforce Bulk API 2.0 with custom SSJS scripts in Automation Studio, you call Salesforce directly to insert Message Bucket records.

Notes:

  • A Bulk API 2.0 request can send up to 150,000,000 records (150 million) in a 24 hour period, with a maximum data size of 150MB per request.
  • Each batch processes up to 10,000 records. That counts as one API call.
  • This does consume API calls outside of the connector's Connected App authentication.
  • For one million updates, that's roughly 100 calls (plus a couple more for authentication and opening or closing the batch job).

Bulk API flow:

  1. Create the job. Define a job for the creation of records.
  2. Push the batches. Send data into the job in batches for Salesforce to process.
  3. Repeat as needed. Continue in batches of up to 10,000 records.
  4. Close the job. Close the job once every batch has been processed.

Option 3: Journey Builder custom activity (Salesforce Bulk/REST API)

The custom activity currently calls the external WhatsApp vendor API. It can be updated to call the Salesforce endpoint instead.

Using the Salesforce REST API, you can create a Message Bucket record in Salesforce by calling the Salesforce endpoint directly.

Salesforce REST endpoint URL

Salesforce Marketing Cloud journey canvas showing the MessageBucket_Test data extension feeding a WhatsApp Custom Activity, followed by a 1 minute wait and Exit on minute 1, with no Salesforce object activity yet in the flow.
Fig 09

Request to create a Message Bucket record in Salesforce

json
{
  "Sender_ID__c": "XXXXX",
  "Number (To Phone)": "XXXXX",
  "Related_To__c": "002XXXXXXX",
  "Requested_Channel__c": "WhatsApp",
  "Account": "002XXXXXXX",
  "Template_ID__c": "T0012"
}

Response

json
{
  "id": "001D000000IqhXXXXX",
  "errors": [],
  "success": true
}

Option 4: After the custom activity (Salesforce Bulk/REST API)

Amend the current custom activity to fetch the Template ID and store it in a data extension. This is slightly more complex to set up. Then use the Object Activity to create the Message Bucket record, the same as in Option 1.

Salesforce Marketing Cloud journey canvas showing the MessageBucket_Test data extension feeding a WhatsApp Custom Activity followed by a Create Message Bucket Record object activity, then a 1 minute wait and Exit on minute 1.
Fig 10
Was this helpful?
← PreviousChatGPT Integration with Salesforce Next →Short Link Integration with ValueText
Docs/Developers & integrations/Create Message Bucket Records in Salesforce from SFMC

Create Message Bucket Records in Salesforce from SFMC

You can create a Message Bucket record in Salesforce Marketing Cloud using any of the four options below.

Last updated 26 Jun 2026

Option 1: Journey Builder object activity

  1. Create the journey. Build a simple journey with one activity: drag the Object Activity from the activity list onto the canvas.
    Salesforce Marketing Cloud Journey Builder canvas for the MessageBucket journey, with Object Activity highlighted in the Sales & Service Cloud activity list on the left and already placed on the canvas next to a Schedule panel showing Start: On Activation and Repeat: Never.
    Fig 01
  2. Select the object. Click the Object Activity to start configuring it. On the Select Object step, search for the "Message Bucket" object and select it.
    Salesforce Marketing Cloud Object Activity wizard on the Select Object step, with
    Fig 02
  3. Choose the action. This activity only creates a Message Bucket record in Sales Cloud, so choose Create New as the action.
    Salesforce Marketing Cloud Object Activity wizard on the Select Action step, with Create New checked over the Find and Update option.
    Fig 03
  4. Open the field mapping. On the Map Fields step, select the fields to map for the new Message Bucket record. This step lists every available field on the Message Bucket object.
    Salesforce Marketing Cloud Object Activity wizard on the Map Fields step, listing available Message Bucket fields to select, including Bot Element (rsplus__Bot_Element__c) and Bot Form (rsplus__Bot_Form__c).
    Fig 04
  5. Map the phone number. Select the Number (To Phone) field: this is the message recipient's phone number. From the panel on the right, choose the phone number field from the journey's data extension (in this example, that field is Mobile_Phone__c).
    Salesforce Marketing Cloud Object Activity Map Fields step, with the Number (To Phone) field set to a merge field pulling Mobile_Phone__c from the Journey Data entry trigger.
    Fig 05
  6. Map the account. Map the Account field the same way, linking it to the corresponding field in the data extension.
    Salesforce Marketing Cloud Object Activity Map Fields step, with the Account field set to a merge field mapped to the Customer__c attribute from the data extension.
    Fig 06
  7. Map the remaining fields. Repeat the mapping until all six fields are set:
    • Sender ID (From): the sending mobile number. You can also type this value in manually instead of mapping it to a data extension field.
    • Template ID: enter the WhatsApp template ID manually.
    • Related To: the ID of the related object record.
    • Requested Channel: enter this manually as "WhatsApp".
    Salesforce Marketing Cloud Create Message Bucket Record summary screen, listing all six mapped fields: Account, Number (To Phone), Template ID, Sender ID (From), Related To, and Requested Channel(s).
    Fig 07
  8. Confirm the journey. The result is a single-step journey. The data extension needs to contain the target customer records with every field the mapping requires.
    Salesforce Marketing Cloud journey canvas showing a single-step journey: the MessageBucket_Test data extension feeding a Create Message Bucket Record activity, followed by a 1 minute wait and Exit on minute 1.
    Fig 08

Notes:

  • Journey Builder's object activity does not use the Bulk API.
  • It processes records slowly, in cycles of about a few hundred records per minute.
  • It's easy to configure and works well for low volumes of Message Bucket creation.
  • The object activity uses Marketing Cloud Connect to update Salesforce, so it does not consume Salesforce API limits.

Option 2: SFMC scripts with Bulk API 2.0

Using Salesforce Bulk API 2.0 with custom SSJS scripts in Automation Studio, you call Salesforce directly to insert Message Bucket records.

Notes:

  • A Bulk API 2.0 request can send up to 150,000,000 records (150 million) in a 24 hour period, with a maximum data size of 150MB per request.
  • Each batch processes up to 10,000 records. That counts as one API call.
  • This does consume API calls outside of the connector's Connected App authentication.
  • For one million updates, that's roughly 100 calls (plus a couple more for authentication and opening or closing the batch job).

Bulk API flow:

  1. Create the job. Define a job for the creation of records.
  2. Push the batches. Send data into the job in batches for Salesforce to process.
  3. Repeat as needed. Continue in batches of up to 10,000 records.
  4. Close the job. Close the job once every batch has been processed.

Option 3: Journey Builder custom activity (Salesforce Bulk/REST API)

The custom activity currently calls the external WhatsApp vendor API. It can be updated to call the Salesforce endpoint instead.

Using the Salesforce REST API, you can create a Message Bucket record in Salesforce by calling the Salesforce endpoint directly.

Salesforce REST endpoint URL

Salesforce Marketing Cloud journey canvas showing the MessageBucket_Test data extension feeding a WhatsApp Custom Activity, followed by a 1 minute wait and Exit on minute 1, with no Salesforce object activity yet in the flow.
Fig 09

Request to create a Message Bucket record in Salesforce

json
{
  "Sender_ID__c": "XXXXX",
  "Number (To Phone)": "XXXXX",
  "Related_To__c": "002XXXXXXX",
  "Requested_Channel__c": "WhatsApp",
  "Account": "002XXXXXXX",
  "Template_ID__c": "T0012"
}

Response

json
{
  "id": "001D000000IqhXXXXX",
  "errors": [],
  "success": true
}

Option 4: After the custom activity (Salesforce Bulk/REST API)

Amend the current custom activity to fetch the Template ID and store it in a data extension. This is slightly more complex to set up. Then use the Object Activity to create the Message Bucket record, the same as in Option 1.

Salesforce Marketing Cloud journey canvas showing the MessageBucket_Test data extension feeding a WhatsApp Custom Activity followed by a Create Message Bucket Record object activity, then a 1 minute wait and Exit on minute 1.
Fig 10
Was this helpful?
← PreviousChatGPT Integration with Salesforce Next →Short Link Integration with ValueText