
Docs/Chat console & conversations/Using Converse View in Salesforce

Using Converse View in Salesforce

Converse View lets you monitor, send, and receive messages for yourself and your colleagues in one place. It also includes the additional features covered below.

Last updated 28 Nov 2025

Open Converse View

To open it: go to Salesforce and open the Converse View tab.
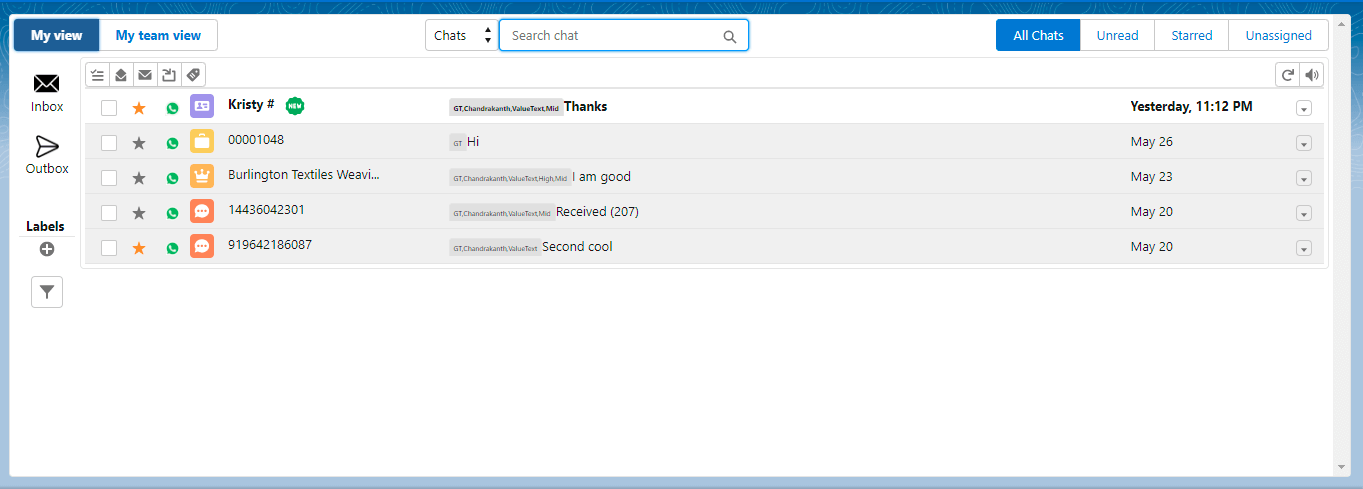
Converse View screen in Salesforce with My view selected, Inbox open on the left, and a list of chats showing star, channel, contact name, and last message columns.
Fig 01

My View and My Team View

In Converse View, you have two sections:

  • My View: shows only chats related to you. This means chats you handled yourself, or chats another team member assigned to you.
  • My Team View: shows every chat handled by your colleagues.
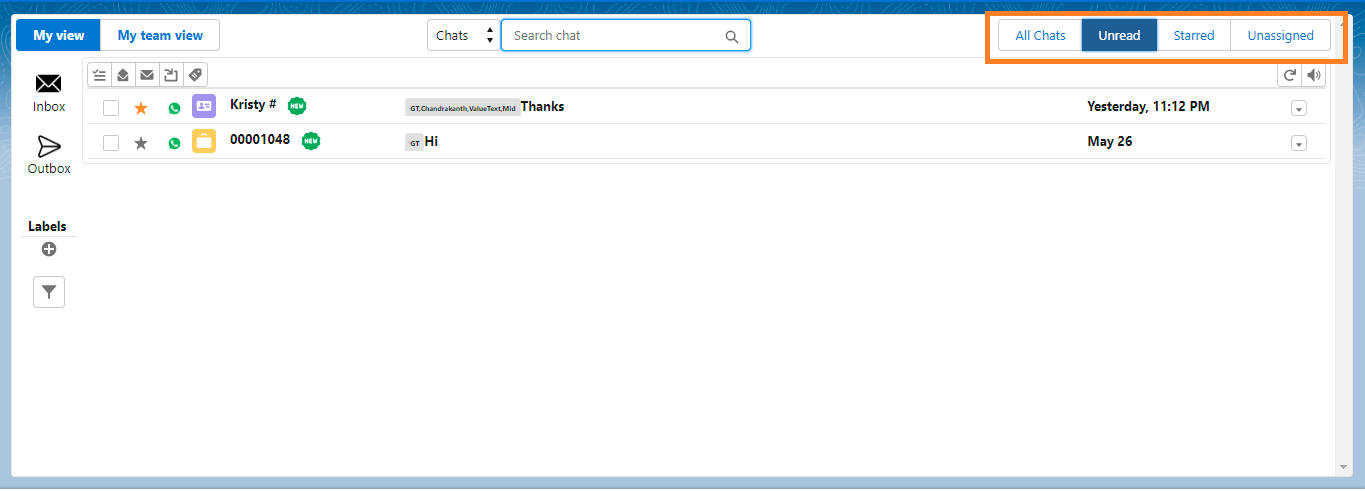
Converse View chat list with the My view tab active and the My team view tab beside it, showing Inbox and Outbox in the left sidebar.
Fig 02

Inbox, Outbox, and chat filters

On the left, you have Inbox and Outbox. Inbox is selected by default and shows inbound (received) chats. Click Outbox to see messages that have been sent.

You can filter chats within your selected view and inbox or outbox using the buttons at the top right:

  • Unread: filters chats that contain unread messages.
  • All Chats: shows all chats (the default).
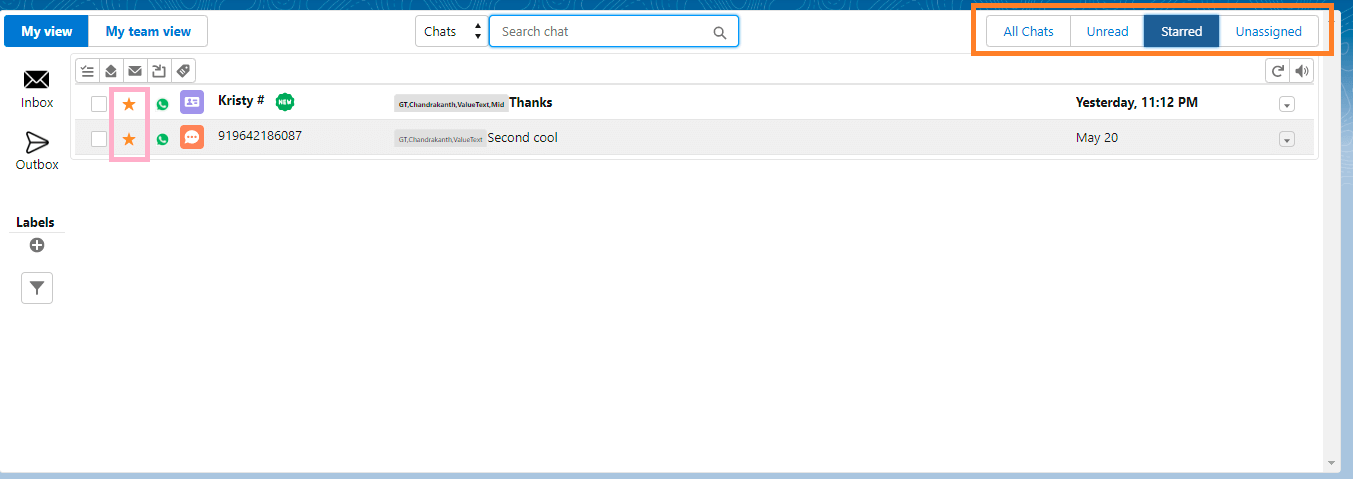
Converse View chat list with the All Chats, Unread, Starred, and Unassigned filter buttons outlined at the top right, with Unread selected.
Fig 03
  • Starred: filters chats that you have marked as important.
Converse View chat list with the All Chats, Unread, Starred, and Unassigned filter buttons outlined at the top right, with Unread selected.
Fig 04
  • Unassigned: shows chats that are not assigned to anyone, or not currently handled by any user.

Star, read, and unread chats

  • Star or unstar a chat: click the star icon in the chat row to mark it as important or unimportant.
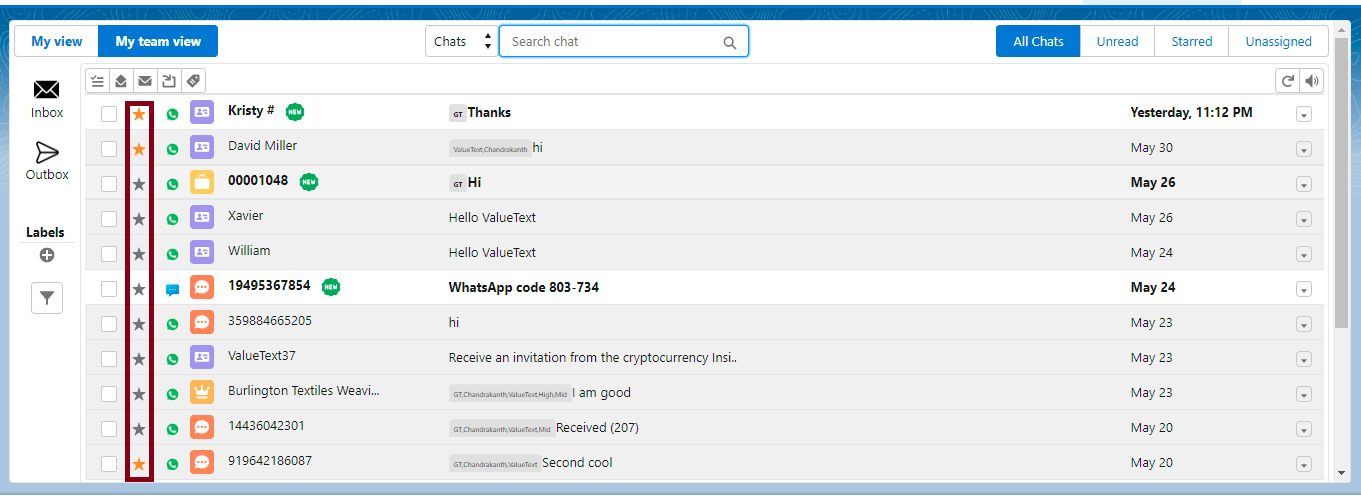
Converse View chat list with the Starred filter selected and the star icon highlighted on two chat rows.
Fig 05
  • Mark an unread chat as read: click the down icon in the chat row and choose the option shown.

Converse View chat row dropdown with Mark as read highlighted above View record and Remove Label options.
Fig 06
  • Mark a read chat as unread: click the down icon in the chat row and choose the option shown.
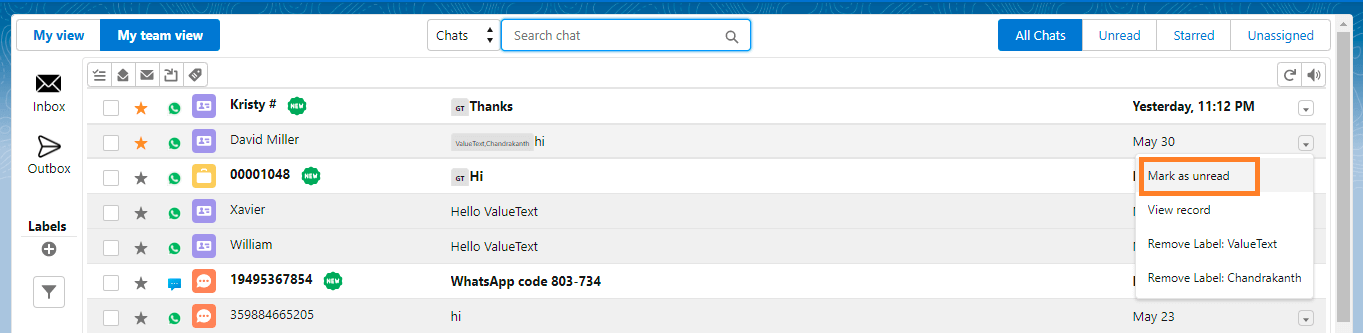
Converse View chat row dropdown with Mark as unread highlighted above View record and two Remove Label options.
Fig 07
  • If your chat is already linked to a record, the down icon menu shows View Record. Click it to open the record.
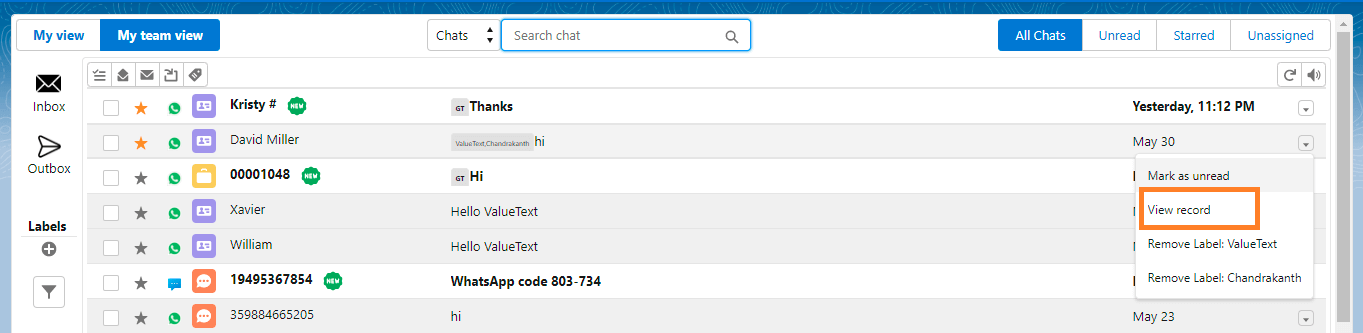
Converse View chat row dropdown with View record highlighted, shown when the chat is already linked to a record.
Fig 08
  • If your chat is not linked to any record, the down icon menu shows an option to Create a Record and Transfer Chat instead.
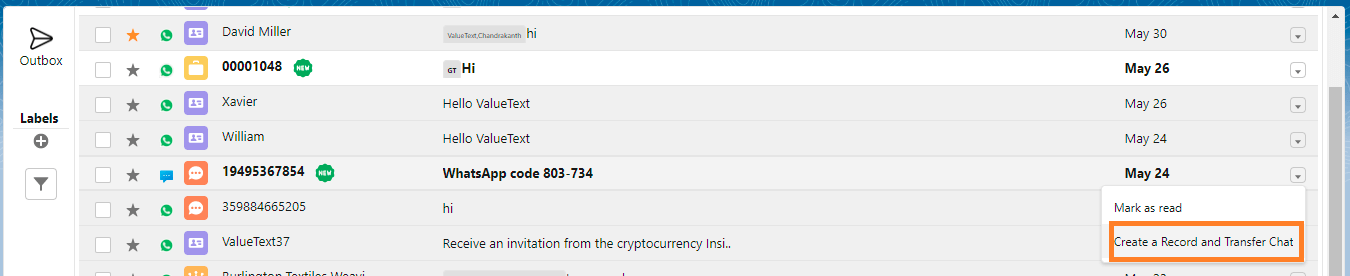
Converse View chat row dropdown with Create a Record and Transfer Chat highlighted, shown when the chat is not yet linked to a record.
Fig 09

Create a record and transfer the chat

  1. Click Create a Record and Transfer Chats to open the popup for creating a record.
  2. Search for and choose the object you want to create the record in, and pick the record type.
  3. Enter the record details. The popup shows the chat's number: paste it into the mobile number field, then click Save.
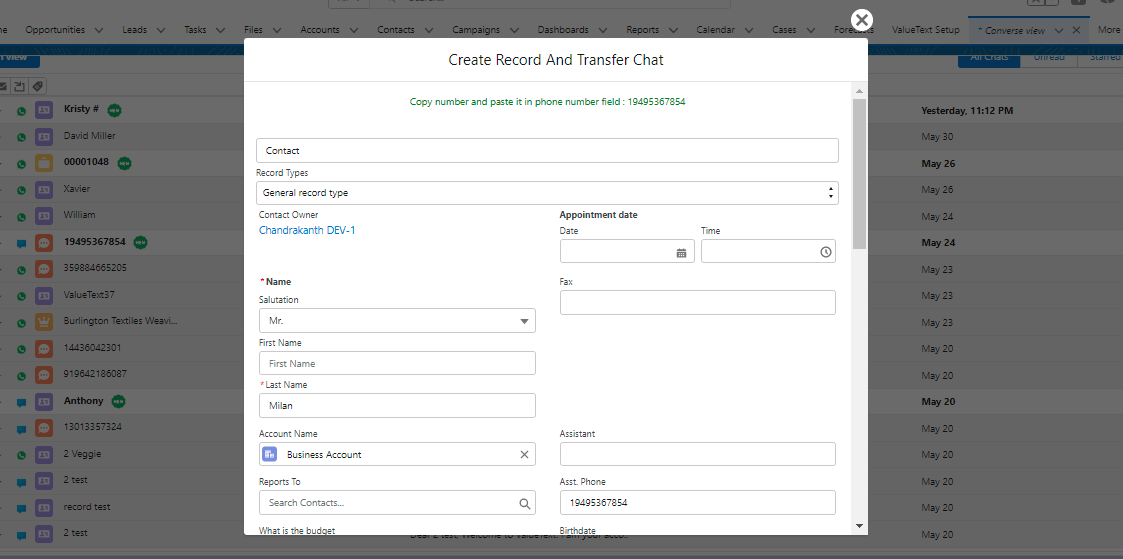
Create Record And Transfer Chat popup for a Contact record, with the phone number note at the top and Name, Account Name, and Appointment date fields below.
Fig 10
  1. After saving, a Transfer Chat button appears. Click it to link the chat to the record you just created.
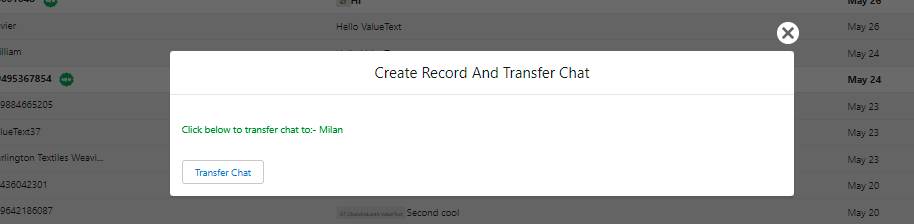
Create Record And Transfer Chat popup after saving the record, with a Transfer Chat button that links the chat to the new contact.
Fig 11

Bulk actions on chats

You can select multiple chats at once and mark them as read, mark them as unread, assign them to a user, or add a label.

  • Click the select/unselect icon (shown below) to select chats, then run one of these actions.
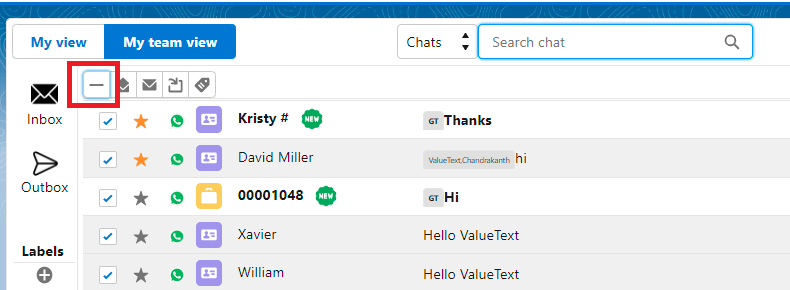
Converse View chat list with the select/unselect icon highlighted above a column of checked chat rows.
Fig 12
  • To mark several chats as read at once: select their checkboxes, then click the Mark as read icon.
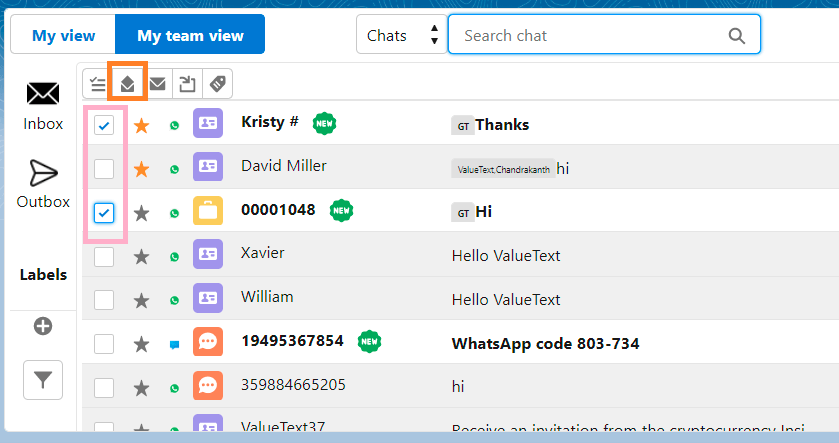
Converse View chat list with two chat rows checked and the Mark as read icon highlighted in the toolbar.
Fig 13
  • To mark several chats as unread at once: select their checkboxes, then click the Mark as unread icon.
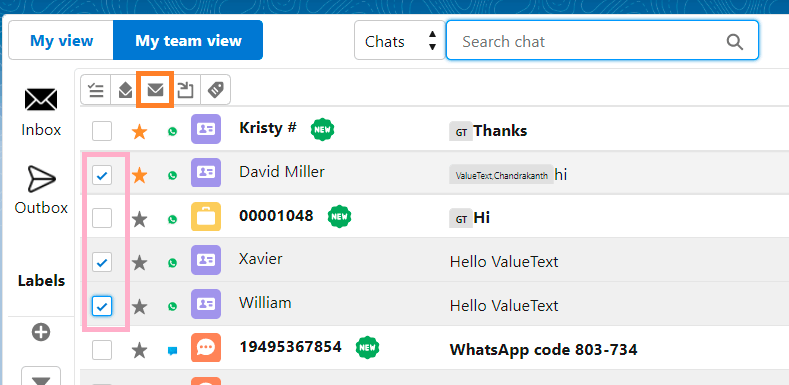
Converse View chat list with two chat rows checked and the Mark as unread icon highlighted in the toolbar.
Fig 14
  • To assign a chat to a user: select its checkbox, then click the assign to user icon. This opens a popup where you choose the user and write comments, then click Done.
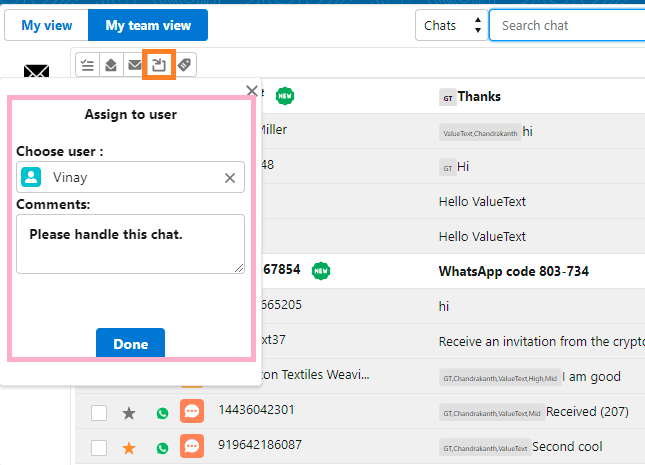
Assign to user popup in Converse View with a user chosen, a comments field filled in, and a Done button.
Fig 15
  • To add a label: select the chat's checkbox, then click the Add label icon. This is similar to Gmail's labels: a popup lets you pick the labels to apply, then click Apply.
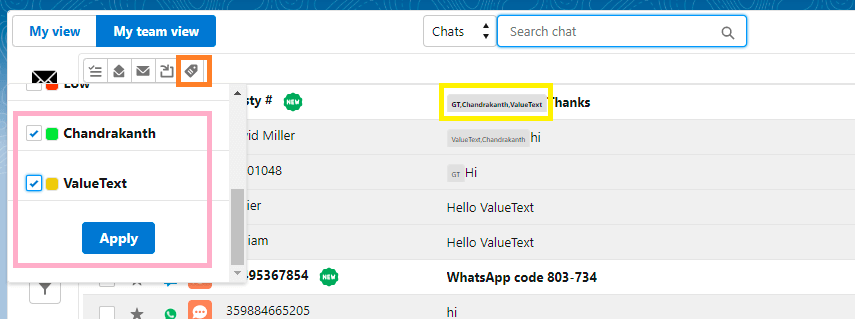
Add label popup in Converse View listing two labels with checkboxes and an Apply button, with the applied labels shown on the chat row.
Fig 16

To create a label, see Create a label below.

Create a label

  1. Click the plus icon on the left side of the interface, in the label section, to open the create-label popup.
  2. Enter the name and choose the color. The label name must be unique from existing labels.
  3. You can also edit an existing label by clicking its edit icon.
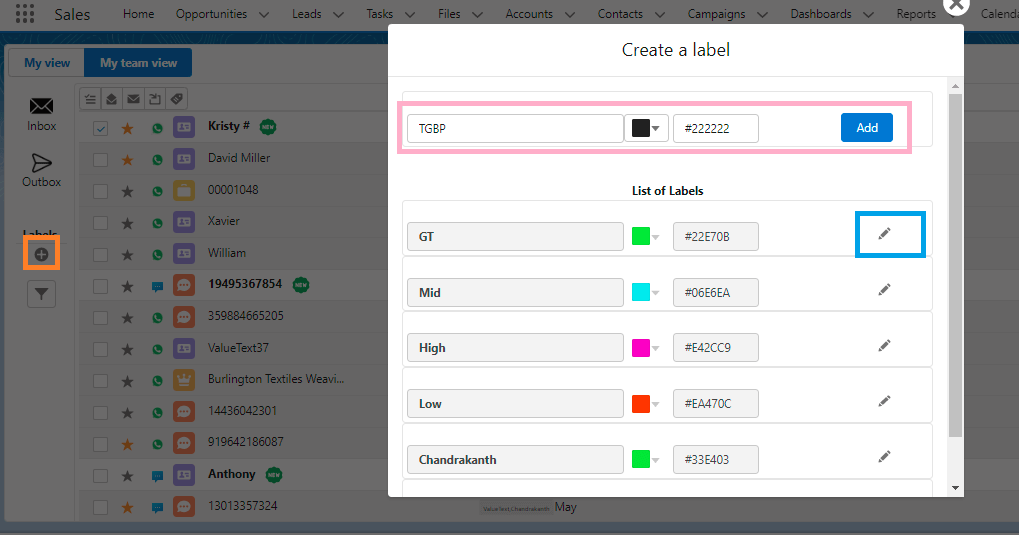
Create a label popup with a name field, color picker, and Add button, above the existing list of labels and their edit icons.
Fig 17

Start a conversation

Click a chat to open the chat console on the right side of the interface. From there you can send and receive messages. Click the red close icon to close the chat console.
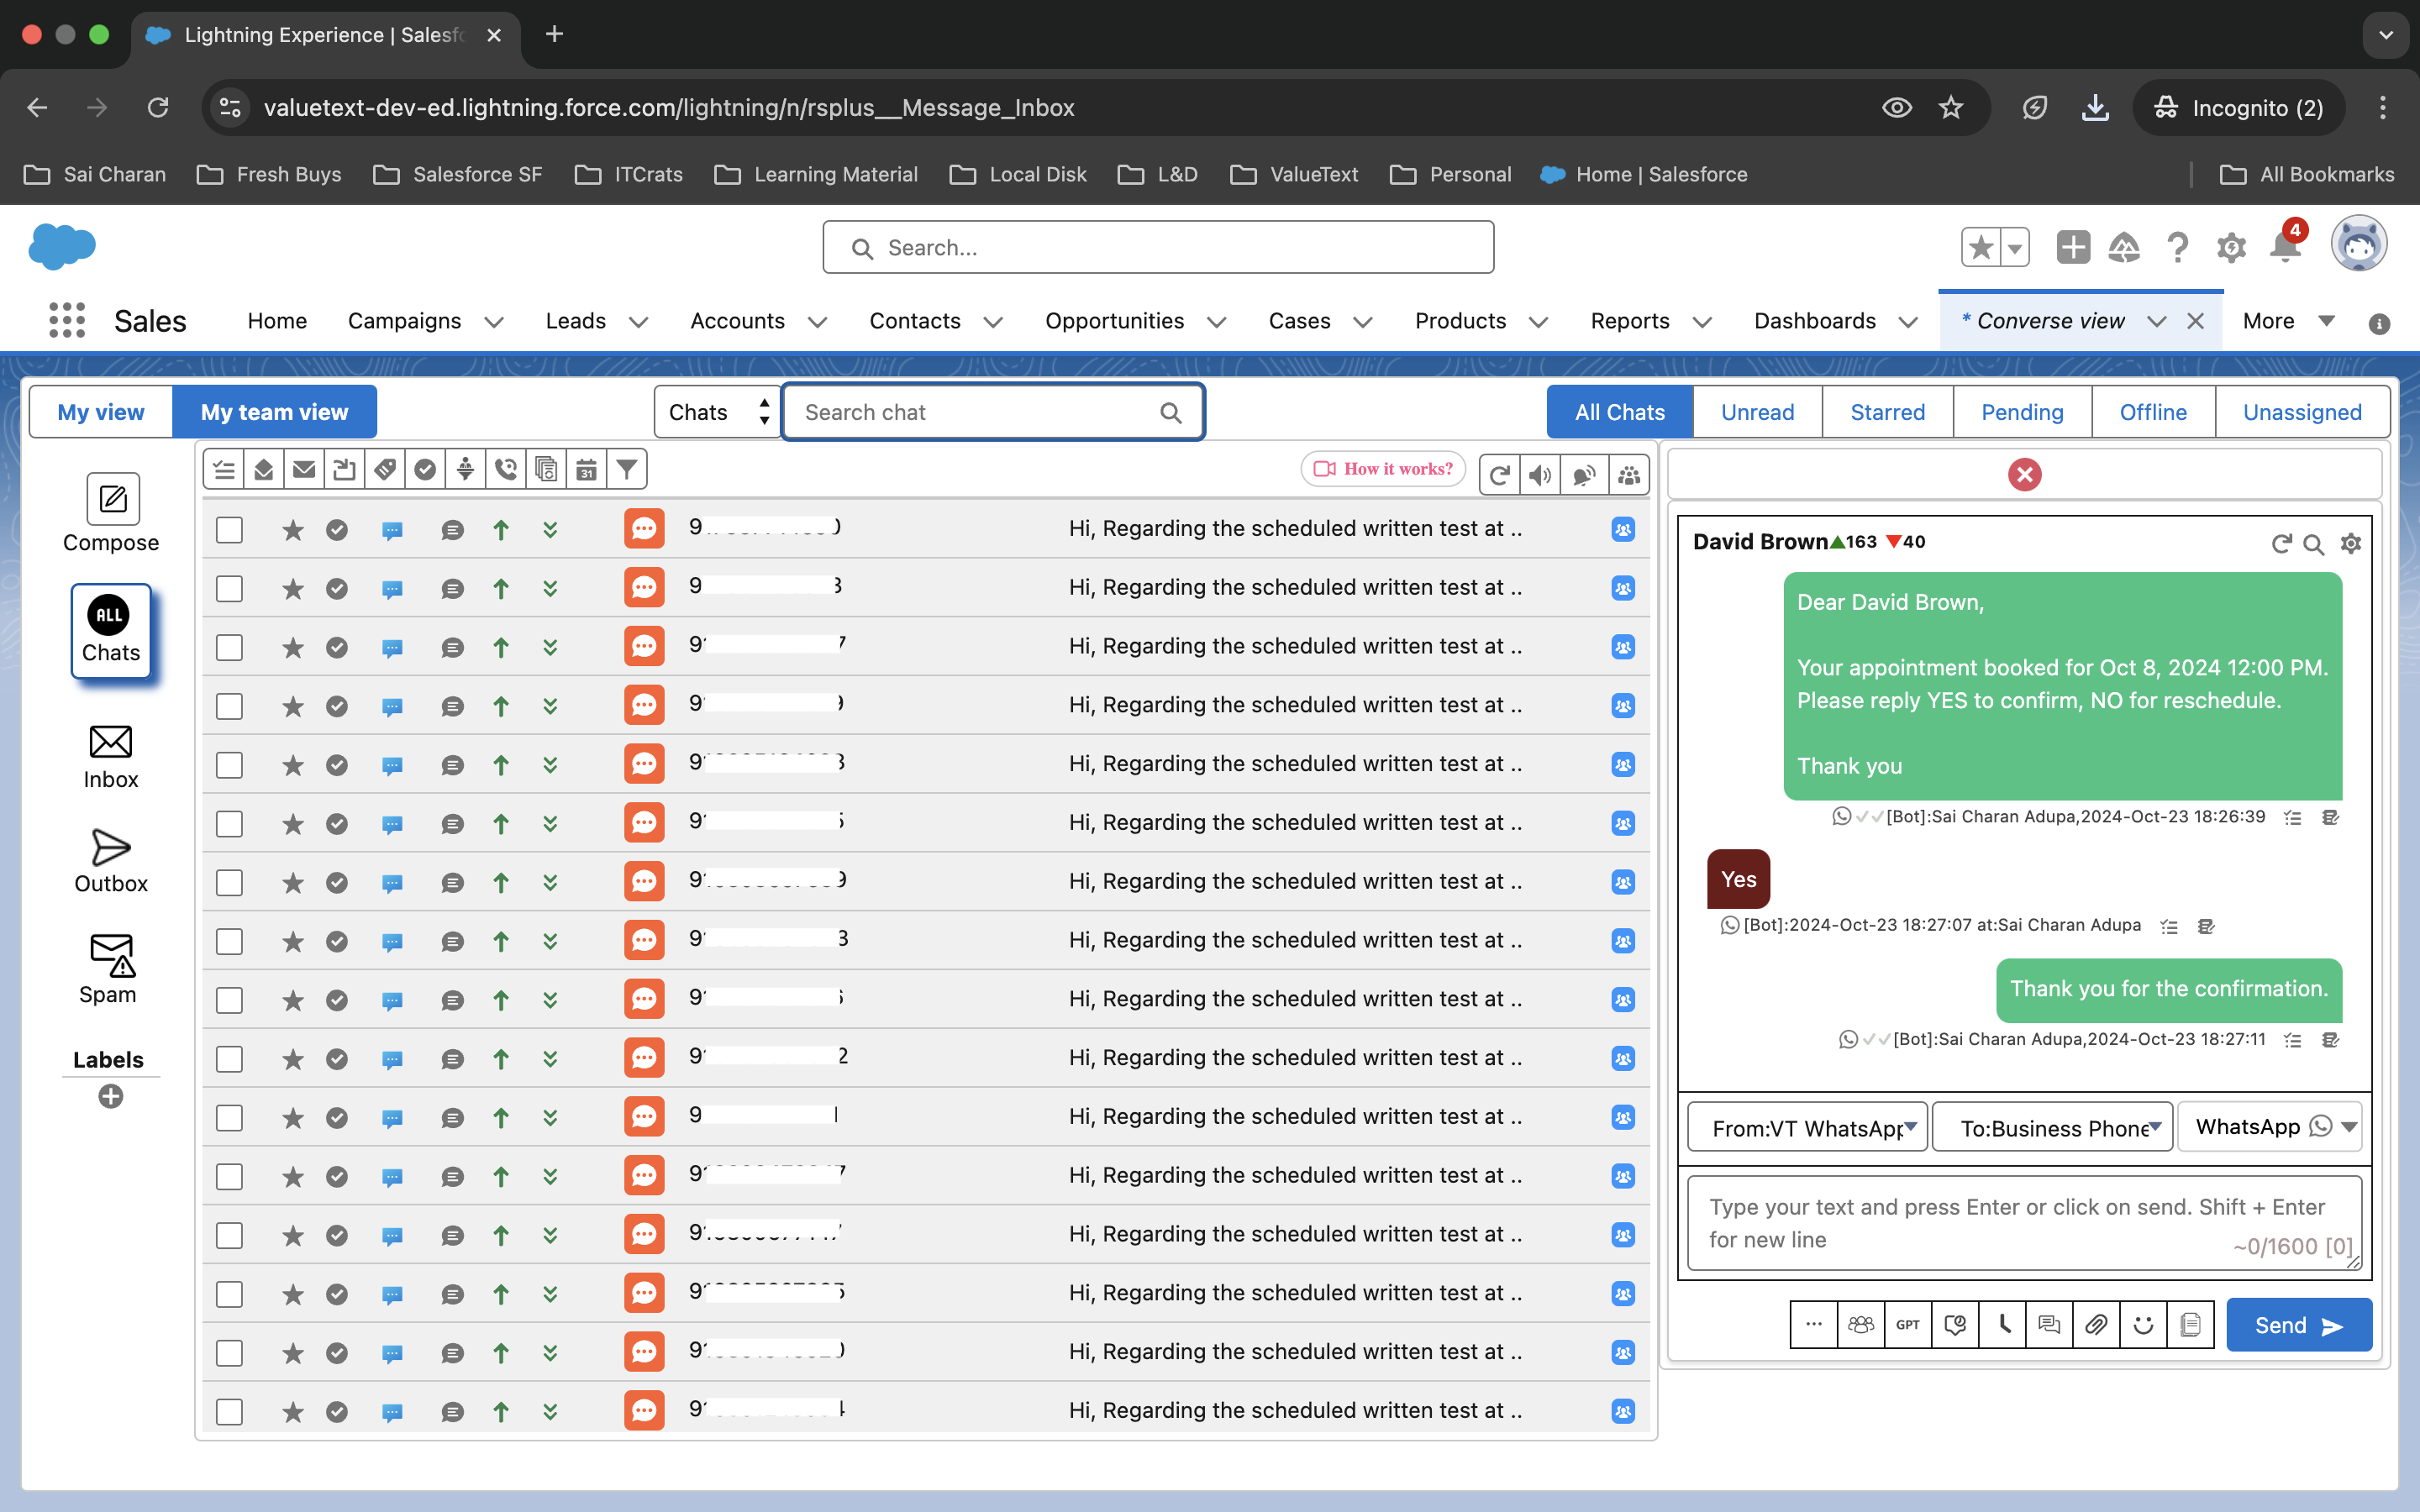
Converse View with a chat open in the right-hand console showing a WhatsApp conversation thread, the close icon at the top, and the message compose box with channel selectors at the bottom.
Fig 18

Search for a chat

Converse View has efficient search across your chats:

  1. Select Name to search by contact name or phone number.
  2. Select Chats to search by a keyword from the conversation you remember.
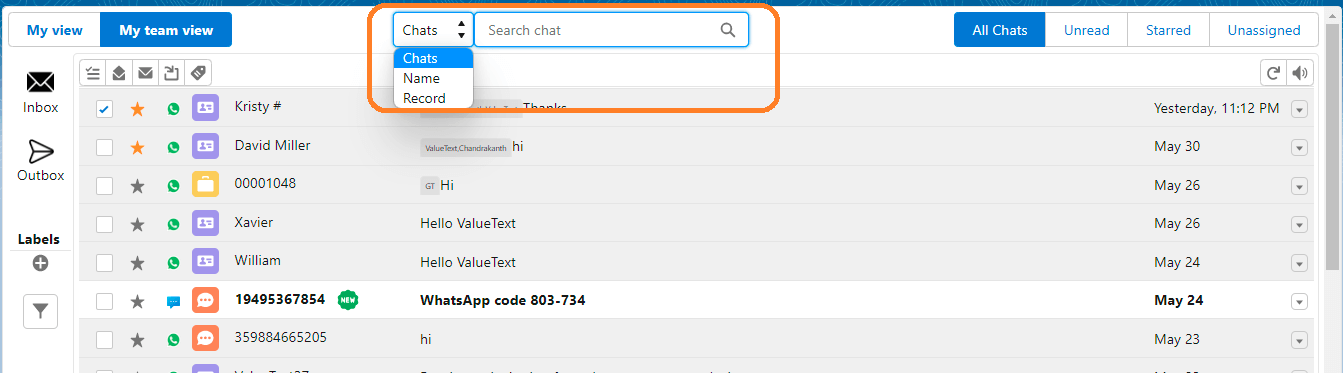
Converse View search bar with the search-type dropdown open, showing Chats, Name, and Record options.
Fig 19
  1. Select Record to search within an object by record name, then open the chat console to start a conversation.

Converse View search bar set to Record, with Contact chosen as the object and Kristy entered as the search term, showing a matching chat result.
Fig 20

Note

To learn more about how the chat console works, see the Chat console document.

Was this helpful?
← PreviousStay Ahead with the MiniChat Console Next →Filter Messages in Converse View for Bulk Jobs
Docs/Chat console & conversations/Using Converse View in Salesforce

Using Converse View in Salesforce

Converse View lets you monitor, send, and receive messages for yourself and your colleagues in one place. It also includes the additional features covered below.

Last updated 28 Nov 2025

Open Converse View

To open it: go to Salesforce and open the Converse View tab.

Converse View screen in Salesforce with My view selected, Inbox open on the left, and a list of chats showing star, channel, contact name, and last message columns.
Fig 01

My View and My Team View

In Converse View, you have two sections:

  • My View: shows only chats related to you. This means chats you handled yourself, or chats another team member assigned to you.
  • My Team View: shows every chat handled by your colleagues.
Converse View chat list with the My view tab active and the My team view tab beside it, showing Inbox and Outbox in the left sidebar.
Fig 02

Inbox, Outbox, and chat filters

On the left, you have Inbox and Outbox. Inbox is selected by default and shows inbound (received) chats. Click Outbox to see messages that have been sent.

You can filter chats within your selected view and inbox or outbox using the buttons at the top right:

  • Unread: filters chats that contain unread messages.
  • All Chats: shows all chats (the default).
Converse View chat list with the All Chats, Unread, Starred, and Unassigned filter buttons outlined at the top right, with Unread selected.
Fig 03
  • Starred: filters chats that you have marked as important.
Converse View chat list with the All Chats, Unread, Starred, and Unassigned filter buttons outlined at the top right, with Unread selected.
Fig 04
  • Unassigned: shows chats that are not assigned to anyone, or not currently handled by any user.

Star, read, and unread chats

  • Star or unstar a chat: click the star icon in the chat row to mark it as important or unimportant.
Converse View chat list with the Starred filter selected and the star icon highlighted on two chat rows.
Fig 05
  • Mark an unread chat as read: click the down icon in the chat row and choose the option shown.
Converse View chat row dropdown with Mark as read highlighted above View record and Remove Label options.
Fig 06
  • Mark a read chat as unread: click the down icon in the chat row and choose the option shown.
Converse View chat row dropdown with Mark as unread highlighted above View record and two Remove Label options.
Fig 07
  • If your chat is already linked to a record, the down icon menu shows View Record. Click it to open the record.
Converse View chat row dropdown with View record highlighted, shown when the chat is already linked to a record.
Fig 08
  • If your chat is not linked to any record, the down icon menu shows an option to Create a Record and Transfer Chat instead.
Converse View chat row dropdown with Create a Record and Transfer Chat highlighted, shown when the chat is not yet linked to a record.
Fig 09

Create a record and transfer the chat

  1. Click Create a Record and Transfer Chats to open the popup for creating a record.
  2. Search for and choose the object you want to create the record in, and pick the record type.
  3. Enter the record details. The popup shows the chat's number: paste it into the mobile number field, then click Save.
Create Record And Transfer Chat popup for a Contact record, with the phone number note at the top and Name, Account Name, and Appointment date fields below.
Fig 10
  1. After saving, a Transfer Chat button appears. Click it to link the chat to the record you just created.
Create Record And Transfer Chat popup after saving the record, with a Transfer Chat button that links the chat to the new contact.
Fig 11

Bulk actions on chats

You can select multiple chats at once and mark them as read, mark them as unread, assign them to a user, or add a label.

  • Click the select/unselect icon (shown below) to select chats, then run one of these actions.
Converse View chat list with the select/unselect icon highlighted above a column of checked chat rows.
Fig 12
  • To mark several chats as read at once: select their checkboxes, then click the Mark as read icon.
Converse View chat list with two chat rows checked and the Mark as read icon highlighted in the toolbar.
Fig 13
  • To mark several chats as unread at once: select their checkboxes, then click the Mark as unread icon.
Converse View chat list with two chat rows checked and the Mark as unread icon highlighted in the toolbar.
Fig 14
  • To assign a chat to a user: select its checkbox, then click the assign to user icon. This opens a popup where you choose the user and write comments, then click Done.
Assign to user popup in Converse View with a user chosen, a comments field filled in, and a Done button.
Fig 15
  • To add a label: select the chat's checkbox, then click the Add label icon. This is similar to Gmail's labels: a popup lets you pick the labels to apply, then click Apply.
Add label popup in Converse View listing two labels with checkboxes and an Apply button, with the applied labels shown on the chat row.
Fig 16

To create a label, see Create a label below.

Create a label

  1. Click the plus icon on the left side of the interface, in the label section, to open the create-label popup.
  2. Enter the name and choose the color. The label name must be unique from existing labels.
  3. You can also edit an existing label by clicking its edit icon.
Create a label popup with a name field, color picker, and Add button, above the existing list of labels and their edit icons.
Fig 17

Start a conversation

Click a chat to open the chat console on the right side of the interface. From there you can send and receive messages. Click the red close icon to close the chat console.

Converse View with a chat open in the right-hand console showing a WhatsApp conversation thread, the close icon at the top, and the message compose box with channel selectors at the bottom.
Fig 18

Search for a chat

Converse View has efficient search across your chats:

  1. Select Name to search by contact name or phone number.
  2. Select Chats to search by a keyword from the conversation you remember.
Converse View search bar with the search-type dropdown open, showing Chats, Name, and Record options.
Fig 19
  1. Select Record to search within an object by record name, then open the chat console to start a conversation.
Converse View search bar set to Record, with Contact chosen as the object and Kristy entered as the search term, showing a matching chat result.
Fig 20

Note

To learn more about how the chat console works, see the Chat console document.

Was this helpful?
← PreviousStay Ahead with the MiniChat Console Next →Filter Messages in Converse View for Bulk Jobs
Docs/Chat console & conversations/Using Converse View in Salesforce

Using Converse View in Salesforce

Converse View lets you monitor, send, and receive messages for yourself and your colleagues in one place. It also includes the additional features covered below.

Last updated 28 Nov 2025

Open Converse View

To open it: go to Salesforce and open the Converse View tab.

Converse View screen in Salesforce with My view selected, Inbox open on the left, and a list of chats showing star, channel, contact name, and last message columns.
Fig 01

My View and My Team View

In Converse View, you have two sections:

  • My View: shows only chats related to you. This means chats you handled yourself, or chats another team member assigned to you.
  • My Team View: shows every chat handled by your colleagues.
Converse View chat list with the My view tab active and the My team view tab beside it, showing Inbox and Outbox in the left sidebar.
Fig 02

Inbox, Outbox, and chat filters

On the left, you have Inbox and Outbox. Inbox is selected by default and shows inbound (received) chats. Click Outbox to see messages that have been sent.

You can filter chats within your selected view and inbox or outbox using the buttons at the top right:

  • Unread: filters chats that contain unread messages.
  • All Chats: shows all chats (the default).
Converse View chat list with the All Chats, Unread, Starred, and Unassigned filter buttons outlined at the top right, with Unread selected.
Fig 03
  • Starred: filters chats that you have marked as important.
Converse View chat list with the All Chats, Unread, Starred, and Unassigned filter buttons outlined at the top right, with Unread selected.
Fig 04
  • Unassigned: shows chats that are not assigned to anyone, or not currently handled by any user.

Star, read, and unread chats

  • Star or unstar a chat: click the star icon in the chat row to mark it as important or unimportant.
Converse View chat list with the Starred filter selected and the star icon highlighted on two chat rows.
Fig 05
  • Mark an unread chat as read: click the down icon in the chat row and choose the option shown.
Converse View chat row dropdown with Mark as read highlighted above View record and Remove Label options.
Fig 06
  • Mark a read chat as unread: click the down icon in the chat row and choose the option shown.
Converse View chat row dropdown with Mark as unread highlighted above View record and two Remove Label options.
Fig 07
  • If your chat is already linked to a record, the down icon menu shows View Record. Click it to open the record.
Converse View chat row dropdown with View record highlighted, shown when the chat is already linked to a record.
Fig 08
  • If your chat is not linked to any record, the down icon menu shows an option to Create a Record and Transfer Chat instead.
Converse View chat row dropdown with Create a Record and Transfer Chat highlighted, shown when the chat is not yet linked to a record.
Fig 09

Create a record and transfer the chat

  1. Click Create a Record and Transfer Chats to open the popup for creating a record.
  2. Search for and choose the object you want to create the record in, and pick the record type.
  3. Enter the record details. The popup shows the chat's number: paste it into the mobile number field, then click Save.
Create Record And Transfer Chat popup for a Contact record, with the phone number note at the top and Name, Account Name, and Appointment date fields below.
Fig 10
  1. After saving, a Transfer Chat button appears. Click it to link the chat to the record you just created.
Create Record And Transfer Chat popup after saving the record, with a Transfer Chat button that links the chat to the new contact.
Fig 11

Bulk actions on chats

You can select multiple chats at once and mark them as read, mark them as unread, assign them to a user, or add a label.

  • Click the select/unselect icon (shown below) to select chats, then run one of these actions.
Converse View chat list with the select/unselect icon highlighted above a column of checked chat rows.
Fig 12
  • To mark several chats as read at once: select their checkboxes, then click the Mark as read icon.
Converse View chat list with two chat rows checked and the Mark as read icon highlighted in the toolbar.
Fig 13
  • To mark several chats as unread at once: select their checkboxes, then click the Mark as unread icon.
Converse View chat list with two chat rows checked and the Mark as unread icon highlighted in the toolbar.
Fig 14
  • To assign a chat to a user: select its checkbox, then click the assign to user icon. This opens a popup where you choose the user and write comments, then click Done.
Assign to user popup in Converse View with a user chosen, a comments field filled in, and a Done button.
Fig 15
  • To add a label: select the chat's checkbox, then click the Add label icon. This is similar to Gmail's labels: a popup lets you pick the labels to apply, then click Apply.
Add label popup in Converse View listing two labels with checkboxes and an Apply button, with the applied labels shown on the chat row.
Fig 16

To create a label, see Create a label below.

Create a label

  1. Click the plus icon on the left side of the interface, in the label section, to open the create-label popup.
  2. Enter the name and choose the color. The label name must be unique from existing labels.
  3. You can also edit an existing label by clicking its edit icon.
Create a label popup with a name field, color picker, and Add button, above the existing list of labels and their edit icons.
Fig 17

Start a conversation

Click a chat to open the chat console on the right side of the interface. From there you can send and receive messages. Click the red close icon to close the chat console.

Converse View with a chat open in the right-hand console showing a WhatsApp conversation thread, the close icon at the top, and the message compose box with channel selectors at the bottom.
Fig 18

Search for a chat

Converse View has efficient search across your chats:

  1. Select Name to search by contact name or phone number.
  2. Select Chats to search by a keyword from the conversation you remember.
Converse View search bar with the search-type dropdown open, showing Chats, Name, and Record options.
Fig 19
  1. Select Record to search within an object by record name, then open the chat console to start a conversation.
Converse View search bar set to Record, with Contact chosen as the object and Kristy entered as the search term, showing a matching chat result.
Fig 20

Note

To learn more about how the chat console works, see the Chat console document.

Was this helpful?
← PreviousStay Ahead with the MiniChat Console Next →Filter Messages in Converse View for Bulk Jobs
Docs/Chat console & conversations/Using Converse View in Salesforce

Using Converse View in Salesforce

Converse View lets you monitor, send, and receive messages for yourself and your colleagues in one place. It also includes the additional features covered below.

Last updated 28 Nov 2025

Open Converse View

To open it: go to Salesforce and open the Converse View tab.

Converse View screen in Salesforce with My view selected, Inbox open on the left, and a list of chats showing star, channel, contact name, and last message columns.
Fig 01

My View and My Team View

In Converse View, you have two sections:

  • My View: shows only chats related to you. This means chats you handled yourself, or chats another team member assigned to you.
  • My Team View: shows every chat handled by your colleagues.
Converse View chat list with the My view tab active and the My team view tab beside it, showing Inbox and Outbox in the left sidebar.
Fig 02

Inbox, Outbox, and chat filters

On the left, you have Inbox and Outbox. Inbox is selected by default and shows inbound (received) chats. Click Outbox to see messages that have been sent.

You can filter chats within your selected view and inbox or outbox using the buttons at the top right:

  • Unread: filters chats that contain unread messages.
  • All Chats: shows all chats (the default).
Converse View chat list with the All Chats, Unread, Starred, and Unassigned filter buttons outlined at the top right, with Unread selected.
Fig 03
  • Starred: filters chats that you have marked as important.
Converse View chat list with the All Chats, Unread, Starred, and Unassigned filter buttons outlined at the top right, with Unread selected.
Fig 04
  • Unassigned: shows chats that are not assigned to anyone, or not currently handled by any user.

Star, read, and unread chats

  • Star or unstar a chat: click the star icon in the chat row to mark it as important or unimportant.
Converse View chat list with the Starred filter selected and the star icon highlighted on two chat rows.
Fig 05
  • Mark an unread chat as read: click the down icon in the chat row and choose the option shown.
Converse View chat row dropdown with Mark as read highlighted above View record and Remove Label options.
Fig 06
  • Mark a read chat as unread: click the down icon in the chat row and choose the option shown.
Converse View chat row dropdown with Mark as unread highlighted above View record and two Remove Label options.
Fig 07
  • If your chat is already linked to a record, the down icon menu shows View Record. Click it to open the record.
Converse View chat row dropdown with View record highlighted, shown when the chat is already linked to a record.
Fig 08
  • If your chat is not linked to any record, the down icon menu shows an option to Create a Record and Transfer Chat instead.
Converse View chat row dropdown with Create a Record and Transfer Chat highlighted, shown when the chat is not yet linked to a record.
Fig 09

Create a record and transfer the chat

  1. Click Create a Record and Transfer Chats to open the popup for creating a record.
  2. Search for and choose the object you want to create the record in, and pick the record type.
  3. Enter the record details. The popup shows the chat's number: paste it into the mobile number field, then click Save.
Create Record And Transfer Chat popup for a Contact record, with the phone number note at the top and Name, Account Name, and Appointment date fields below.
Fig 10
  1. After saving, a Transfer Chat button appears. Click it to link the chat to the record you just created.
Create Record And Transfer Chat popup after saving the record, with a Transfer Chat button that links the chat to the new contact.
Fig 11

Bulk actions on chats

You can select multiple chats at once and mark them as read, mark them as unread, assign them to a user, or add a label.

  • Click the select/unselect icon (shown below) to select chats, then run one of these actions.
Converse View chat list with the select/unselect icon highlighted above a column of checked chat rows.
Fig 12
  • To mark several chats as read at once: select their checkboxes, then click the Mark as read icon.
Converse View chat list with two chat rows checked and the Mark as read icon highlighted in the toolbar.
Fig 13
  • To mark several chats as unread at once: select their checkboxes, then click the Mark as unread icon.
Converse View chat list with two chat rows checked and the Mark as unread icon highlighted in the toolbar.
Fig 14
  • To assign a chat to a user: select its checkbox, then click the assign to user icon. This opens a popup where you choose the user and write comments, then click Done.
Assign to user popup in Converse View with a user chosen, a comments field filled in, and a Done button.
Fig 15
  • To add a label: select the chat's checkbox, then click the Add label icon. This is similar to Gmail's labels: a popup lets you pick the labels to apply, then click Apply.
Add label popup in Converse View listing two labels with checkboxes and an Apply button, with the applied labels shown on the chat row.
Fig 16

To create a label, see Create a label below.

Create a label

  1. Click the plus icon on the left side of the interface, in the label section, to open the create-label popup.
  2. Enter the name and choose the color. The label name must be unique from existing labels.
  3. You can also edit an existing label by clicking its edit icon.
Create a label popup with a name field, color picker, and Add button, above the existing list of labels and their edit icons.
Fig 17

Start a conversation

Click a chat to open the chat console on the right side of the interface. From there you can send and receive messages. Click the red close icon to close the chat console.

Converse View with a chat open in the right-hand console showing a WhatsApp conversation thread, the close icon at the top, and the message compose box with channel selectors at the bottom.
Fig 18

Search for a chat

Converse View has efficient search across your chats:

  1. Select Name to search by contact name or phone number.
  2. Select Chats to search by a keyword from the conversation you remember.
Converse View search bar with the search-type dropdown open, showing Chats, Name, and Record options.
Fig 19
  1. Select Record to search within an object by record name, then open the chat console to start a conversation.
Converse View search bar set to Record, with Contact chosen as the object and Kristy entered as the search term, showing a matching chat result.
Fig 20

Note

To learn more about how the chat console works, see the Chat console document.

Was this helpful?
← PreviousStay Ahead with the MiniChat Console Next →Filter Messages in Converse View for Bulk Jobs