Docs/Chat console & conversations/Set up mobile notifications in Salesforce

Set up mobile notifications in Salesforce

ValueText can send a mobile notification for every inbound message in two ways: by enabling a checkbox in ValueText Setup, or by building a Flow that creates a Salesforce custom notification. Use the checkbox if you can. The Flow method is the older process, kept here for orgs still on it.

Last updated 28 Nov 2025

Enable notifications from ValueText Setup

This option needs ValueText package version 1.298 or later. If you are on an older version, install the latest package first.

Open the ValueText Setup tab. In step 1, check Enable salesforce custom notifications.
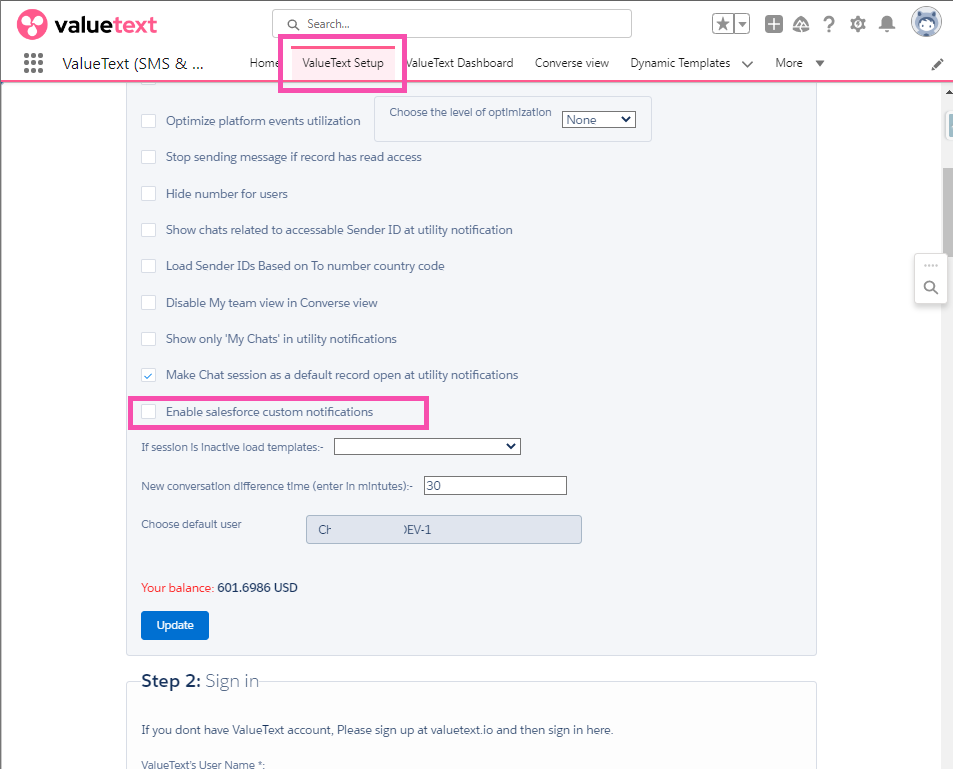
ValueText Setup tab in Salesforce with the
Fig 01

Build the trigger flow (older packages)

If your package predates 1.298, set up mobile notifications with a Flow instead.

  1. Open Setup. In Salesforce, click Setup from the gear icon in the top right.
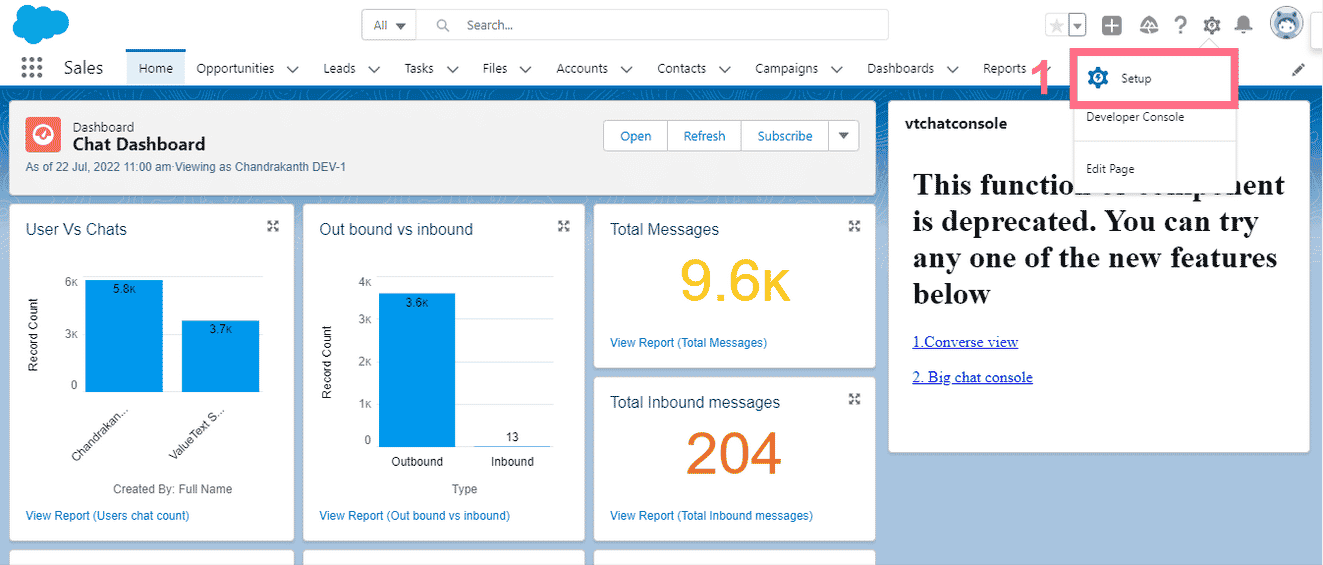
    Salesforce Sales app home page with the Setup gear icon highlighted in the top-right corner of the navigation bar.
    Fig 02
  2. Create a new flow. Search for Flows in Quick Find, open Flows under Process Automation, then click New Flow.
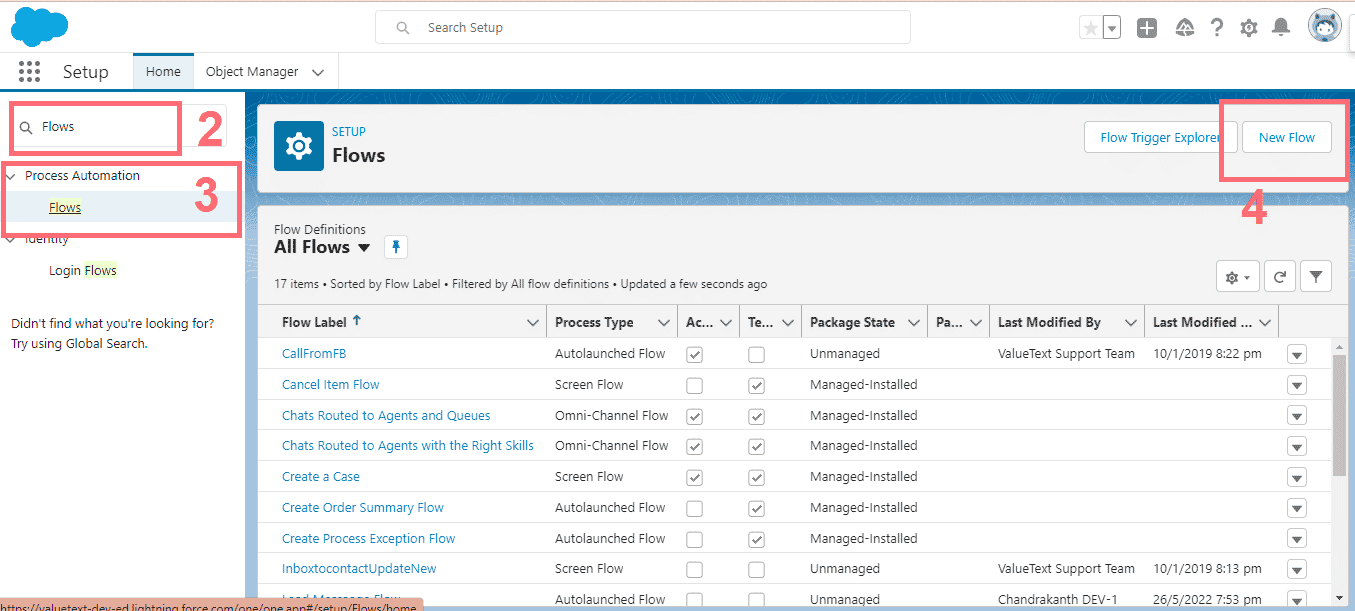
    Salesforce Setup page with
    Fig 03
  3. Choose the flow type. A popup opens to choose the flow type. Select Record-Triggered Flow and click Create.
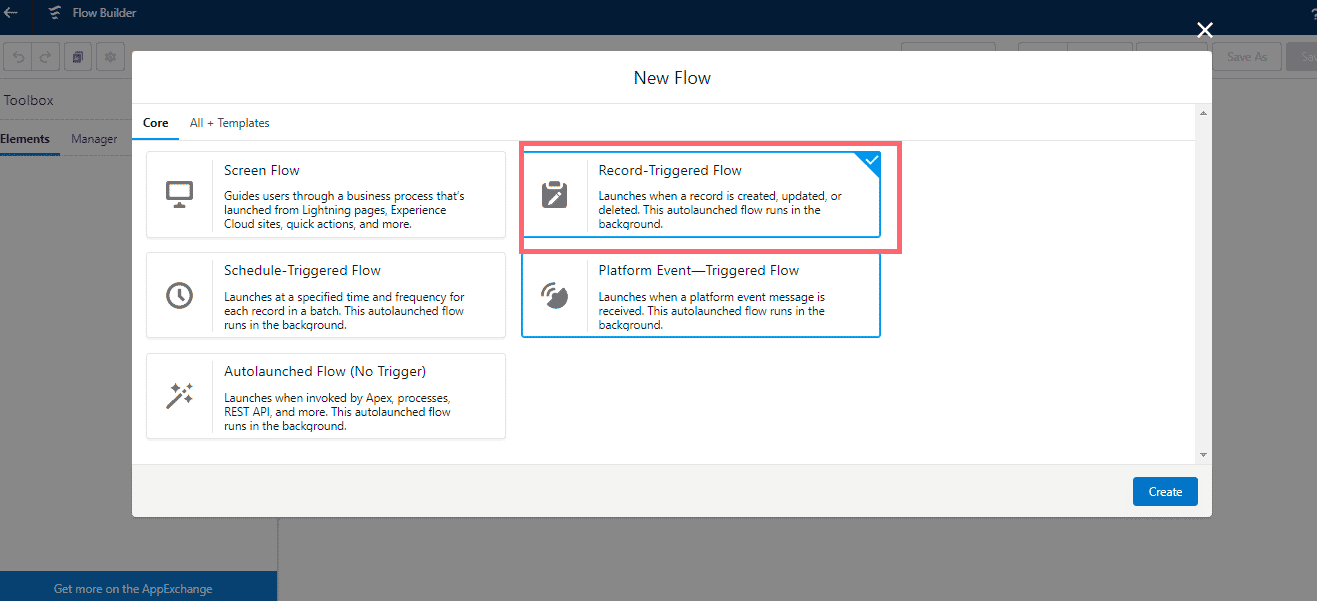
    New Flow popup in Flow Builder with the Record-Triggered Flow type selected, alongside Screen Flow, Schedule-Triggered Flow, and Platform Event-Triggered Flow, and the Create button visible.
    Fig 04
  4. Configure the trigger. Choose an object and set the entry conditions:
    • Object: Message Bucket.
    • Trigger the flow when: A record is created.
    • Entry conditions: Type equal to "Inbound", Related User not equal to null.

    Click Done.
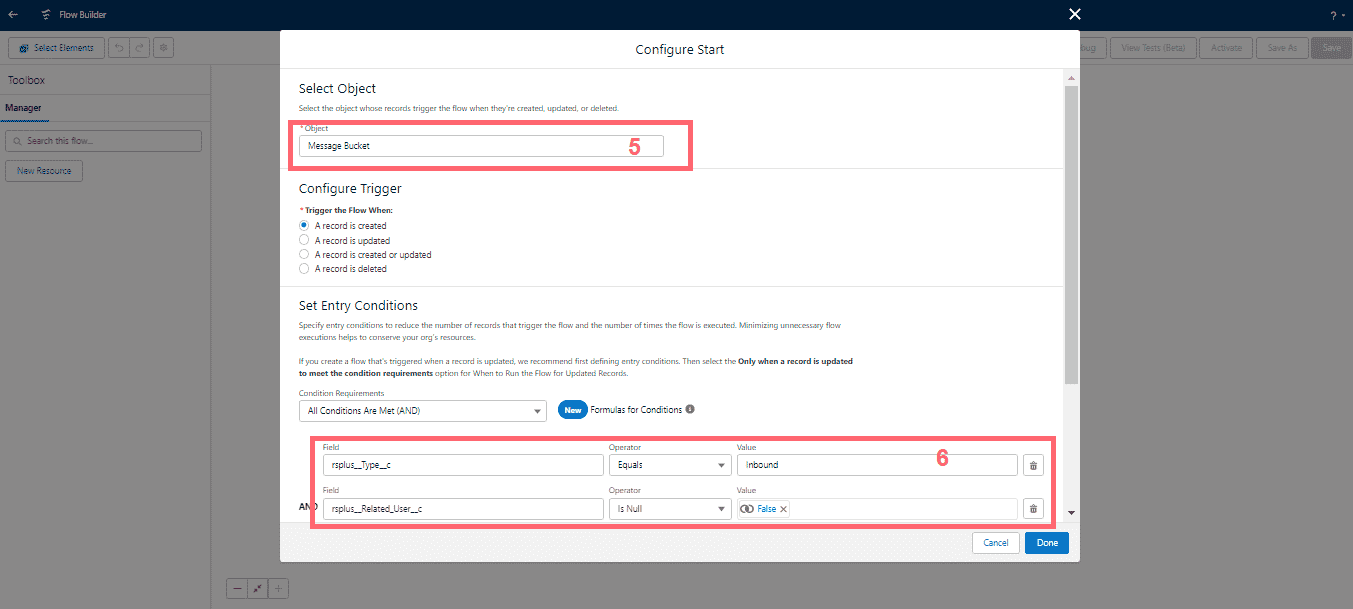
    Flow Builder's Configure Start screen with Message Bucket selected as the object,
    Fig 05
  5. Create a resource variable. Add a new resource with the data type set to a collection, so it can hold the record's related user.
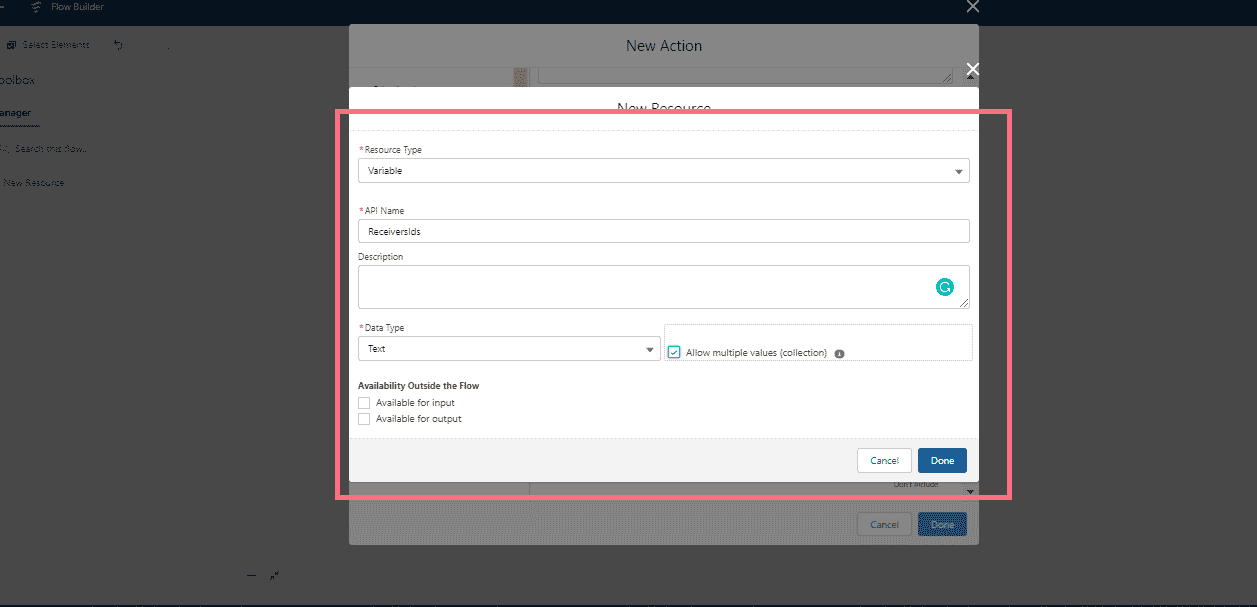
    New Resource dialog in Flow Builder with Resource Type set to Variable, API Name set to ReceiversIds, Data Type set to Text, and
    Fig 06
  6. Assign the related user. Add an Assignment element that adds the record's related user to the resource variable.
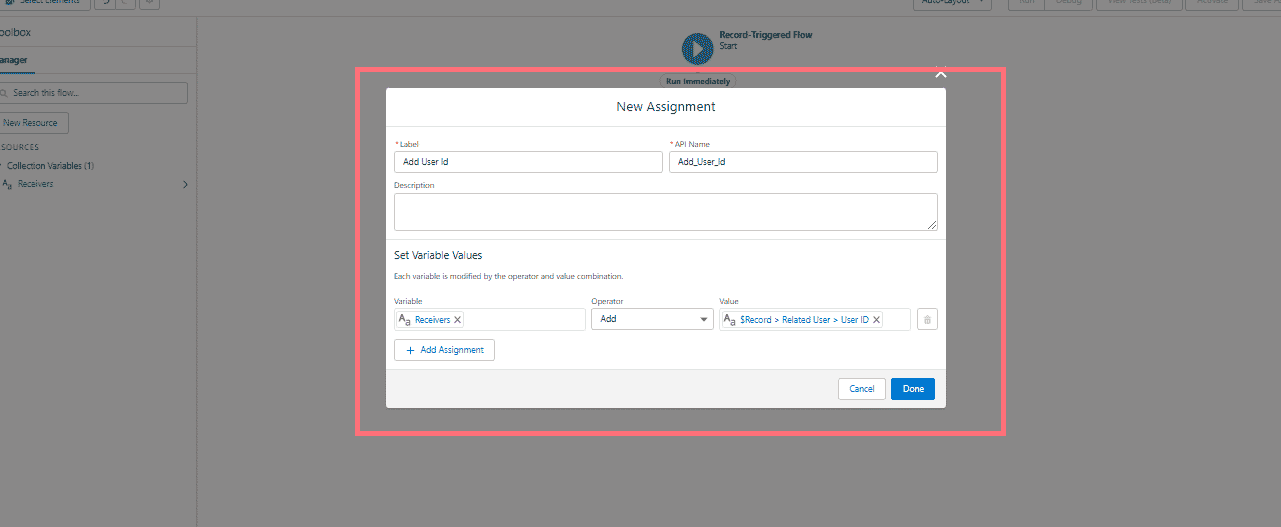
    New Assignment dialog in Flow Builder labeled Add User Id, adding the value $Record > Related User > User ID to the Receivers collection variable.
    Fig 07

Send a custom notification from the flow

Add an Action element and choose the custom notifications action. If you don't already have a custom notification type to send, see Salesforce's Create Custom Notification in Salesforce article first.

Create the custom notification type

Create a new notification in Salesforce.
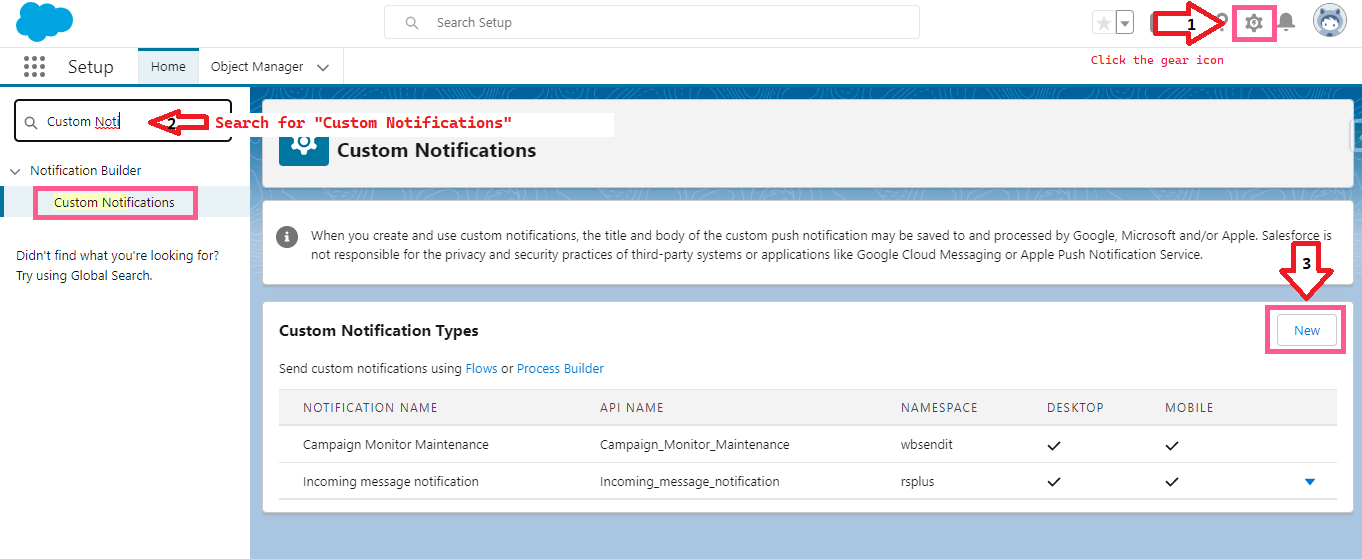
Salesforce Setup page for Custom Notifications, with the gear icon, the Custom Notifications search result, and the New button highlighted, and an existing
Fig 08

Click New, create a Custom Notification Type (for example, "Incoming message notification"), then click Save.
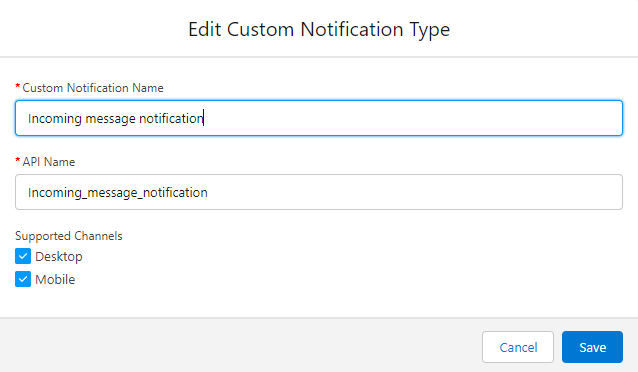
Edit Custom Notification Type dialog with Custom Notification Name set to
Fig 09

Find the notification type Id

Open the Developer Console and run this query:

sql
SELECT id, MasterLabel FROM CustomNotificationType WHERE MasterLabel = 'Incoming message notification'

If you changed the name in the step above, or already had a custom notification type created, use that name in the query instead. Copy the returned Id.

Developer Console query editor showing the SOQL statement SELECT id, MasterLabel FROM CustomNotificationType WHERE MasterLabel ='Incoming message notification', with the returned Id 0ML0I000000GmaiWAC highlighted to copy.
Fig 10

Set the flow action's input values

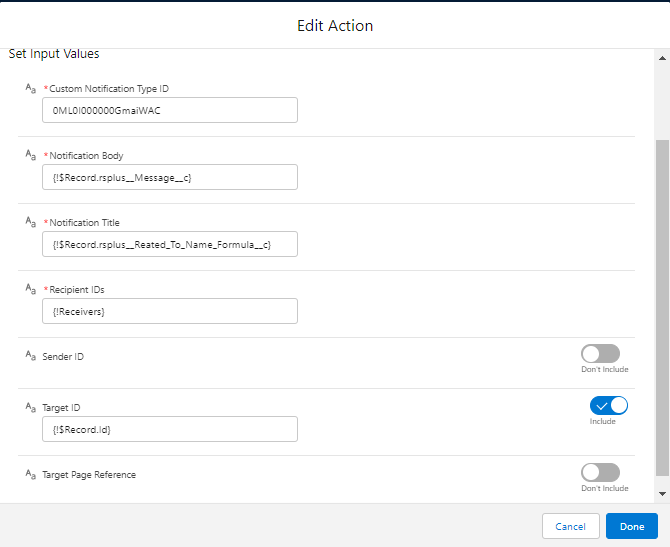
Set the following input values on the flow action:

  • Custom Notification Type ID: paste the Id you copied (for example, 0ML0I000000GmaiWAC).
  • Notification Body: choose a message field from the record (for example, {!$Record.rsplus__Message__c}).
  • Notification Title: choose rsplus__Reated_To_Name_Formula__c from the record.
  • Recipient IDs: choose the resource variable you created.
  • Target ID: use the record Id.
Edit Action dialog for the flow's Notifications action, with Custom Notification Type ID, Notification Body, Notification Title, and Recipient IDs filled in, and Target ID toggled to Include.
Fig 11

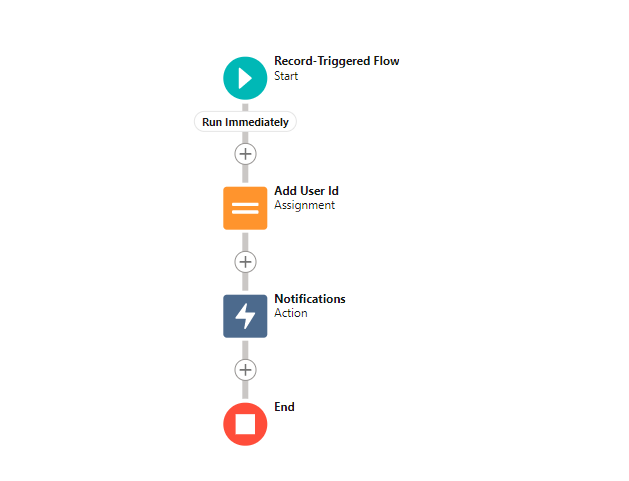
The finished flow

Flow Builder canvas showing the completed Record-Triggered Flow, with Add User Id (Assignment) and Notifications (Action) elements running immediately between Start and End.
Fig 12

Custom notification limits

  • You can create up to 500 custom notification types.
  • Each notification can have up to 10,000 recipients. To reach more users, add another action to the same flow (or the same process in Process Builder).
  • Your org keeps the most recent 1 million custom notifications for view in notification trays. It can hold up to 1.2 million before it trims down to the most recent 1 million.
  • An org can execute up to 10,000 notification actions per hour. Once you exceed that limit, no more notifications send until the next hour, and the excess is lost. For example, if 10,250 notification actions trigger between 4:00 and 5:00, Salesforce sends the first 10,000 and drops the remaining 250. Notifications resume at 5:01.
  • Custom notification title and body fields support plain text only.

Reference: Salesforce's Custom Notification Considerations.

Was this helpful?
← PreviousChat Sessions in ValueText Next →Set up ValueText notifications in the Utility Bar
Docs/Chat console & conversations/Set up mobile notifications in Salesforce

Set up mobile notifications in Salesforce

ValueText can send a mobile notification for every inbound message in two ways: by enabling a checkbox in ValueText Setup, or by building a Flow that creates a Salesforce custom notification. Use the checkbox if you can. The Flow method is the older process, kept here for orgs still on it.

Last updated 28 Nov 2025

Enable notifications from ValueText Setup

This option needs ValueText package version 1.298 or later. If you are on an older version, install the latest package first.

Open the ValueText Setup tab. In step 1, check Enable salesforce custom notifications.

ValueText Setup tab in Salesforce with the
Fig 01

Build the trigger flow (older packages)

If your package predates 1.298, set up mobile notifications with a Flow instead.

  1. Open Setup. In Salesforce, click Setup from the gear icon in the top right.
    Salesforce Sales app home page with the Setup gear icon highlighted in the top-right corner of the navigation bar.
    Fig 02
  2. Create a new flow. Search for Flows in Quick Find, open Flows under Process Automation, then click New Flow.
    Salesforce Setup page with
    Fig 03
  3. Choose the flow type. A popup opens to choose the flow type. Select Record-Triggered Flow and click Create.
    New Flow popup in Flow Builder with the Record-Triggered Flow type selected, alongside Screen Flow, Schedule-Triggered Flow, and Platform Event-Triggered Flow, and the Create button visible.
    Fig 04
  4. Configure the trigger. Choose an object and set the entry conditions:
    • Object: Message Bucket.
    • Trigger the flow when: A record is created.
    • Entry conditions: Type equal to "Inbound", Related User not equal to null.

    Click Done.

    Flow Builder's Configure Start screen with Message Bucket selected as the object,
    Fig 05
  5. Create a resource variable. Add a new resource with the data type set to a collection, so it can hold the record's related user.
    New Resource dialog in Flow Builder with Resource Type set to Variable, API Name set to ReceiversIds, Data Type set to Text, and
    Fig 06
  6. Assign the related user. Add an Assignment element that adds the record's related user to the resource variable.
    New Assignment dialog in Flow Builder labeled Add User Id, adding the value $Record > Related User > User ID to the Receivers collection variable.
    Fig 07

Send a custom notification from the flow

Add an Action element and choose the custom notifications action. If you don't already have a custom notification type to send, see Salesforce's Create Custom Notification in Salesforce article first.

Create the custom notification type

Create a new notification in Salesforce.

Salesforce Setup page for Custom Notifications, with the gear icon, the Custom Notifications search result, and the New button highlighted, and an existing
Fig 08

Click New, create a Custom Notification Type (for example, "Incoming message notification"), then click Save.

Edit Custom Notification Type dialog with Custom Notification Name set to
Fig 09

Find the notification type Id

Open the Developer Console and run this query:

sql
SELECT id, MasterLabel FROM CustomNotificationType WHERE MasterLabel = 'Incoming message notification'

If you changed the name in the step above, or already had a custom notification type created, use that name in the query instead. Copy the returned Id.

Developer Console query editor showing the SOQL statement SELECT id, MasterLabel FROM CustomNotificationType WHERE MasterLabel ='Incoming message notification', with the returned Id 0ML0I000000GmaiWAC highlighted to copy.
Fig 10

Set the flow action's input values

Set the following input values on the flow action:

  • Custom Notification Type ID: paste the Id you copied (for example, 0ML0I000000GmaiWAC).
  • Notification Body: choose a message field from the record (for example, {!$Record.rsplus__Message__c}).
  • Notification Title: choose rsplus__Reated_To_Name_Formula__c from the record.
  • Recipient IDs: choose the resource variable you created.
  • Target ID: use the record Id.
Edit Action dialog for the flow's Notifications action, with Custom Notification Type ID, Notification Body, Notification Title, and Recipient IDs filled in, and Target ID toggled to Include.
Fig 11

The finished flow

Flow Builder canvas showing the completed Record-Triggered Flow, with Add User Id (Assignment) and Notifications (Action) elements running immediately between Start and End.
Fig 12

Custom notification limits

  • You can create up to 500 custom notification types.
  • Each notification can have up to 10,000 recipients. To reach more users, add another action to the same flow (or the same process in Process Builder).
  • Your org keeps the most recent 1 million custom notifications for view in notification trays. It can hold up to 1.2 million before it trims down to the most recent 1 million.
  • An org can execute up to 10,000 notification actions per hour. Once you exceed that limit, no more notifications send until the next hour, and the excess is lost. For example, if 10,250 notification actions trigger between 4:00 and 5:00, Salesforce sends the first 10,000 and drops the remaining 250. Notifications resume at 5:01.
  • Custom notification title and body fields support plain text only.

Reference: Salesforce's Custom Notification Considerations.

Was this helpful?
← PreviousChat Sessions in ValueText Next →Set up ValueText notifications in the Utility Bar
Docs/Chat console & conversations/Set up mobile notifications in Salesforce

Set up mobile notifications in Salesforce

ValueText can send a mobile notification for every inbound message in two ways: by enabling a checkbox in ValueText Setup, or by building a Flow that creates a Salesforce custom notification. Use the checkbox if you can. The Flow method is the older process, kept here for orgs still on it.

Last updated 28 Nov 2025

Enable notifications from ValueText Setup

This option needs ValueText package version 1.298 or later. If you are on an older version, install the latest package first.

Open the ValueText Setup tab. In step 1, check Enable salesforce custom notifications.

ValueText Setup tab in Salesforce with the
Fig 01

Build the trigger flow (older packages)

If your package predates 1.298, set up mobile notifications with a Flow instead.

  1. Open Setup. In Salesforce, click Setup from the gear icon in the top right.
    Salesforce Sales app home page with the Setup gear icon highlighted in the top-right corner of the navigation bar.
    Fig 02
  2. Create a new flow. Search for Flows in Quick Find, open Flows under Process Automation, then click New Flow.
    Salesforce Setup page with
    Fig 03
  3. Choose the flow type. A popup opens to choose the flow type. Select Record-Triggered Flow and click Create.
    New Flow popup in Flow Builder with the Record-Triggered Flow type selected, alongside Screen Flow, Schedule-Triggered Flow, and Platform Event-Triggered Flow, and the Create button visible.
    Fig 04
  4. Configure the trigger. Choose an object and set the entry conditions:
    • Object: Message Bucket.
    • Trigger the flow when: A record is created.
    • Entry conditions: Type equal to "Inbound", Related User not equal to null.

    Click Done.

    Flow Builder's Configure Start screen with Message Bucket selected as the object,
    Fig 05
  5. Create a resource variable. Add a new resource with the data type set to a collection, so it can hold the record's related user.
    New Resource dialog in Flow Builder with Resource Type set to Variable, API Name set to ReceiversIds, Data Type set to Text, and
    Fig 06
  6. Assign the related user. Add an Assignment element that adds the record's related user to the resource variable.
    New Assignment dialog in Flow Builder labeled Add User Id, adding the value $Record > Related User > User ID to the Receivers collection variable.
    Fig 07

Send a custom notification from the flow

Add an Action element and choose the custom notifications action. If you don't already have a custom notification type to send, see Salesforce's Create Custom Notification in Salesforce article first.

Create the custom notification type

Create a new notification in Salesforce.

Salesforce Setup page for Custom Notifications, with the gear icon, the Custom Notifications search result, and the New button highlighted, and an existing
Fig 08

Click New, create a Custom Notification Type (for example, "Incoming message notification"), then click Save.

Edit Custom Notification Type dialog with Custom Notification Name set to
Fig 09

Find the notification type Id

Open the Developer Console and run this query:

sql
SELECT id, MasterLabel FROM CustomNotificationType WHERE MasterLabel = 'Incoming message notification'

If you changed the name in the step above, or already had a custom notification type created, use that name in the query instead. Copy the returned Id.

Developer Console query editor showing the SOQL statement SELECT id, MasterLabel FROM CustomNotificationType WHERE MasterLabel ='Incoming message notification', with the returned Id 0ML0I000000GmaiWAC highlighted to copy.
Fig 10

Set the flow action's input values

Set the following input values on the flow action:

  • Custom Notification Type ID: paste the Id you copied (for example, 0ML0I000000GmaiWAC).
  • Notification Body: choose a message field from the record (for example, {!$Record.rsplus__Message__c}).
  • Notification Title: choose rsplus__Reated_To_Name_Formula__c from the record.
  • Recipient IDs: choose the resource variable you created.
  • Target ID: use the record Id.
Edit Action dialog for the flow's Notifications action, with Custom Notification Type ID, Notification Body, Notification Title, and Recipient IDs filled in, and Target ID toggled to Include.
Fig 11

The finished flow

Flow Builder canvas showing the completed Record-Triggered Flow, with Add User Id (Assignment) and Notifications (Action) elements running immediately between Start and End.
Fig 12

Custom notification limits

  • You can create up to 500 custom notification types.
  • Each notification can have up to 10,000 recipients. To reach more users, add another action to the same flow (or the same process in Process Builder).
  • Your org keeps the most recent 1 million custom notifications for view in notification trays. It can hold up to 1.2 million before it trims down to the most recent 1 million.
  • An org can execute up to 10,000 notification actions per hour. Once you exceed that limit, no more notifications send until the next hour, and the excess is lost. For example, if 10,250 notification actions trigger between 4:00 and 5:00, Salesforce sends the first 10,000 and drops the remaining 250. Notifications resume at 5:01.
  • Custom notification title and body fields support plain text only.

Reference: Salesforce's Custom Notification Considerations.

Was this helpful?
← PreviousChat Sessions in ValueText Next →Set up ValueText notifications in the Utility Bar
Docs/Chat console & conversations/Set up mobile notifications in Salesforce

Set up mobile notifications in Salesforce

ValueText can send a mobile notification for every inbound message in two ways: by enabling a checkbox in ValueText Setup, or by building a Flow that creates a Salesforce custom notification. Use the checkbox if you can. The Flow method is the older process, kept here for orgs still on it.

Last updated 28 Nov 2025

Enable notifications from ValueText Setup

This option needs ValueText package version 1.298 or later. If you are on an older version, install the latest package first.

Open the ValueText Setup tab. In step 1, check Enable salesforce custom notifications.

ValueText Setup tab in Salesforce with the
Fig 01

Build the trigger flow (older packages)

If your package predates 1.298, set up mobile notifications with a Flow instead.

  1. Open Setup. In Salesforce, click Setup from the gear icon in the top right.
    Salesforce Sales app home page with the Setup gear icon highlighted in the top-right corner of the navigation bar.
    Fig 02
  2. Create a new flow. Search for Flows in Quick Find, open Flows under Process Automation, then click New Flow.
    Salesforce Setup page with
    Fig 03
  3. Choose the flow type. A popup opens to choose the flow type. Select Record-Triggered Flow and click Create.
    New Flow popup in Flow Builder with the Record-Triggered Flow type selected, alongside Screen Flow, Schedule-Triggered Flow, and Platform Event-Triggered Flow, and the Create button visible.
    Fig 04
  4. Configure the trigger. Choose an object and set the entry conditions:
    • Object: Message Bucket.
    • Trigger the flow when: A record is created.
    • Entry conditions: Type equal to "Inbound", Related User not equal to null.

    Click Done.

    Flow Builder's Configure Start screen with Message Bucket selected as the object,
    Fig 05
  5. Create a resource variable. Add a new resource with the data type set to a collection, so it can hold the record's related user.
    New Resource dialog in Flow Builder with Resource Type set to Variable, API Name set to ReceiversIds, Data Type set to Text, and
    Fig 06
  6. Assign the related user. Add an Assignment element that adds the record's related user to the resource variable.
    New Assignment dialog in Flow Builder labeled Add User Id, adding the value $Record > Related User > User ID to the Receivers collection variable.
    Fig 07

Send a custom notification from the flow

Add an Action element and choose the custom notifications action. If you don't already have a custom notification type to send, see Salesforce's Create Custom Notification in Salesforce article first.

Create the custom notification type

Create a new notification in Salesforce.

Salesforce Setup page for Custom Notifications, with the gear icon, the Custom Notifications search result, and the New button highlighted, and an existing
Fig 08

Click New, create a Custom Notification Type (for example, "Incoming message notification"), then click Save.

Edit Custom Notification Type dialog with Custom Notification Name set to
Fig 09

Find the notification type Id

Open the Developer Console and run this query:

sql
SELECT id, MasterLabel FROM CustomNotificationType WHERE MasterLabel = 'Incoming message notification'

If you changed the name in the step above, or already had a custom notification type created, use that name in the query instead. Copy the returned Id.

Developer Console query editor showing the SOQL statement SELECT id, MasterLabel FROM CustomNotificationType WHERE MasterLabel ='Incoming message notification', with the returned Id 0ML0I000000GmaiWAC highlighted to copy.
Fig 10

Set the flow action's input values

Set the following input values on the flow action:

  • Custom Notification Type ID: paste the Id you copied (for example, 0ML0I000000GmaiWAC).
  • Notification Body: choose a message field from the record (for example, {!$Record.rsplus__Message__c}).
  • Notification Title: choose rsplus__Reated_To_Name_Formula__c from the record.
  • Recipient IDs: choose the resource variable you created.
  • Target ID: use the record Id.
Edit Action dialog for the flow's Notifications action, with Custom Notification Type ID, Notification Body, Notification Title, and Recipient IDs filled in, and Target ID toggled to Include.
Fig 11

The finished flow

Flow Builder canvas showing the completed Record-Triggered Flow, with Add User Id (Assignment) and Notifications (Action) elements running immediately between Start and End.
Fig 12

Custom notification limits

  • You can create up to 500 custom notification types.
  • Each notification can have up to 10,000 recipients. To reach more users, add another action to the same flow (or the same process in Process Builder).
  • Your org keeps the most recent 1 million custom notifications for view in notification trays. It can hold up to 1.2 million before it trims down to the most recent 1 million.
  • An org can execute up to 10,000 notification actions per hour. Once you exceed that limit, no more notifications send until the next hour, and the excess is lost. For example, if 10,250 notification actions trigger between 4:00 and 5:00, Salesforce sends the first 10,000 and drops the remaining 250. Notifications resume at 5:01.
  • Custom notification title and body fields support plain text only.

Reference: Salesforce's Custom Notification Considerations.

Was this helpful?
← PreviousChat Sessions in ValueText Next →Set up ValueText notifications in the Utility Bar