
Docs/Sending messages/Sending a Message from the Chat Console

Sending a Message from the Chat Console

Send messages to any Salesforce record from the Chat Console, then use its built-in tools: auto-reply, scheduling, Quick Text, attachments, emojis, and group chat.

Last updated 28 Nov 2025

Step 1: Open the record with a Chat Console

Open any record detail page that includes the Chat Console, for example the Kristy contact record shown below.
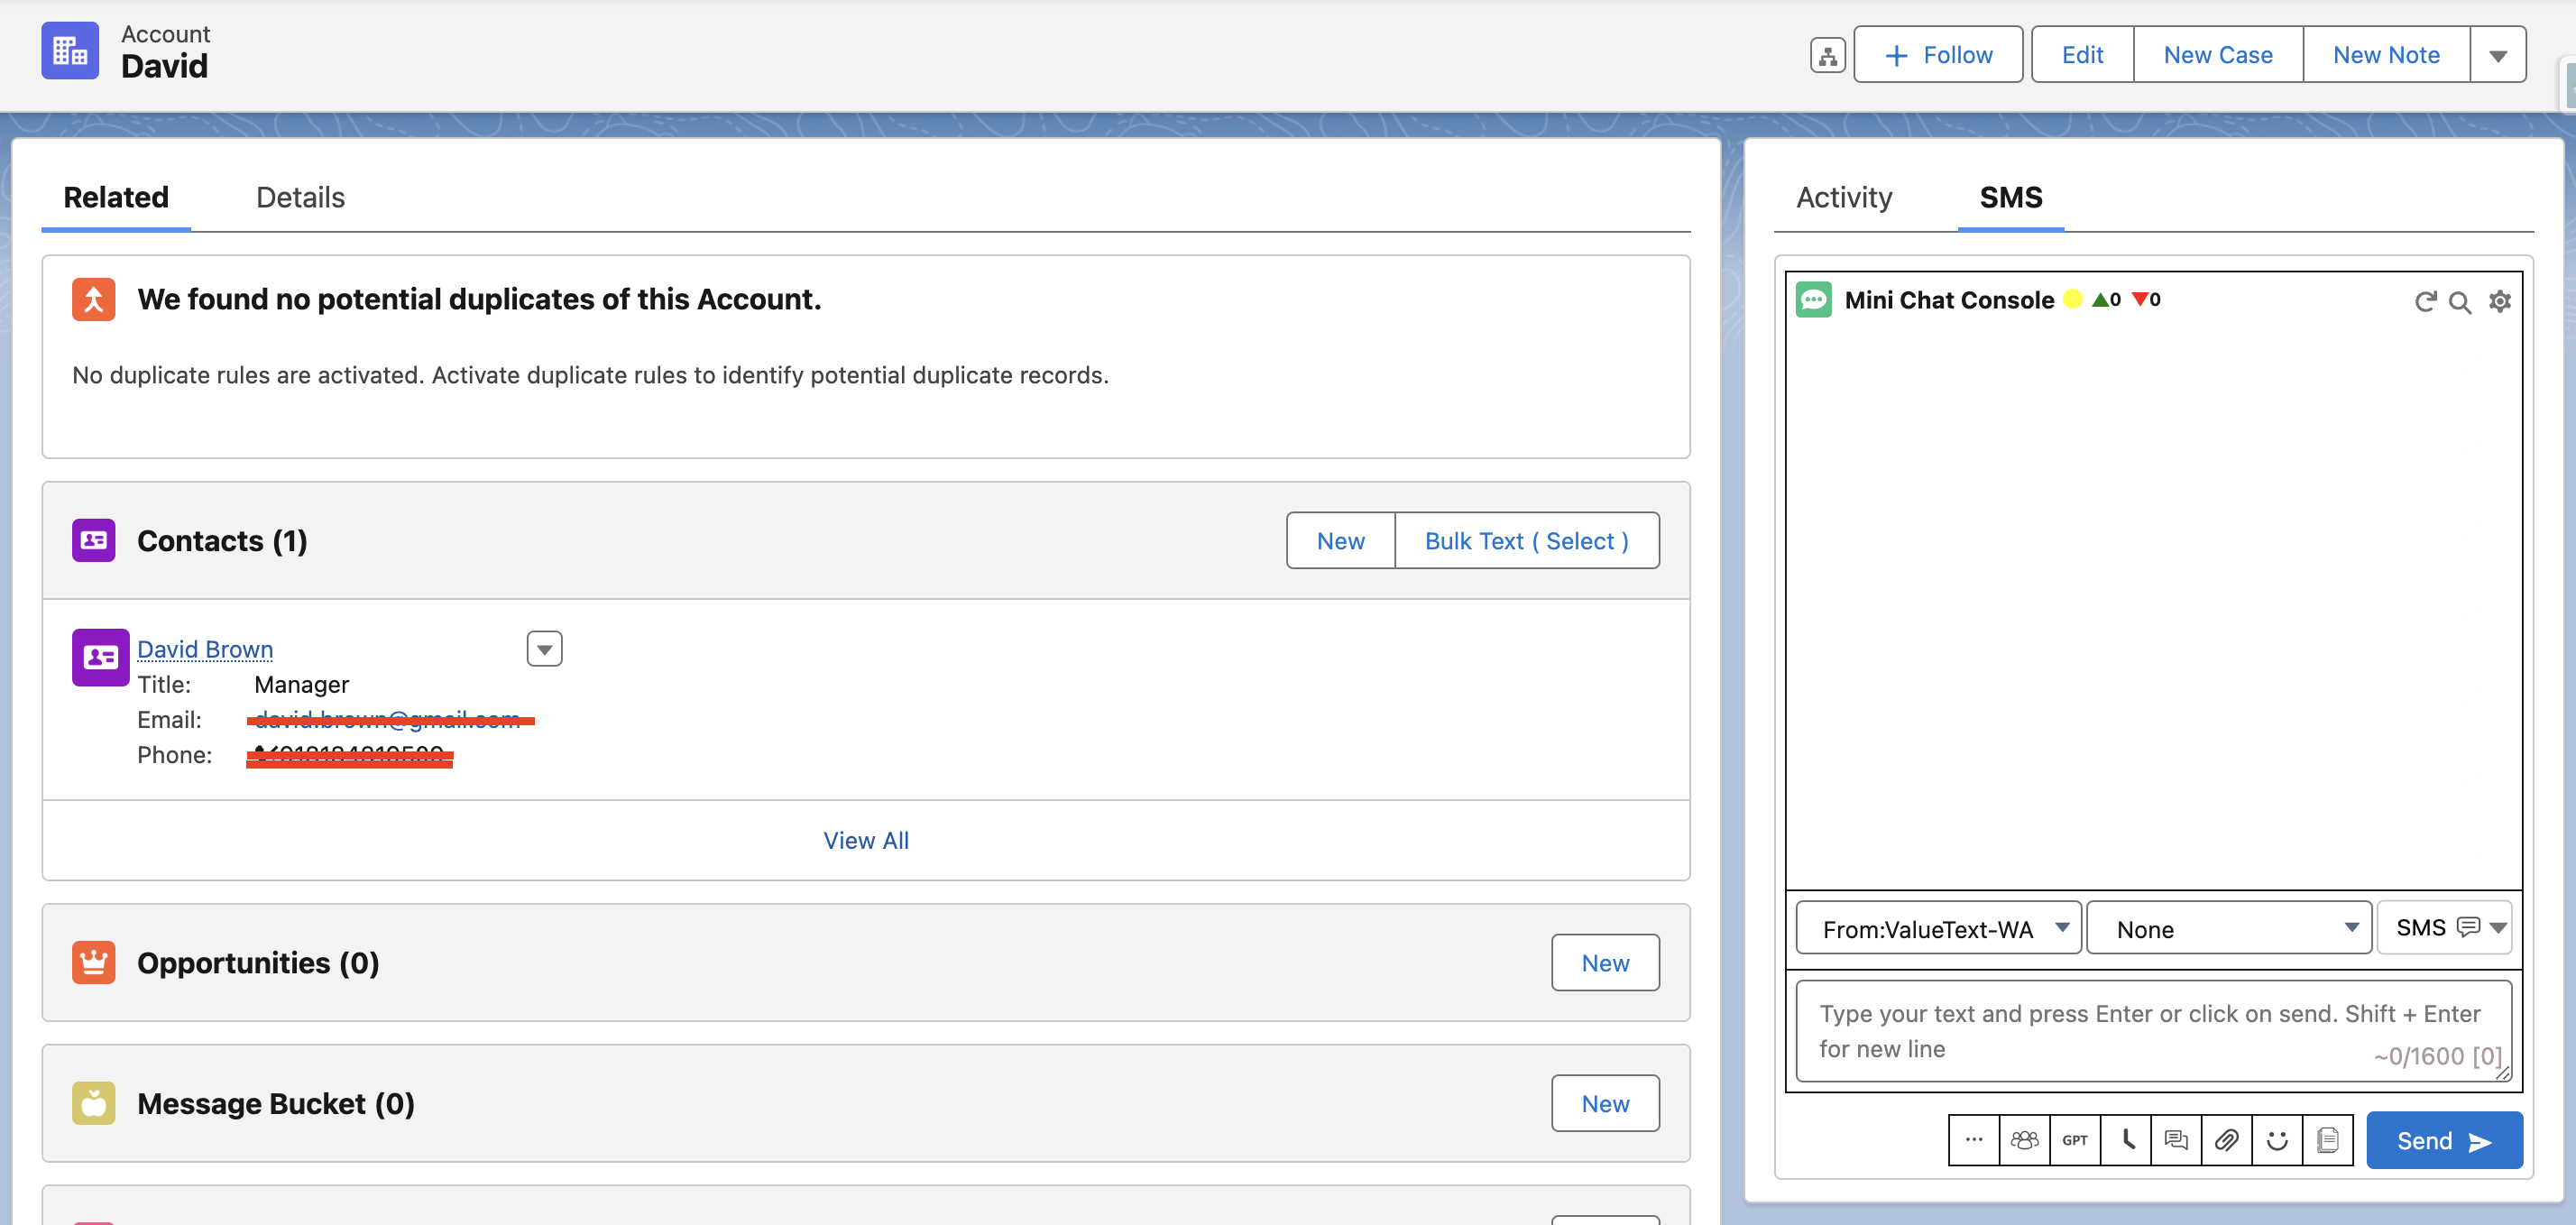
Salesforce Account record page with the Related tab open and the Mini Chat Console panel on the right, showing the SMS tab, a From ValueText-WA field, a To field, and a Send button.
Fig 01

Step 2: Select sender and recipient numbers

Select the From number (Sender ID) and the To number you want to message. The available To numbers are automatically loaded from the phone fields on the record you opened.
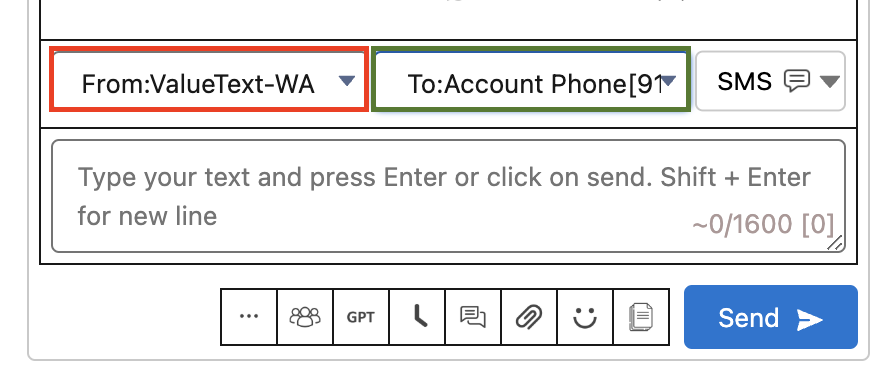
Mini Chat Console with the From ValueText-WA sender field and the To Account Phone recipient field highlighted above the message text box and Send button.
Fig 02

Step 3: Identify inactive sessions

If there has been no incoming message from the user in the last 24 hours, the session is considered inactive. In this case, you must send an approved template to initiate the conversation.
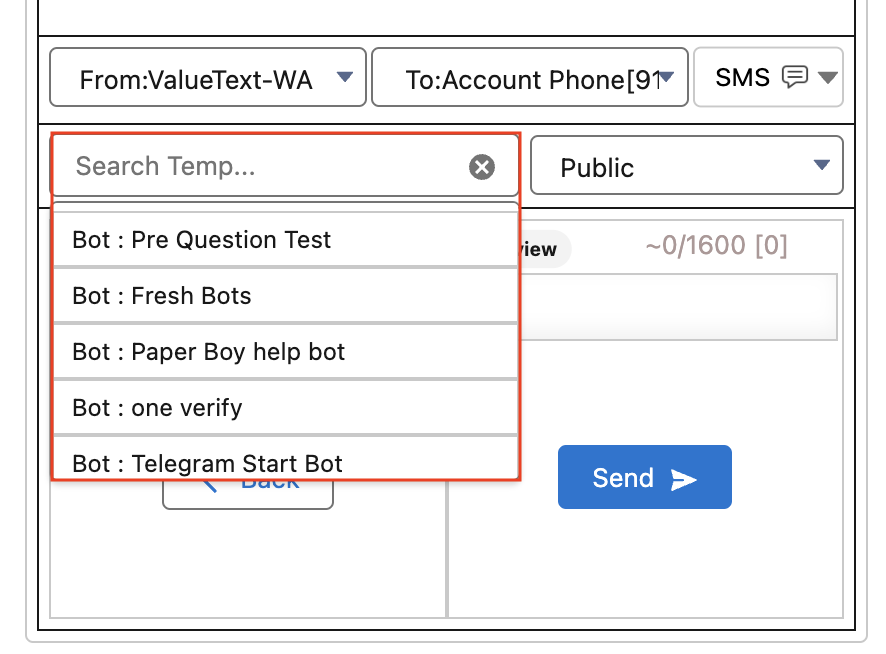
Mini Chat Console template search box with a list of approved templates, such as Bot: Pre Question Test and Bot: Fresh Bots, required to open an inactive session.
Fig 03
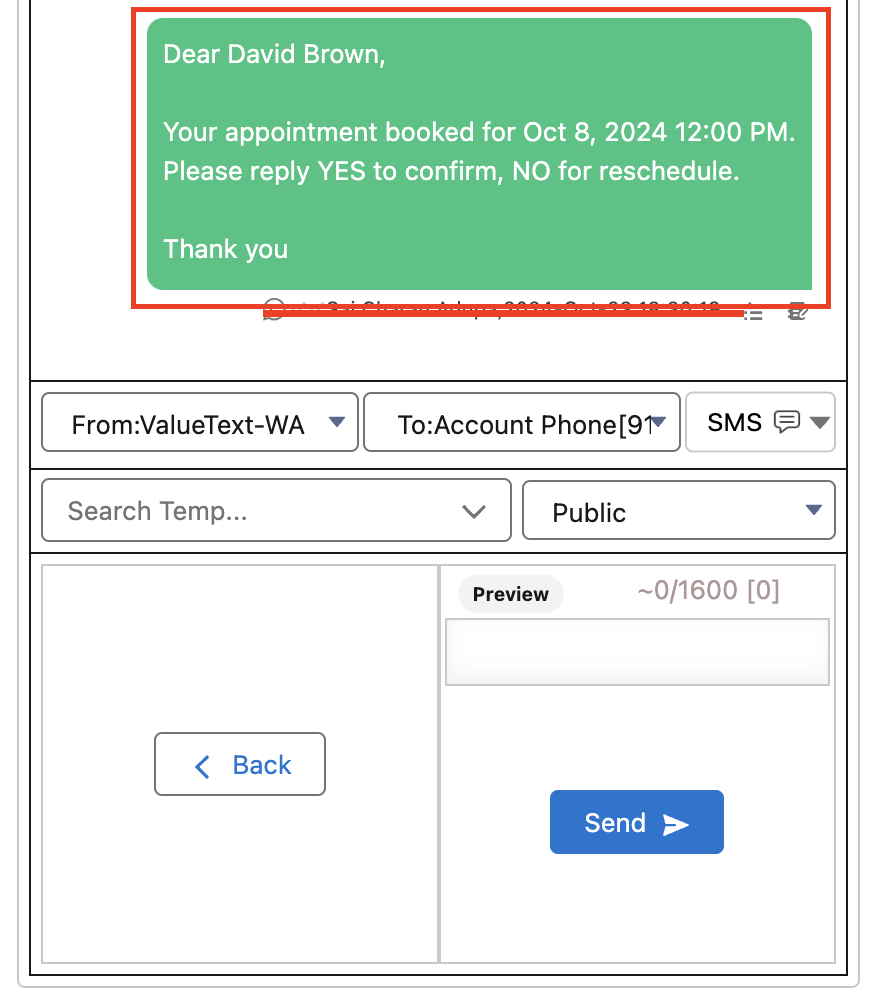
Mini Chat Console showing a preview of an approved template message about a booked appointment, with Back and Send buttons below the From and To fields.
Fig 04

Step 4: Activate the session

Once you send the template and the user replies, the inactive session becomes an active session. You will receive a notification with blinking text saying "New Message."
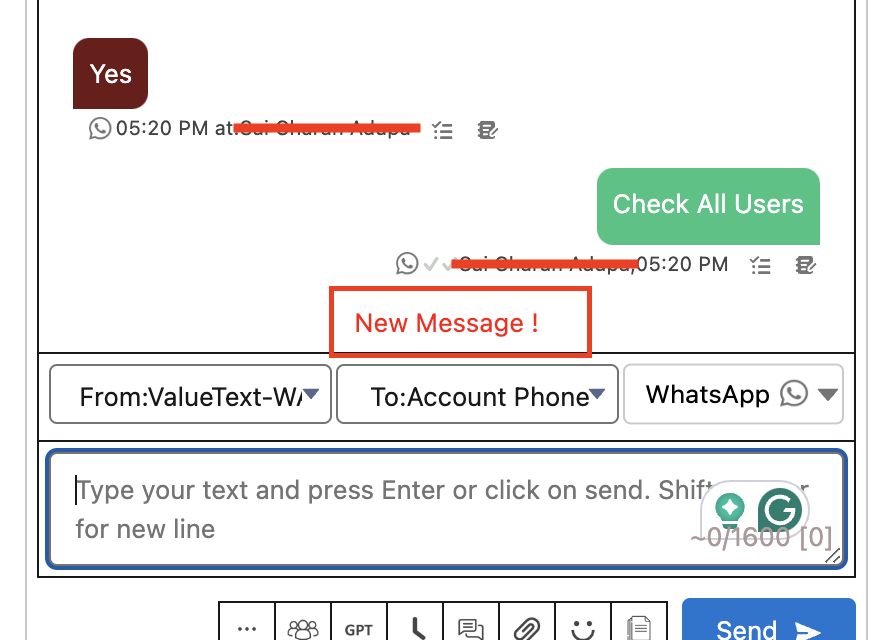
Mini Chat Console with a red New Message alert above the WhatsApp message input, shown after a session becomes active.
Fig 05

Step 5: Send messages in an active session

In an active session, you can send the following:

  • Free text messages
  • Templates
  • Quick Text
  • Emojis

Chat Console features

The Chat Console includes the features described below.

1. Auto-reply

Auto-reply helps send automated messages during non-business hours or when you are out of the office. Clicking the Auto-reply icon opens a configuration popup.

Out of Office Settings

You can define a From date and To date, then choose one of the following actions:

  • Auto reply: automatically sends the reply text you enter in the text box to the user during the out-of-office period.
  • Assign to user: assigns the record for chat handling to one of your colleagues by searching and selecting their name.

Business Hours Settings

Select your company's business hours by searching for them, then enter the reply text that should be sent when a message is received outside business hours.

After completing the setup, click Save. To remove the configuration, click Clear.
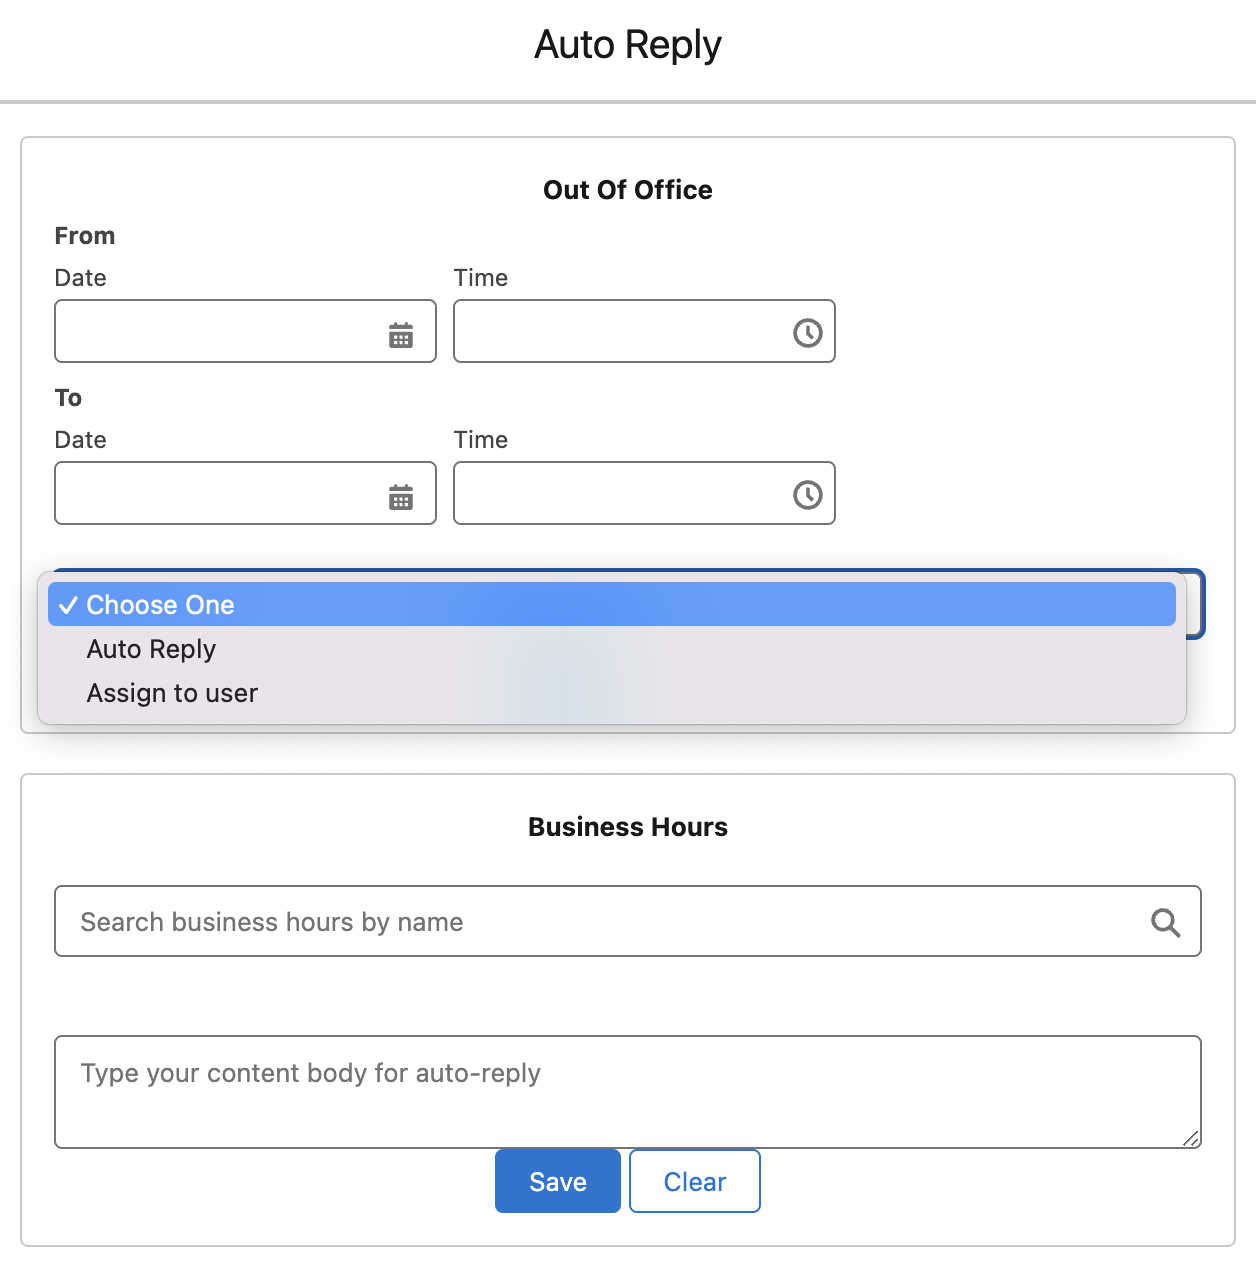
Auto Reply configuration popup with Out of Office From and To date and time fields, a Choose One dropdown for Auto Reply or Assign to user, and a Business Hours section with a business hours search field, a reply text box, and Save and Clear buttons.
Fig 06

2. Enter button enable or disable

Click this icon to enable or disable sending a message using the Enter key.

3. Schedule Message

Click the Schedule Message icon to open the scheduling settings. Select your preferred date and time. The message will be sent automatically at the selected time.
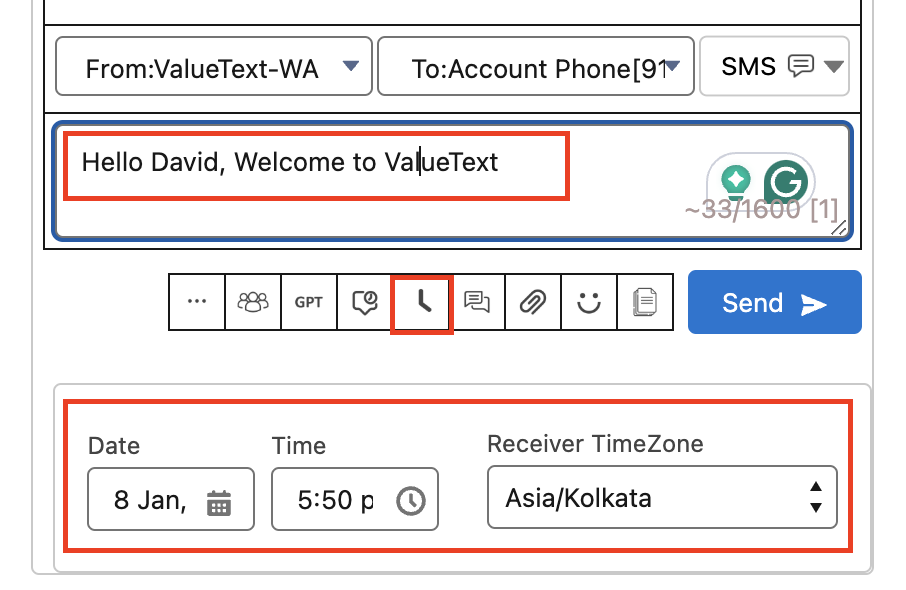
Mini Chat Console with the schedule icon highlighted in the toolbar and the resulting Date, Time, and Receiver Time Zone fields set to 8 Jan, 5:50 PM, and Asia/Kolkata.
Fig 07

4. Chat color

You can customize chat colors separately for inbound and outbound messages.
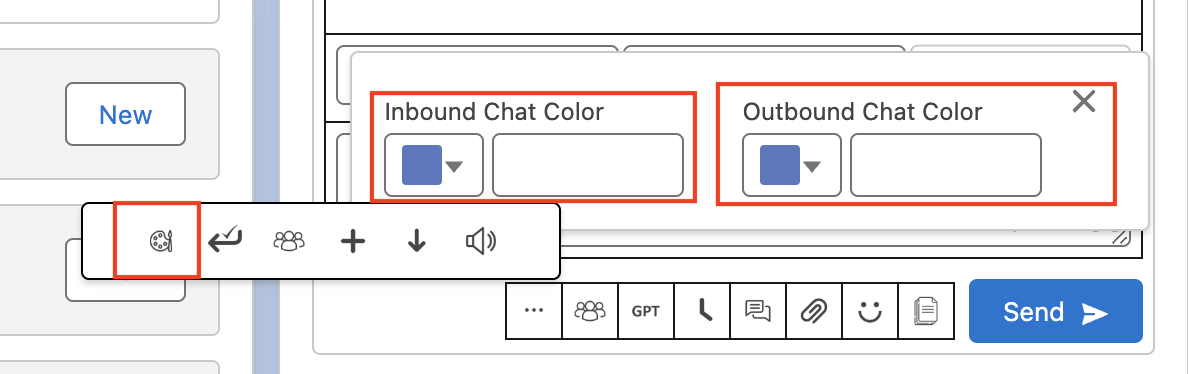
Mini Chat Console color picker popup with separate Inbound Chat Color and Outbound Chat Color swatches, opened from the palette icon in the toolbar.
Fig 08

5. Quick Text

Templates are usually created by Salesforce admins or users with access to template objects. Quick Text, however, can be created by any user for their daily use.

Instead of retyping frequent messages, users can save Quick Text entries and reuse them. Quick Text works like templates, but they are user-specific and owned by the creator.

In the Chat Console:

  • Click the Quick Text button to open the popup view.
  • The left panel displays saved Quick Text entries.
  • Selecting one shows its preview on the right panel.
  • Click the Plus icon to create a new Quick Text.

Quick Text setup for the Chat Console

When creating Quick Text for use in the ValueText Chat Console, the selected channel must be set to WhatsApp.

Note: add a picklist value for the Channel field in the Quick Text object.
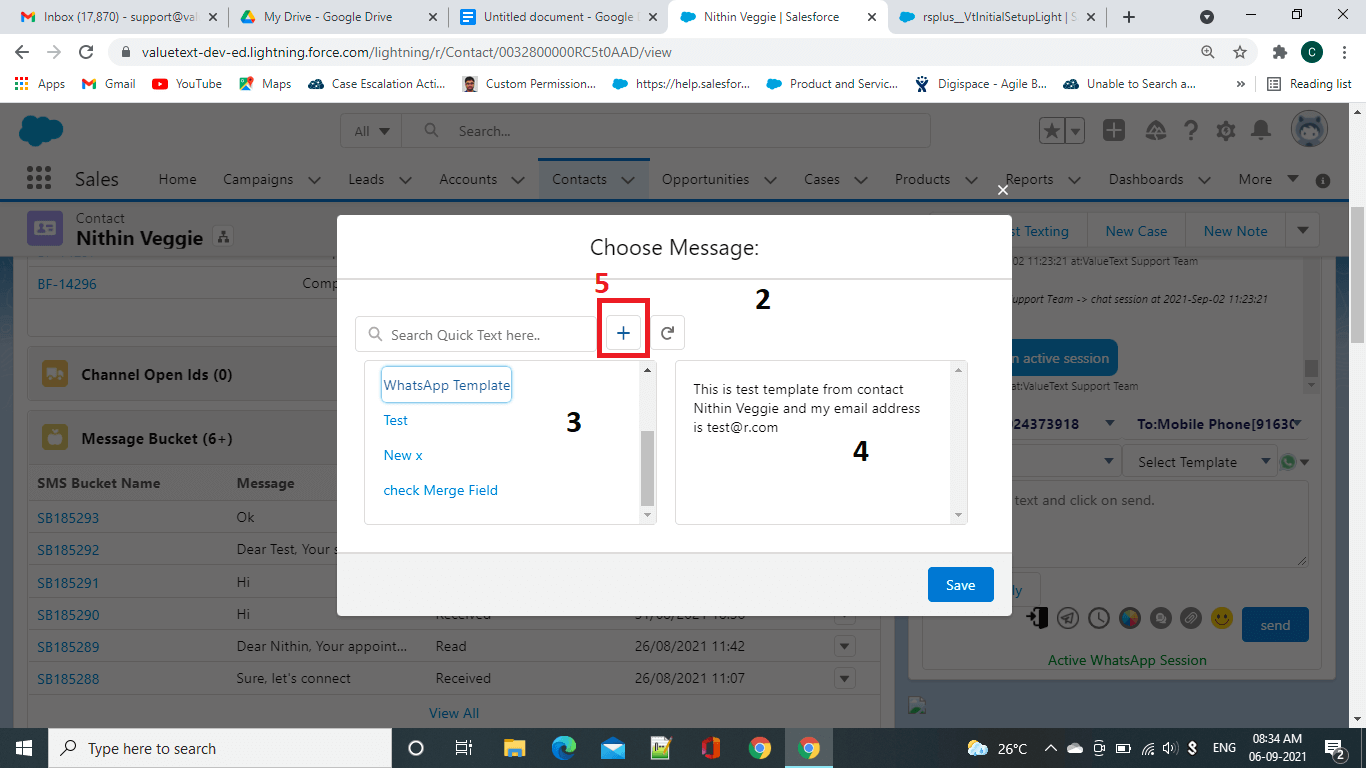
Choose Message popup in the Chat Console with a search field, a Plus icon to create a new Quick Text, a left panel listing saved Quick Text entries, and a preview pane on the right.
Fig 09

You can use merge fields. After configuration, click Save.
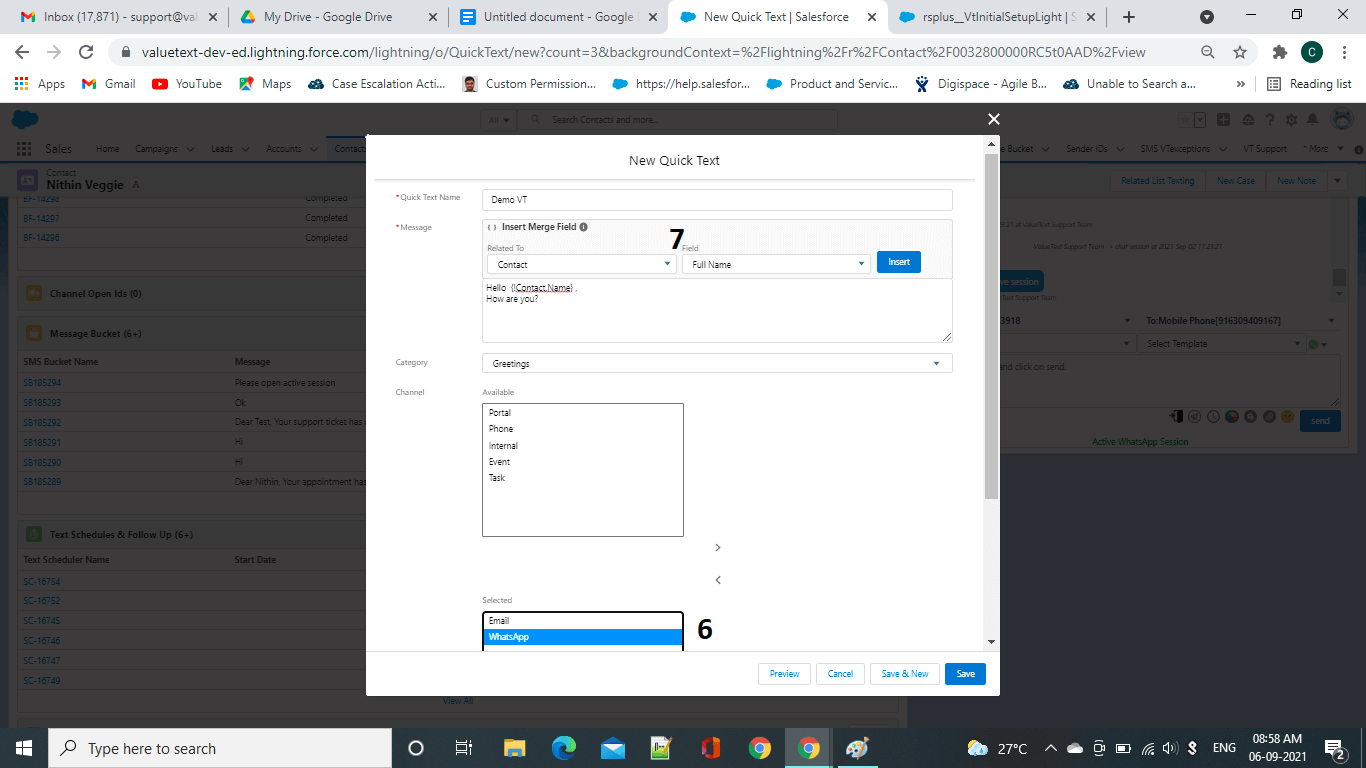
New Quick Text creation screen with the Quick Text Name field, a message box with Insert Merge Field controls, and the Channel picklist with WhatsApp moved into the Selected list.
Fig 10

Sending Quick Text

  • Select a Quick Text entry from the left panel and click Save.
  • The text appears in the chat input box.
  • Click Send to deliver the message to the recipient.
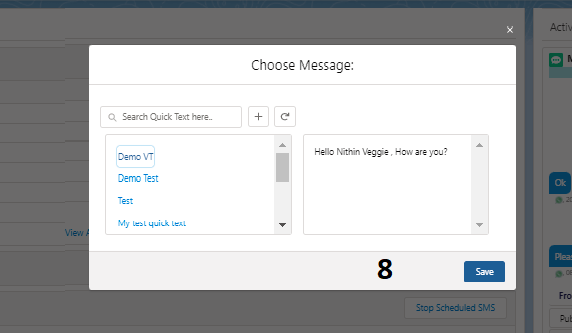
Choose Message popup with a Quick Text entry selected, its preview text shown on the right, and a Save button to load it into the chat input box.
Fig 11

6. Attachments

Click the attachment icon to upload and send files. You can also record an audio message and send it directly from the console.
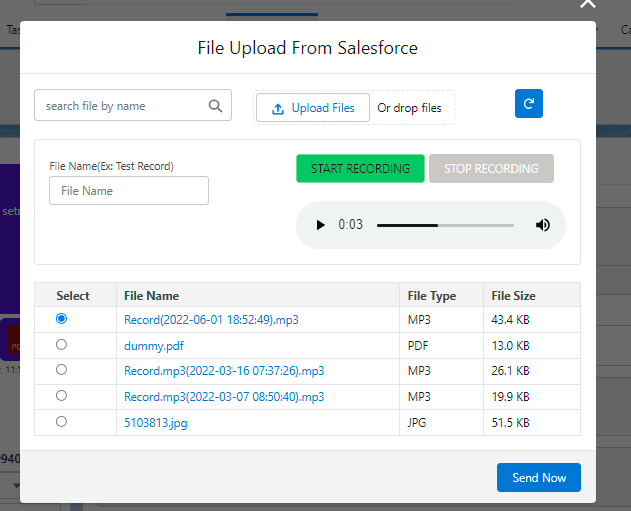
File Upload From Salesforce dialog with a file search box, an Upload Files button, audio recording controls, a list of uploaded files with type and size, and a Send Now button.
Fig 12

7. Emojis

Click the emoji icon and select emojis to include in your message.
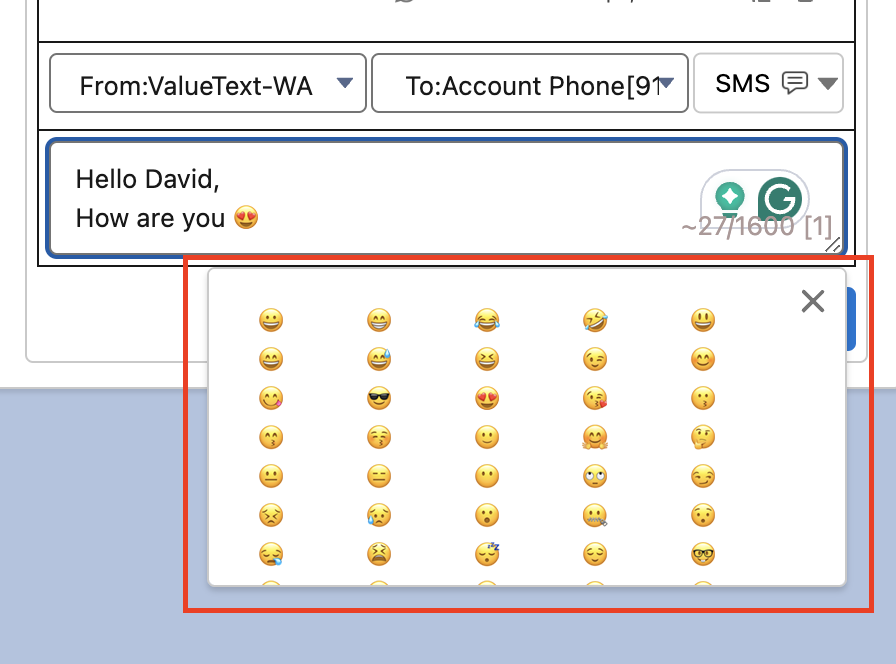
Mini Chat Console message box with an emoji already inserted in the draft text and the emoji picker grid open below it.
Fig 13

8. Download chat

You can download the chat history currently loaded in the Chat Console as an XLS file.

9. Sound on or off

Use this icon to enable or disable sound notifications for incoming messages.

10. Group Chat

Click the Group Chat button to start a group chat. This feature allows you and up to two colleagues to chat with a customer simultaneously.

You can invite colleagues by searching for their names and sending a request. Once they accept, all participants can chat with the customer.
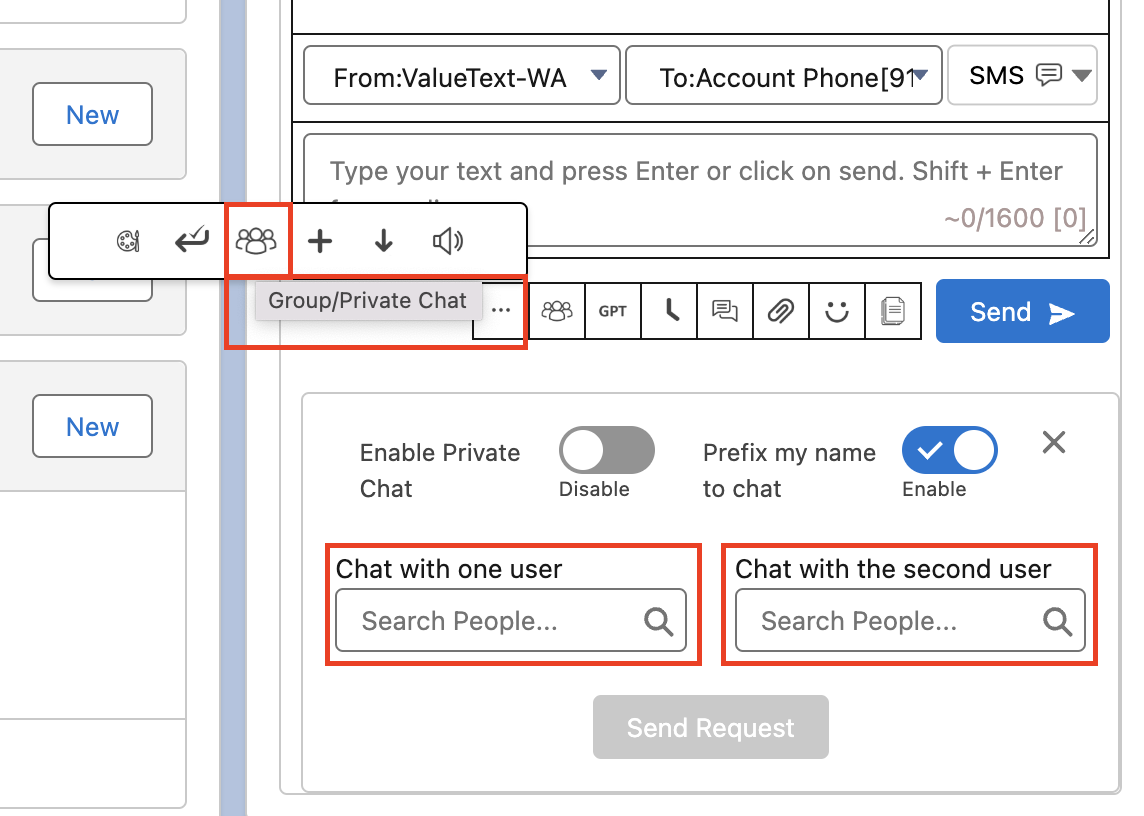
Mini Chat Console Group/Private Chat panel with Enable Private Chat and Prefix my name to chat toggles, plus two search fields to invite colleagues and a Send Request button.
Fig 14
Was this helpful?
← PreviousDisable a Phone Field in Salesforce Next →Bulk Messaging in Salesforce
Docs/Sending messages/Sending a Message from the Chat Console

Sending a Message from the Chat Console

Send messages to any Salesforce record from the Chat Console, then use its built-in tools: auto-reply, scheduling, Quick Text, attachments, emojis, and group chat.

Last updated 28 Nov 2025

Step 1: Open the record with a Chat Console

Open any record detail page that includes the Chat Console, for example the Kristy contact record shown below.

Salesforce Account record page with the Related tab open and the Mini Chat Console panel on the right, showing the SMS tab, a From ValueText-WA field, a To field, and a Send button.
Fig 01

Step 2: Select sender and recipient numbers

Select the From number (Sender ID) and the To number you want to message. The available To numbers are automatically loaded from the phone fields on the record you opened.

Mini Chat Console with the From ValueText-WA sender field and the To Account Phone recipient field highlighted above the message text box and Send button.
Fig 02

Step 3: Identify inactive sessions

If there has been no incoming message from the user in the last 24 hours, the session is considered inactive. In this case, you must send an approved template to initiate the conversation.

Mini Chat Console template search box with a list of approved templates, such as Bot: Pre Question Test and Bot: Fresh Bots, required to open an inactive session.
Fig 03
Mini Chat Console showing a preview of an approved template message about a booked appointment, with Back and Send buttons below the From and To fields.
Fig 04

Step 4: Activate the session

Once you send the template and the user replies, the inactive session becomes an active session. You will receive a notification with blinking text saying "New Message."

Mini Chat Console with a red New Message alert above the WhatsApp message input, shown after a session becomes active.
Fig 05

Step 5: Send messages in an active session

In an active session, you can send the following:

  • Free text messages
  • Templates
  • Quick Text
  • Emojis

Chat Console features

The Chat Console includes the features described below.

1. Auto-reply

Auto-reply helps send automated messages during non-business hours or when you are out of the office. Clicking the Auto-reply icon opens a configuration popup.

Out of Office Settings

You can define a From date and To date, then choose one of the following actions:

  • Auto reply: automatically sends the reply text you enter in the text box to the user during the out-of-office period.
  • Assign to user: assigns the record for chat handling to one of your colleagues by searching and selecting their name.

Business Hours Settings

Select your company's business hours by searching for them, then enter the reply text that should be sent when a message is received outside business hours.

After completing the setup, click Save. To remove the configuration, click Clear.

Auto Reply configuration popup with Out of Office From and To date and time fields, a Choose One dropdown for Auto Reply or Assign to user, and a Business Hours section with a business hours search field, a reply text box, and Save and Clear buttons.
Fig 06

2. Enter button enable or disable

Click this icon to enable or disable sending a message using the Enter key.

3. Schedule Message

Click the Schedule Message icon to open the scheduling settings. Select your preferred date and time. The message will be sent automatically at the selected time.

Mini Chat Console with the schedule icon highlighted in the toolbar and the resulting Date, Time, and Receiver Time Zone fields set to 8 Jan, 5:50 PM, and Asia/Kolkata.
Fig 07

4. Chat color

You can customize chat colors separately for inbound and outbound messages.

Mini Chat Console color picker popup with separate Inbound Chat Color and Outbound Chat Color swatches, opened from the palette icon in the toolbar.
Fig 08

5. Quick Text

Templates are usually created by Salesforce admins or users with access to template objects. Quick Text, however, can be created by any user for their daily use.

Instead of retyping frequent messages, users can save Quick Text entries and reuse them. Quick Text works like templates, but they are user-specific and owned by the creator.

In the Chat Console:

  • Click the Quick Text button to open the popup view.
  • The left panel displays saved Quick Text entries.
  • Selecting one shows its preview on the right panel.
  • Click the Plus icon to create a new Quick Text.

Quick Text setup for the Chat Console

When creating Quick Text for use in the ValueText Chat Console, the selected channel must be set to WhatsApp.

Note: add a picklist value for the Channel field in the Quick Text object.

Choose Message popup in the Chat Console with a search field, a Plus icon to create a new Quick Text, a left panel listing saved Quick Text entries, and a preview pane on the right.
Fig 09

You can use merge fields. After configuration, click Save.

New Quick Text creation screen with the Quick Text Name field, a message box with Insert Merge Field controls, and the Channel picklist with WhatsApp moved into the Selected list.
Fig 10

Sending Quick Text

  • Select a Quick Text entry from the left panel and click Save.
  • The text appears in the chat input box.
  • Click Send to deliver the message to the recipient.
Choose Message popup with a Quick Text entry selected, its preview text shown on the right, and a Save button to load it into the chat input box.
Fig 11

6. Attachments

Click the attachment icon to upload and send files. You can also record an audio message and send it directly from the console.

File Upload From Salesforce dialog with a file search box, an Upload Files button, audio recording controls, a list of uploaded files with type and size, and a Send Now button.
Fig 12

7. Emojis

Click the emoji icon and select emojis to include in your message.

Mini Chat Console message box with an emoji already inserted in the draft text and the emoji picker grid open below it.
Fig 13

8. Download chat

You can download the chat history currently loaded in the Chat Console as an XLS file.

9. Sound on or off

Use this icon to enable or disable sound notifications for incoming messages.

10. Group Chat

Click the Group Chat button to start a group chat. This feature allows you and up to two colleagues to chat with a customer simultaneously.

You can invite colleagues by searching for their names and sending a request. Once they accept, all participants can chat with the customer.

Mini Chat Console Group/Private Chat panel with Enable Private Chat and Prefix my name to chat toggles, plus two search fields to invite colleagues and a Send Request button.
Fig 14
Was this helpful?
← PreviousDisable a Phone Field in Salesforce Next →Bulk Messaging in Salesforce
Docs/Sending messages/Sending a Message from the Chat Console

Sending a Message from the Chat Console

Send messages to any Salesforce record from the Chat Console, then use its built-in tools: auto-reply, scheduling, Quick Text, attachments, emojis, and group chat.

Last updated 28 Nov 2025

Step 1: Open the record with a Chat Console

Open any record detail page that includes the Chat Console, for example the Kristy contact record shown below.

Salesforce Account record page with the Related tab open and the Mini Chat Console panel on the right, showing the SMS tab, a From ValueText-WA field, a To field, and a Send button.
Fig 01

Step 2: Select sender and recipient numbers

Select the From number (Sender ID) and the To number you want to message. The available To numbers are automatically loaded from the phone fields on the record you opened.

Mini Chat Console with the From ValueText-WA sender field and the To Account Phone recipient field highlighted above the message text box and Send button.
Fig 02

Step 3: Identify inactive sessions

If there has been no incoming message from the user in the last 24 hours, the session is considered inactive. In this case, you must send an approved template to initiate the conversation.

Mini Chat Console template search box with a list of approved templates, such as Bot: Pre Question Test and Bot: Fresh Bots, required to open an inactive session.
Fig 03
Mini Chat Console showing a preview of an approved template message about a booked appointment, with Back and Send buttons below the From and To fields.
Fig 04

Step 4: Activate the session

Once you send the template and the user replies, the inactive session becomes an active session. You will receive a notification with blinking text saying "New Message."

Mini Chat Console with a red New Message alert above the WhatsApp message input, shown after a session becomes active.
Fig 05

Step 5: Send messages in an active session

In an active session, you can send the following:

  • Free text messages
  • Templates
  • Quick Text
  • Emojis

Chat Console features

The Chat Console includes the features described below.

1. Auto-reply

Auto-reply helps send automated messages during non-business hours or when you are out of the office. Clicking the Auto-reply icon opens a configuration popup.

Out of Office Settings

You can define a From date and To date, then choose one of the following actions:

  • Auto reply: automatically sends the reply text you enter in the text box to the user during the out-of-office period.
  • Assign to user: assigns the record for chat handling to one of your colleagues by searching and selecting their name.

Business Hours Settings

Select your company's business hours by searching for them, then enter the reply text that should be sent when a message is received outside business hours.

After completing the setup, click Save. To remove the configuration, click Clear.

Auto Reply configuration popup with Out of Office From and To date and time fields, a Choose One dropdown for Auto Reply or Assign to user, and a Business Hours section with a business hours search field, a reply text box, and Save and Clear buttons.
Fig 06

2. Enter button enable or disable

Click this icon to enable or disable sending a message using the Enter key.

3. Schedule Message

Click the Schedule Message icon to open the scheduling settings. Select your preferred date and time. The message will be sent automatically at the selected time.

Mini Chat Console with the schedule icon highlighted in the toolbar and the resulting Date, Time, and Receiver Time Zone fields set to 8 Jan, 5:50 PM, and Asia/Kolkata.
Fig 07

4. Chat color

You can customize chat colors separately for inbound and outbound messages.

Mini Chat Console color picker popup with separate Inbound Chat Color and Outbound Chat Color swatches, opened from the palette icon in the toolbar.
Fig 08

5. Quick Text

Templates are usually created by Salesforce admins or users with access to template objects. Quick Text, however, can be created by any user for their daily use.

Instead of retyping frequent messages, users can save Quick Text entries and reuse them. Quick Text works like templates, but they are user-specific and owned by the creator.

In the Chat Console:

  • Click the Quick Text button to open the popup view.
  • The left panel displays saved Quick Text entries.
  • Selecting one shows its preview on the right panel.
  • Click the Plus icon to create a new Quick Text.

Quick Text setup for the Chat Console

When creating Quick Text for use in the ValueText Chat Console, the selected channel must be set to WhatsApp.

Note: add a picklist value for the Channel field in the Quick Text object.

Choose Message popup in the Chat Console with a search field, a Plus icon to create a new Quick Text, a left panel listing saved Quick Text entries, and a preview pane on the right.
Fig 09

You can use merge fields. After configuration, click Save.

New Quick Text creation screen with the Quick Text Name field, a message box with Insert Merge Field controls, and the Channel picklist with WhatsApp moved into the Selected list.
Fig 10

Sending Quick Text

  • Select a Quick Text entry from the left panel and click Save.
  • The text appears in the chat input box.
  • Click Send to deliver the message to the recipient.
Choose Message popup with a Quick Text entry selected, its preview text shown on the right, and a Save button to load it into the chat input box.
Fig 11

6. Attachments

Click the attachment icon to upload and send files. You can also record an audio message and send it directly from the console.

File Upload From Salesforce dialog with a file search box, an Upload Files button, audio recording controls, a list of uploaded files with type and size, and a Send Now button.
Fig 12

7. Emojis

Click the emoji icon and select emojis to include in your message.

Mini Chat Console message box with an emoji already inserted in the draft text and the emoji picker grid open below it.
Fig 13

8. Download chat

You can download the chat history currently loaded in the Chat Console as an XLS file.

9. Sound on or off

Use this icon to enable or disable sound notifications for incoming messages.

10. Group Chat

Click the Group Chat button to start a group chat. This feature allows you and up to two colleagues to chat with a customer simultaneously.

You can invite colleagues by searching for their names and sending a request. Once they accept, all participants can chat with the customer.

Mini Chat Console Group/Private Chat panel with Enable Private Chat and Prefix my name to chat toggles, plus two search fields to invite colleagues and a Send Request button.
Fig 14
Was this helpful?
← PreviousDisable a Phone Field in Salesforce Next →Bulk Messaging in Salesforce
Docs/Sending messages/Sending a Message from the Chat Console

Sending a Message from the Chat Console

Send messages to any Salesforce record from the Chat Console, then use its built-in tools: auto-reply, scheduling, Quick Text, attachments, emojis, and group chat.

Last updated 28 Nov 2025

Step 1: Open the record with a Chat Console

Open any record detail page that includes the Chat Console, for example the Kristy contact record shown below.

Salesforce Account record page with the Related tab open and the Mini Chat Console panel on the right, showing the SMS tab, a From ValueText-WA field, a To field, and a Send button.
Fig 01

Step 2: Select sender and recipient numbers

Select the From number (Sender ID) and the To number you want to message. The available To numbers are automatically loaded from the phone fields on the record you opened.

Mini Chat Console with the From ValueText-WA sender field and the To Account Phone recipient field highlighted above the message text box and Send button.
Fig 02

Step 3: Identify inactive sessions

If there has been no incoming message from the user in the last 24 hours, the session is considered inactive. In this case, you must send an approved template to initiate the conversation.

Mini Chat Console template search box with a list of approved templates, such as Bot: Pre Question Test and Bot: Fresh Bots, required to open an inactive session.
Fig 03
Mini Chat Console showing a preview of an approved template message about a booked appointment, with Back and Send buttons below the From and To fields.
Fig 04

Step 4: Activate the session

Once you send the template and the user replies, the inactive session becomes an active session. You will receive a notification with blinking text saying "New Message."

Mini Chat Console with a red New Message alert above the WhatsApp message input, shown after a session becomes active.
Fig 05

Step 5: Send messages in an active session

In an active session, you can send the following:

  • Free text messages
  • Templates
  • Quick Text
  • Emojis

Chat Console features

The Chat Console includes the features described below.

1. Auto-reply

Auto-reply helps send automated messages during non-business hours or when you are out of the office. Clicking the Auto-reply icon opens a configuration popup.

Out of Office Settings

You can define a From date and To date, then choose one of the following actions:

  • Auto reply: automatically sends the reply text you enter in the text box to the user during the out-of-office period.
  • Assign to user: assigns the record for chat handling to one of your colleagues by searching and selecting their name.

Business Hours Settings

Select your company's business hours by searching for them, then enter the reply text that should be sent when a message is received outside business hours.

After completing the setup, click Save. To remove the configuration, click Clear.

Auto Reply configuration popup with Out of Office From and To date and time fields, a Choose One dropdown for Auto Reply or Assign to user, and a Business Hours section with a business hours search field, a reply text box, and Save and Clear buttons.
Fig 06

2. Enter button enable or disable

Click this icon to enable or disable sending a message using the Enter key.

3. Schedule Message

Click the Schedule Message icon to open the scheduling settings. Select your preferred date and time. The message will be sent automatically at the selected time.

Mini Chat Console with the schedule icon highlighted in the toolbar and the resulting Date, Time, and Receiver Time Zone fields set to 8 Jan, 5:50 PM, and Asia/Kolkata.
Fig 07

4. Chat color

You can customize chat colors separately for inbound and outbound messages.

Mini Chat Console color picker popup with separate Inbound Chat Color and Outbound Chat Color swatches, opened from the palette icon in the toolbar.
Fig 08

5. Quick Text

Templates are usually created by Salesforce admins or users with access to template objects. Quick Text, however, can be created by any user for their daily use.

Instead of retyping frequent messages, users can save Quick Text entries and reuse them. Quick Text works like templates, but they are user-specific and owned by the creator.

In the Chat Console:

  • Click the Quick Text button to open the popup view.
  • The left panel displays saved Quick Text entries.
  • Selecting one shows its preview on the right panel.
  • Click the Plus icon to create a new Quick Text.

Quick Text setup for the Chat Console

When creating Quick Text for use in the ValueText Chat Console, the selected channel must be set to WhatsApp.

Note: add a picklist value for the Channel field in the Quick Text object.

Choose Message popup in the Chat Console with a search field, a Plus icon to create a new Quick Text, a left panel listing saved Quick Text entries, and a preview pane on the right.
Fig 09

You can use merge fields. After configuration, click Save.

New Quick Text creation screen with the Quick Text Name field, a message box with Insert Merge Field controls, and the Channel picklist with WhatsApp moved into the Selected list.
Fig 10

Sending Quick Text

  • Select a Quick Text entry from the left panel and click Save.
  • The text appears in the chat input box.
  • Click Send to deliver the message to the recipient.
Choose Message popup with a Quick Text entry selected, its preview text shown on the right, and a Save button to load it into the chat input box.
Fig 11

6. Attachments

Click the attachment icon to upload and send files. You can also record an audio message and send it directly from the console.

File Upload From Salesforce dialog with a file search box, an Upload Files button, audio recording controls, a list of uploaded files with type and size, and a Send Now button.
Fig 12

7. Emojis

Click the emoji icon and select emojis to include in your message.

Mini Chat Console message box with an emoji already inserted in the draft text and the emoji picker grid open below it.
Fig 13

8. Download chat

You can download the chat history currently loaded in the Chat Console as an XLS file.

9. Sound on or off

Use this icon to enable or disable sound notifications for incoming messages.

10. Group Chat

Click the Group Chat button to start a group chat. This feature allows you and up to two colleagues to chat with a customer simultaneously.

You can invite colleagues by searching for their names and sending a request. Once they accept, all participants can chat with the customer.

Mini Chat Console Group/Private Chat panel with Enable Private Chat and Prefix my name to chat toggles, plus two search fields to invite colleagues and a Send Request button.
Fig 14
Was this helpful?
← PreviousDisable a Phone Field in Salesforce Next →Bulk Messaging in Salesforce