Docs/History & record linking/Configure Message-to-Activity Logging

Configure Message-to-Activity Logging

To log every message to the record's activity history, build a flow that creates a Task each time a message arrives. The Task then shows up in the activity history on the record page.

Last updated 28 Nov 2025

Open Setup

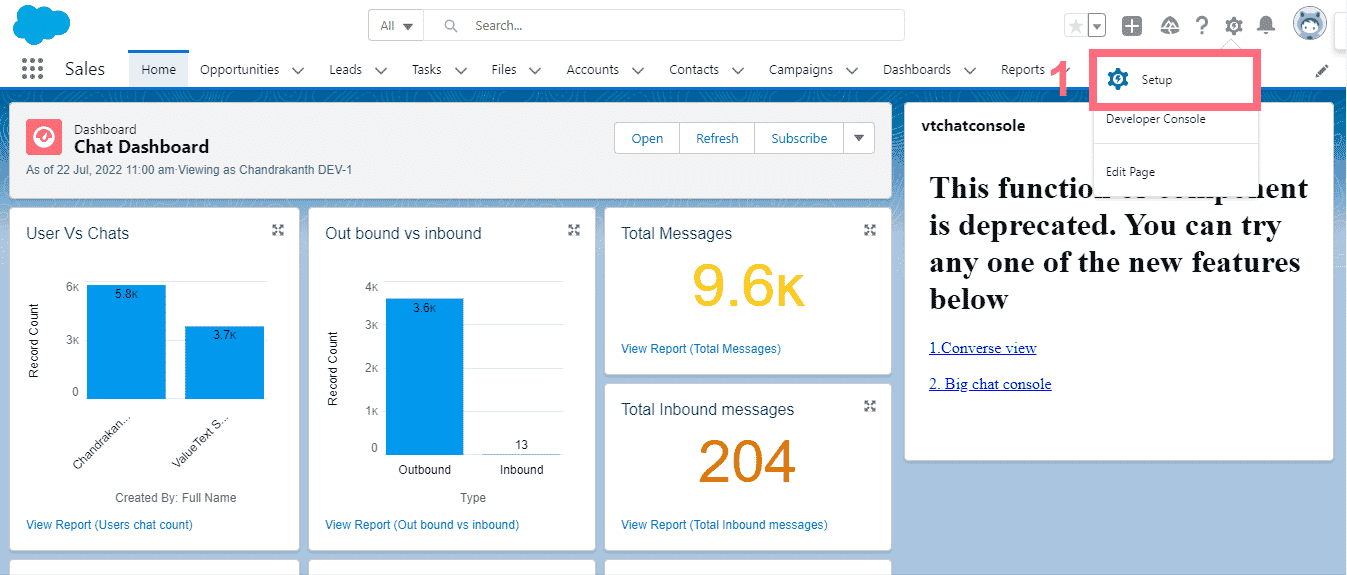
In Salesforce, open Setup.

Salesforce Sales app Home page with the Setup gear icon circled in the top navigation bar.
Fig 01

Create the flow

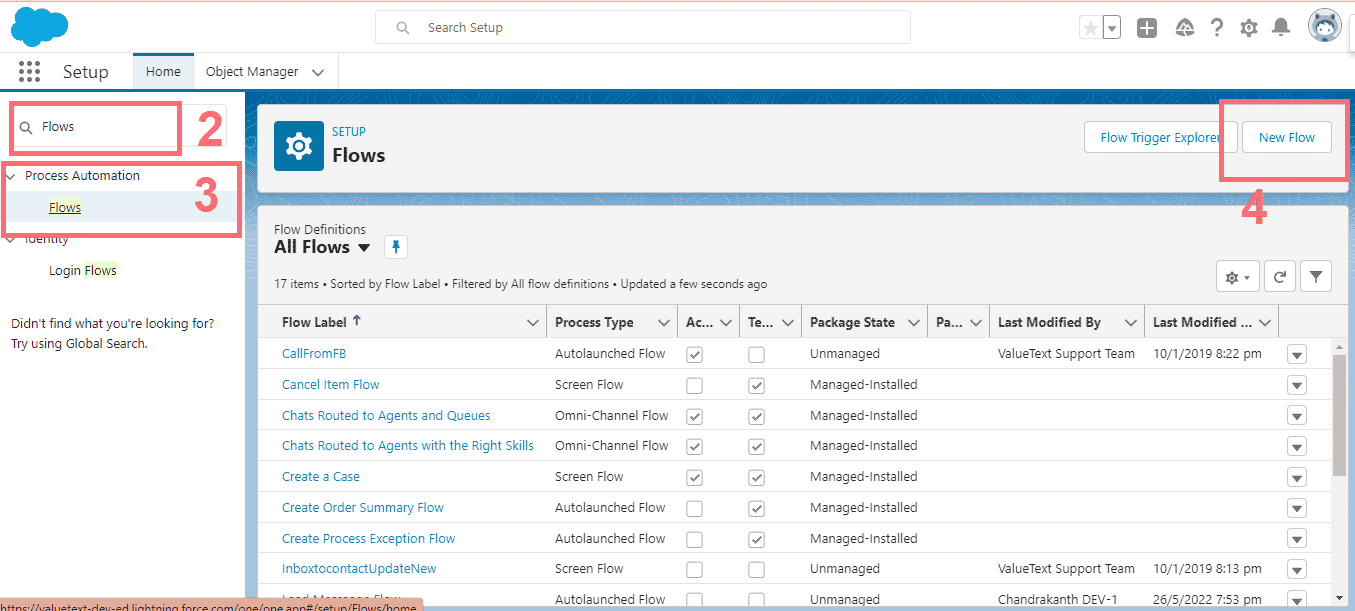
  1. Search for Flows in Quick Find, then open Flows under Process Automation.
  2. Click New Flow.
    Salesforce Setup page with Flows typed into Search Setup, the Flows link under Process Automation highlighted, and the New Flow button highlighted.
    Fig 02
  3. In the popup, choose the Record-Triggered Flow type, then click Create.

Configure the flow trigger

Configuring the start of the flow opens a popup where you choose the object and set the entry conditions.

  • Choose the Message Bucket object.
  • For Trigger the Flow When, choose A record is created.
  • Set entry conditions so the flow only runs once a message exists:
    • rsplus__Message__c Is Null = False
    • rsplus__Related_To__c Is Null = False
  • On Title, choose Related To Name Formula from the record.
  • On Recipient IDs, choose a resource variable.

Click Done.
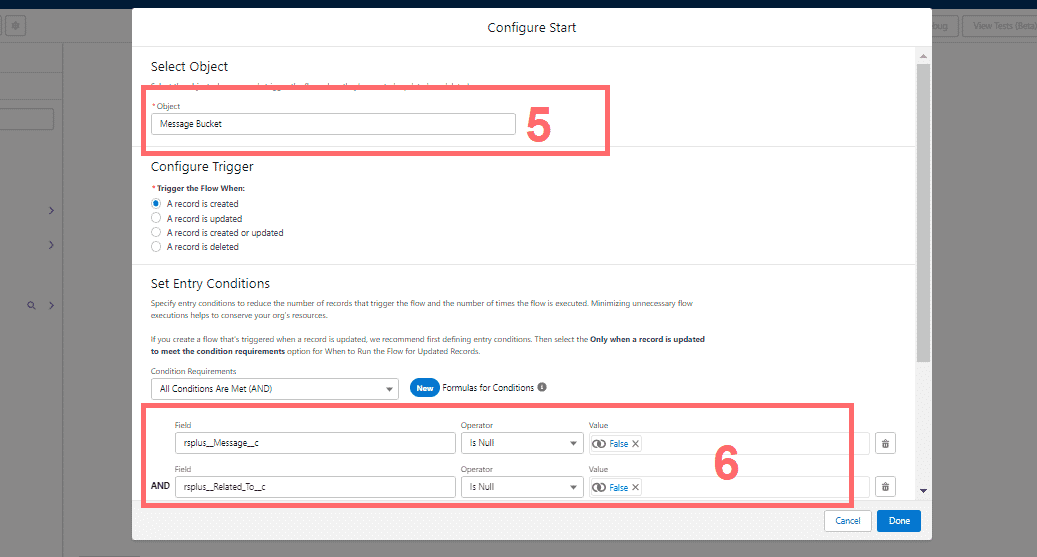
Flow Configure Start popup with the Message Bucket object selected, the trigger set to A record is created, and two entry conditions highlighted: rsplus__Message__c Is Null False and rsplus__Related_To__c Is Null False.
Fig 03

Build the subject-line formula

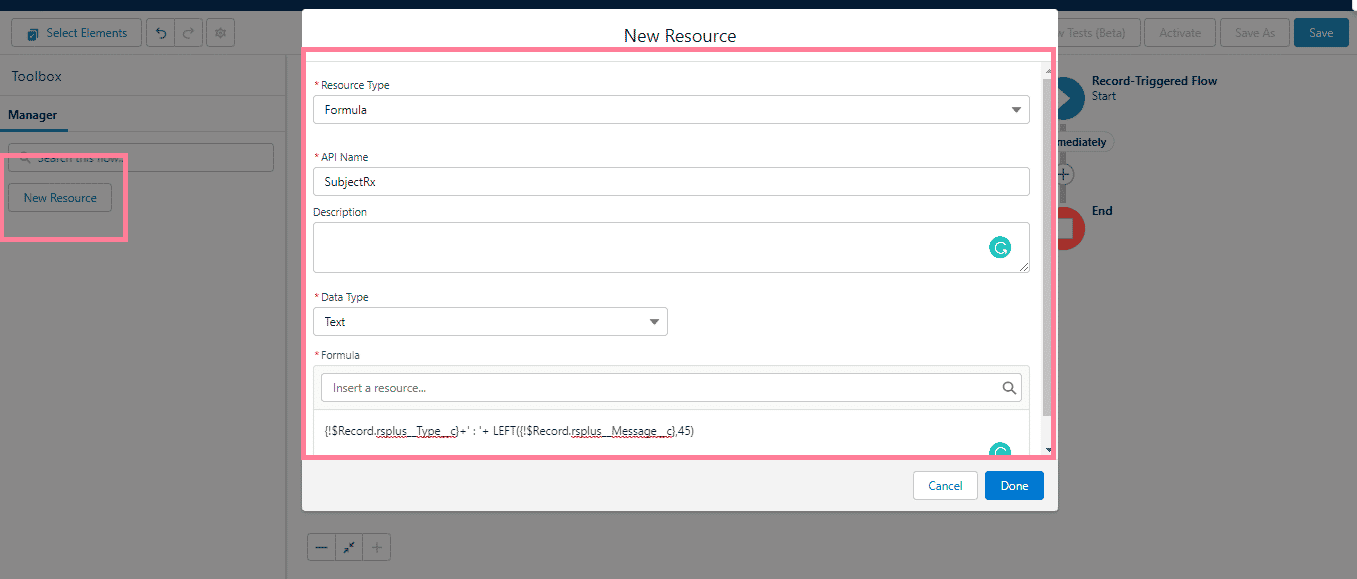
Create a new resource with the type Formula, then use this formula to combine the message type with the first 45 characters of the message:
Example
TEXT({!$Record.rsplus__Type__c})+' : '+ LEFT({!$Record.rsplus__Message__c},45)
Flow New Resource popup with Resource Type set to Formula, API Name set to SubjectRx, Data Type set to Text, and the formula field showing the Type and Message merge fields concatenated.
Fig 04

Add the Create Records element

Add a Create Records element to the flow.
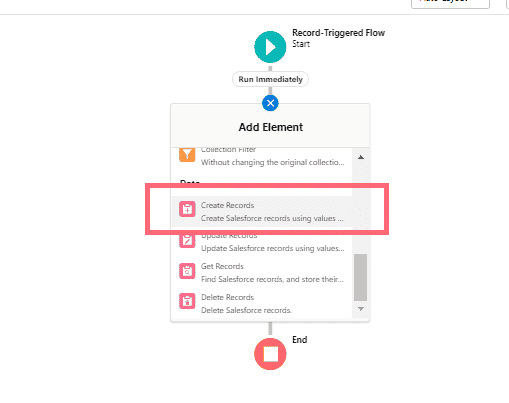
Flow Builder canvas between the Start and End nodes, with the Add Element menu open and Create Records highlighted.
Fig 05

Set the Task fields

Note: For Create a Record of This Object, choose Task as the object.
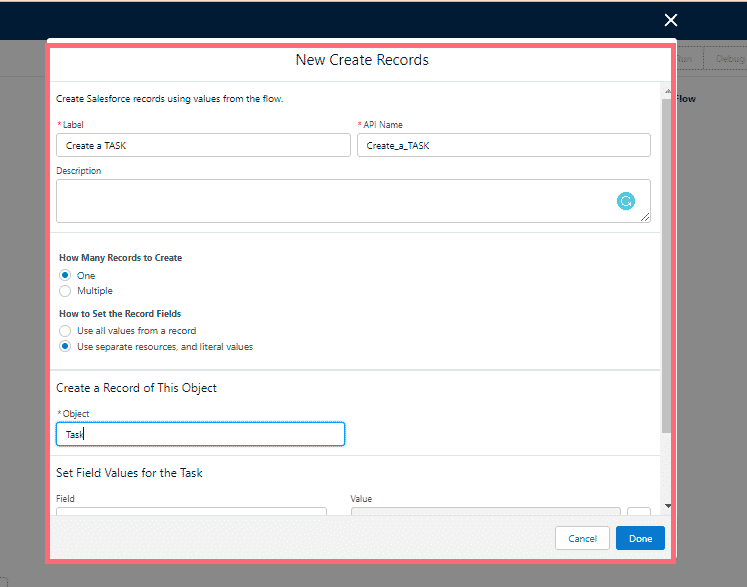
New Create Records popup labeled Create a TASK, with How Many Records to Create set to One, Set the Record Fields set to Use separate resources and literal values, and the object field set to Task.
Fig 06

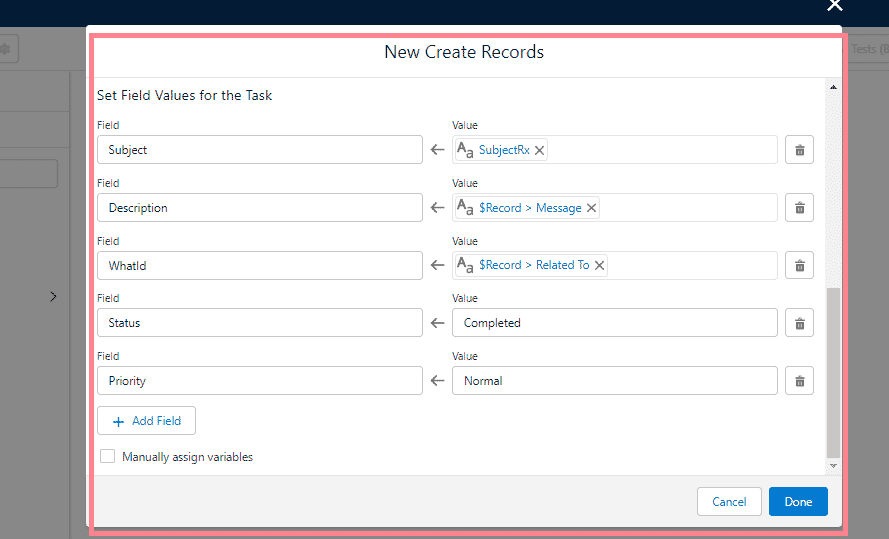
Set the field values for the Task.

Important: If you are sending messages on a Contact or a Lead, you have to map WhoId instead, using the record's related-to value.

  • Subject: the formula resource you created.
  • Description: the record's Message.
  • WhatId / Related To: the record's Related To.
  • Status: Completed.
  • Priority: Normal.

Click Done.

New Create Records popup's Set Field Values for the Task section, with Subject set to SubjectRx, Description set to Record > Message, WhatId set to Record > Related To, Status set to Completed, and Priority set to Normal.
Fig 07

Save and activate the flow

Save the flow, then activate it.

Was this helpful?
← PreviousOpt-Out and Opt-In Management in Salesforce Next →Log Chat Conversations to Activity History
Docs/History & record linking/Configure Message-to-Activity Logging

Configure Message-to-Activity Logging

To log every message to the record's activity history, build a flow that creates a Task each time a message arrives. The Task then shows up in the activity history on the record page.

Last updated 28 Nov 2025

Open Setup

In Salesforce, open Setup.

Salesforce Sales app Home page with the Setup gear icon circled in the top navigation bar.
Fig 01

Create the flow

  1. Search for Flows in Quick Find, then open Flows under Process Automation.
  2. Click New Flow.
    Salesforce Setup page with Flows typed into Search Setup, the Flows link under Process Automation highlighted, and the New Flow button highlighted.
    Fig 02
  3. In the popup, choose the Record-Triggered Flow type, then click Create.

Configure the flow trigger

Configuring the start of the flow opens a popup where you choose the object and set the entry conditions.

  • Choose the Message Bucket object.
  • For Trigger the Flow When, choose A record is created.
  • Set entry conditions so the flow only runs once a message exists:
    • rsplus__Message__c Is Null = False
    • rsplus__Related_To__c Is Null = False
  • On Title, choose Related To Name Formula from the record.
  • On Recipient IDs, choose a resource variable.

Click Done.

Flow Configure Start popup with the Message Bucket object selected, the trigger set to A record is created, and two entry conditions highlighted: rsplus__Message__c Is Null False and rsplus__Related_To__c Is Null False.
Fig 03

Build the subject-line formula

Create a new resource with the type Formula, then use this formula to combine the message type with the first 45 characters of the message:

Example
TEXT({!$Record.rsplus__Type__c})+' : '+ LEFT({!$Record.rsplus__Message__c},45)
Flow New Resource popup with Resource Type set to Formula, API Name set to SubjectRx, Data Type set to Text, and the formula field showing the Type and Message merge fields concatenated.
Fig 04

Add the Create Records element

Add a Create Records element to the flow.

Flow Builder canvas between the Start and End nodes, with the Add Element menu open and Create Records highlighted.
Fig 05

Set the Task fields

Note: For Create a Record of This Object, choose Task as the object.

New Create Records popup labeled Create a TASK, with How Many Records to Create set to One, Set the Record Fields set to Use separate resources and literal values, and the object field set to Task.
Fig 06

Set the field values for the Task.

Important: If you are sending messages on a Contact or a Lead, you have to map WhoId instead, using the record's related-to value.

  • Subject: the formula resource you created.
  • Description: the record's Message.
  • WhatId / Related To: the record's Related To.
  • Status: Completed.
  • Priority: Normal.

Click Done.

New Create Records popup's Set Field Values for the Task section, with Subject set to SubjectRx, Description set to Record > Message, WhatId set to Record > Related To, Status set to Completed, and Priority set to Normal.
Fig 07

Save and activate the flow

Save the flow, then activate it.

Was this helpful?
← PreviousOpt-Out and Opt-In Management in Salesforce Next →Log Chat Conversations to Activity History
Docs/History & record linking/Configure Message-to-Activity Logging

Configure Message-to-Activity Logging

To log every message to the record's activity history, build a flow that creates a Task each time a message arrives. The Task then shows up in the activity history on the record page.

Last updated 28 Nov 2025

Open Setup

In Salesforce, open Setup.

Salesforce Sales app Home page with the Setup gear icon circled in the top navigation bar.
Fig 01

Create the flow

  1. Search for Flows in Quick Find, then open Flows under Process Automation.
  2. Click New Flow.
    Salesforce Setup page with Flows typed into Search Setup, the Flows link under Process Automation highlighted, and the New Flow button highlighted.
    Fig 02
  3. In the popup, choose the Record-Triggered Flow type, then click Create.

Configure the flow trigger

Configuring the start of the flow opens a popup where you choose the object and set the entry conditions.

  • Choose the Message Bucket object.
  • For Trigger the Flow When, choose A record is created.
  • Set entry conditions so the flow only runs once a message exists:
    • rsplus__Message__c Is Null = False
    • rsplus__Related_To__c Is Null = False
  • On Title, choose Related To Name Formula from the record.
  • On Recipient IDs, choose a resource variable.

Click Done.

Flow Configure Start popup with the Message Bucket object selected, the trigger set to A record is created, and two entry conditions highlighted: rsplus__Message__c Is Null False and rsplus__Related_To__c Is Null False.
Fig 03

Build the subject-line formula

Create a new resource with the type Formula, then use this formula to combine the message type with the first 45 characters of the message:

Example
TEXT({!$Record.rsplus__Type__c})+' : '+ LEFT({!$Record.rsplus__Message__c},45)
Flow New Resource popup with Resource Type set to Formula, API Name set to SubjectRx, Data Type set to Text, and the formula field showing the Type and Message merge fields concatenated.
Fig 04

Add the Create Records element

Add a Create Records element to the flow.

Flow Builder canvas between the Start and End nodes, with the Add Element menu open and Create Records highlighted.
Fig 05

Set the Task fields

Note: For Create a Record of This Object, choose Task as the object.

New Create Records popup labeled Create a TASK, with How Many Records to Create set to One, Set the Record Fields set to Use separate resources and literal values, and the object field set to Task.
Fig 06

Set the field values for the Task.

Important: If you are sending messages on a Contact or a Lead, you have to map WhoId instead, using the record's related-to value.

  • Subject: the formula resource you created.
  • Description: the record's Message.
  • WhatId / Related To: the record's Related To.
  • Status: Completed.
  • Priority: Normal.

Click Done.

New Create Records popup's Set Field Values for the Task section, with Subject set to SubjectRx, Description set to Record > Message, WhatId set to Record > Related To, Status set to Completed, and Priority set to Normal.
Fig 07

Save and activate the flow

Save the flow, then activate it.

Was this helpful?
← PreviousOpt-Out and Opt-In Management in Salesforce Next →Log Chat Conversations to Activity History
Docs/History & record linking/Configure Message-to-Activity Logging

Configure Message-to-Activity Logging

To log every message to the record's activity history, build a flow that creates a Task each time a message arrives. The Task then shows up in the activity history on the record page.

Last updated 28 Nov 2025

Open Setup

In Salesforce, open Setup.

Salesforce Sales app Home page with the Setup gear icon circled in the top navigation bar.
Fig 01

Create the flow

  1. Search for Flows in Quick Find, then open Flows under Process Automation.
  2. Click New Flow.
    Salesforce Setup page with Flows typed into Search Setup, the Flows link under Process Automation highlighted, and the New Flow button highlighted.
    Fig 02
  3. In the popup, choose the Record-Triggered Flow type, then click Create.

Configure the flow trigger

Configuring the start of the flow opens a popup where you choose the object and set the entry conditions.

  • Choose the Message Bucket object.
  • For Trigger the Flow When, choose A record is created.
  • Set entry conditions so the flow only runs once a message exists:
    • rsplus__Message__c Is Null = False
    • rsplus__Related_To__c Is Null = False
  • On Title, choose Related To Name Formula from the record.
  • On Recipient IDs, choose a resource variable.

Click Done.

Flow Configure Start popup with the Message Bucket object selected, the trigger set to A record is created, and two entry conditions highlighted: rsplus__Message__c Is Null False and rsplus__Related_To__c Is Null False.
Fig 03

Build the subject-line formula

Create a new resource with the type Formula, then use this formula to combine the message type with the first 45 characters of the message:

Example
TEXT({!$Record.rsplus__Type__c})+' : '+ LEFT({!$Record.rsplus__Message__c},45)
Flow New Resource popup with Resource Type set to Formula, API Name set to SubjectRx, Data Type set to Text, and the formula field showing the Type and Message merge fields concatenated.
Fig 04

Add the Create Records element

Add a Create Records element to the flow.

Flow Builder canvas between the Start and End nodes, with the Add Element menu open and Create Records highlighted.
Fig 05

Set the Task fields

Note: For Create a Record of This Object, choose Task as the object.

New Create Records popup labeled Create a TASK, with How Many Records to Create set to One, Set the Record Fields set to Use separate resources and literal values, and the object field set to Task.
Fig 06

Set the field values for the Task.

Important: If you are sending messages on a Contact or a Lead, you have to map WhoId instead, using the record's related-to value.

  • Subject: the formula resource you created.
  • Description: the record's Message.
  • WhatId / Related To: the record's Related To.
  • Status: Completed.
  • Priority: Normal.

Click Done.

New Create Records popup's Set Field Values for the Task section, with Subject set to SubjectRx, Description set to Record > Message, WhatId set to Record > Related To, Status set to Completed, and Priority set to Normal.
Fig 07

Save and activate the flow

Save the flow, then activate it.

Was this helpful?
← PreviousOpt-Out and Opt-In Management in Salesforce Next →Log Chat Conversations to Activity History